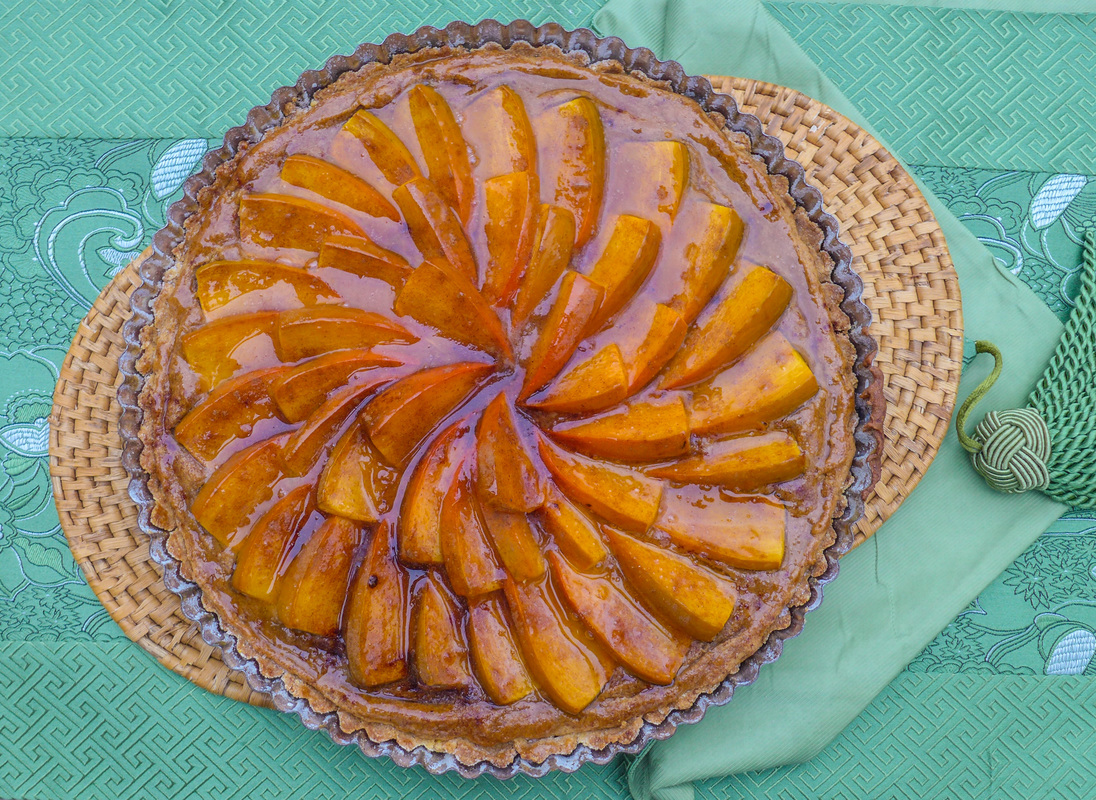
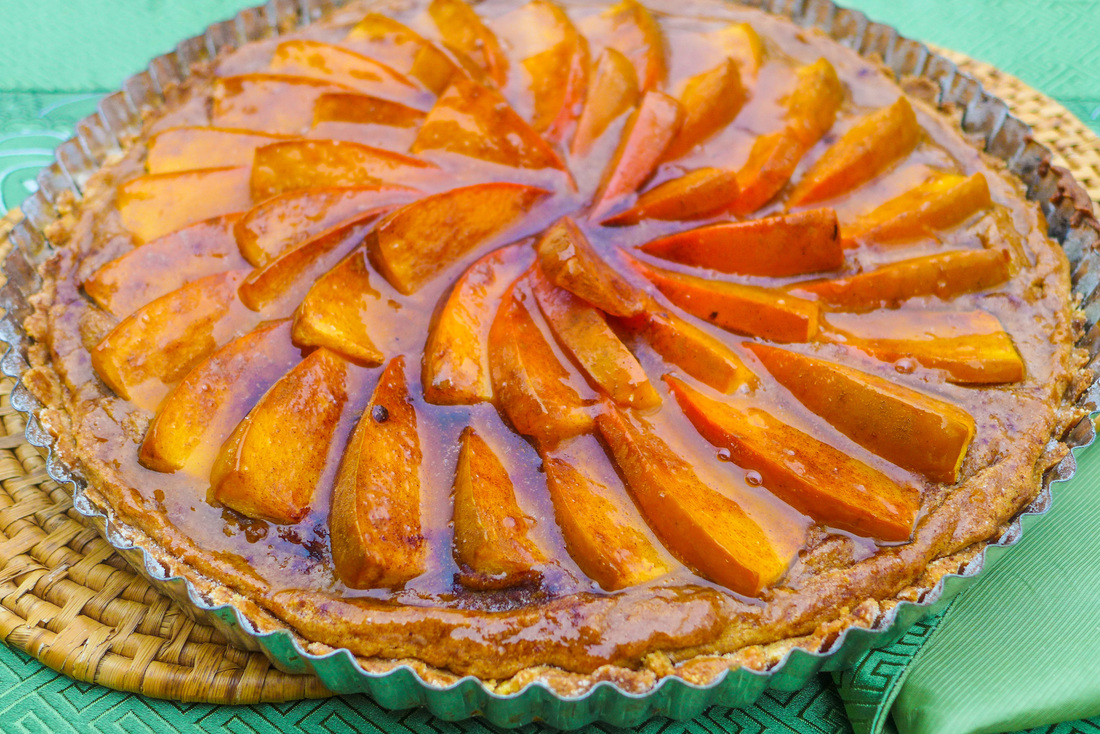
The only way I can describe their texture is by saying that it is between that of a plum and a tomato, but without seeds in the center. They have a similar "slippery" feel to them. They are light and delicate and have a deliciously sweet flavor. They aren't acidic hardly at all, which is why I like to pair them with citrus. This tart that I've created does just that! 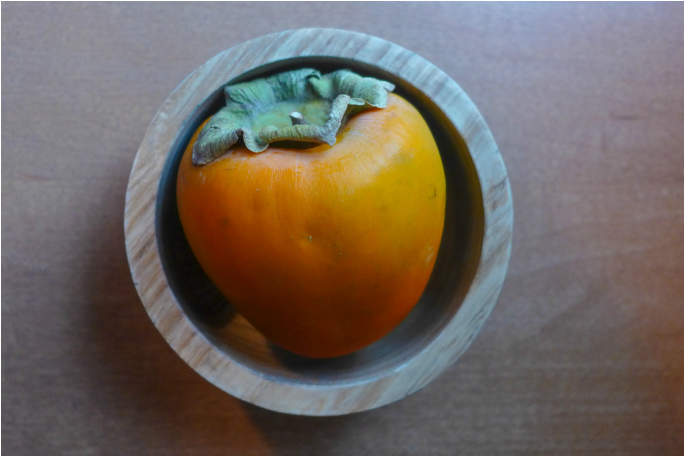 I got the idea to create a frangipane filling for these wonderful persimmon slices to nestle into. I wanted to try to make the tart nut-free, though. I've always wanted to try to substitute almond meal for chickpea flour. I love the flavor of chickpeas in desserts. They provide an earthy savory flavor that I love when it's slightly sweet. This tart can easily be made into a pie if you wish. I included a recipe for the tart shell that I made. It's a cornmeal-based crust. If you'd rather a more traditional tart shell, head over to the Post Punk Kitchen's blog. I adapted the frangipane filling recipe from Isa's in Vegan Pie in the Sky. I wanted to keep my tart nut-free, so I opted for the cornmeal crust. All this baking is getting me pumped for Thanksgiving! I wanted to provide a recipe for everyone to enjoy that was simple yet elegant. It's also a little lighter than a pie, so feel free to compensate by smothering it in vegan ice cream! ;D 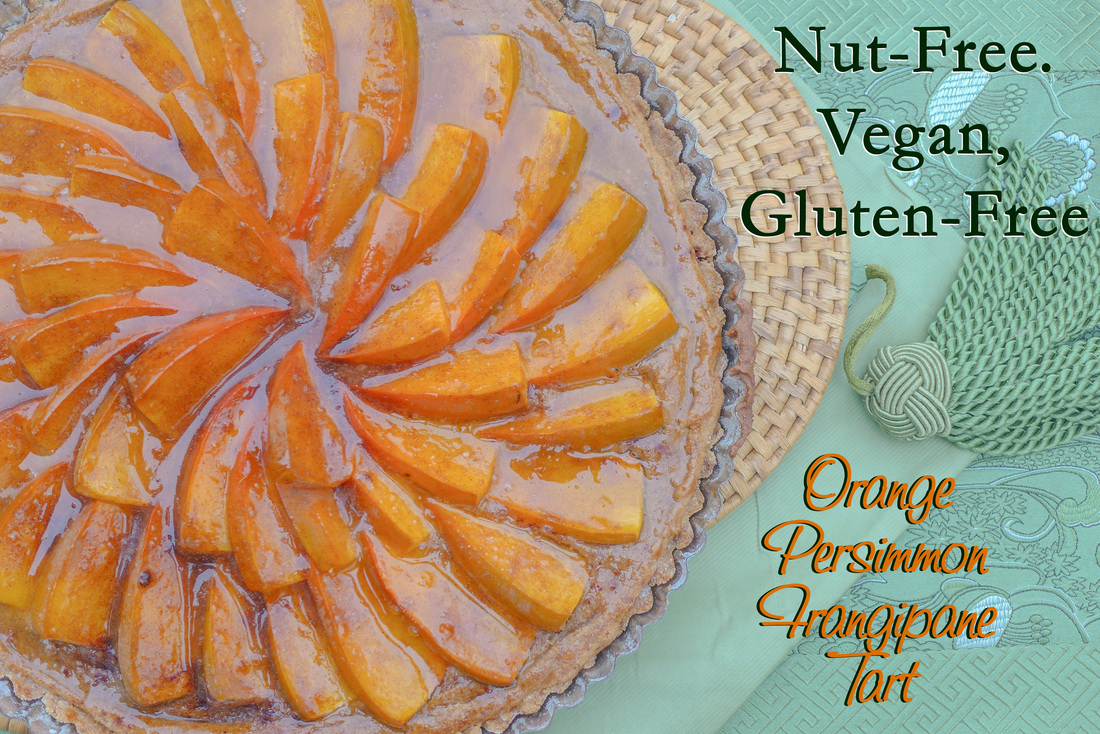 Orange Persimmon Frangipane TartYield: 1 - 1o inch tart/ 9" pie Free from: Gluten, Nuts, Soy Ingredients Cornmeal Crust (OR prepared crust of your choice)
Frangipane Batter
Toppings
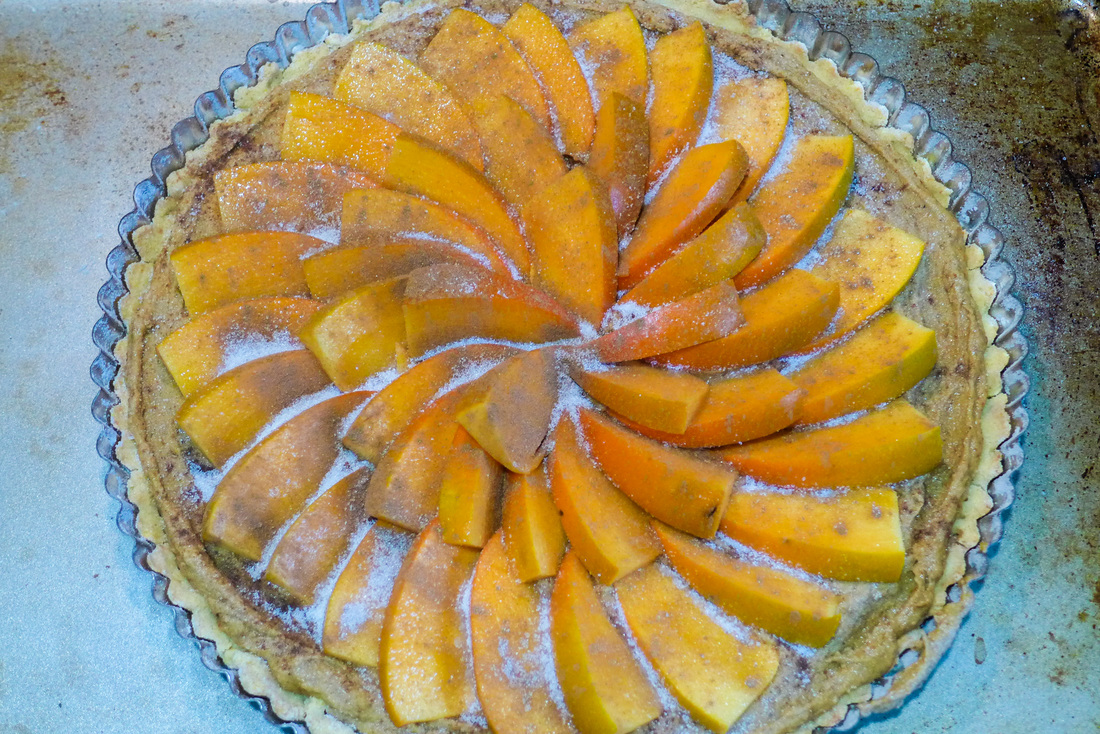 Instructions Crust Preheat oven 345 F.
Tart Filling & Assembly Preheat oven to 350 F.
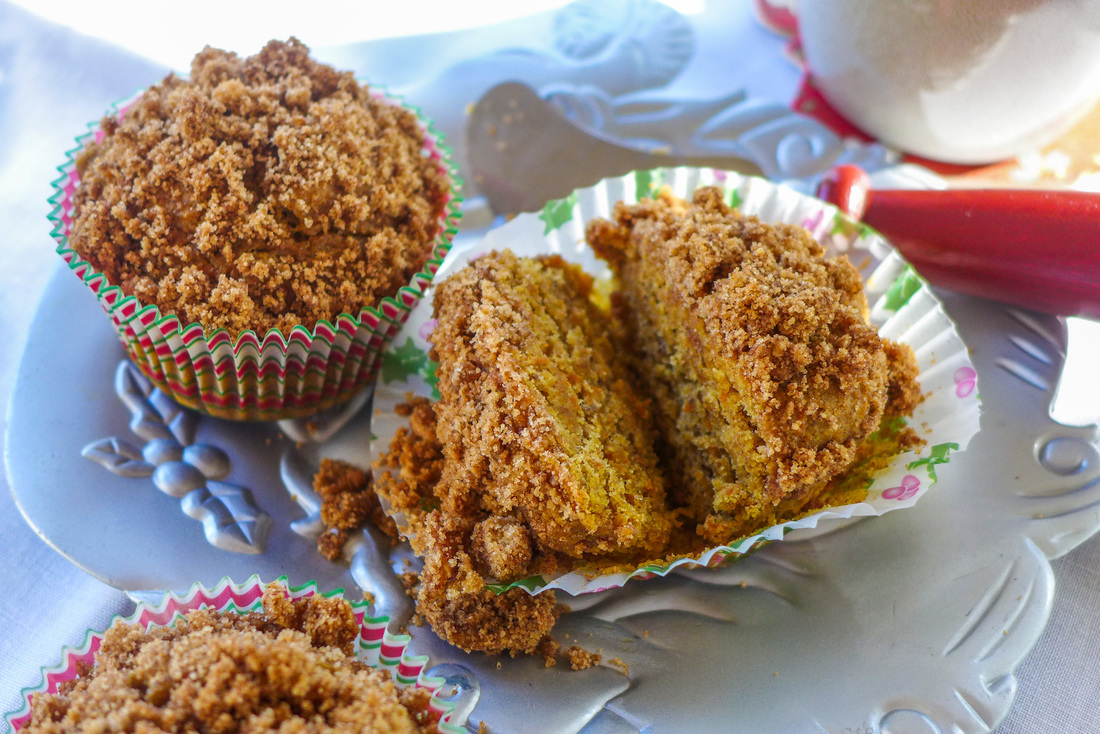
 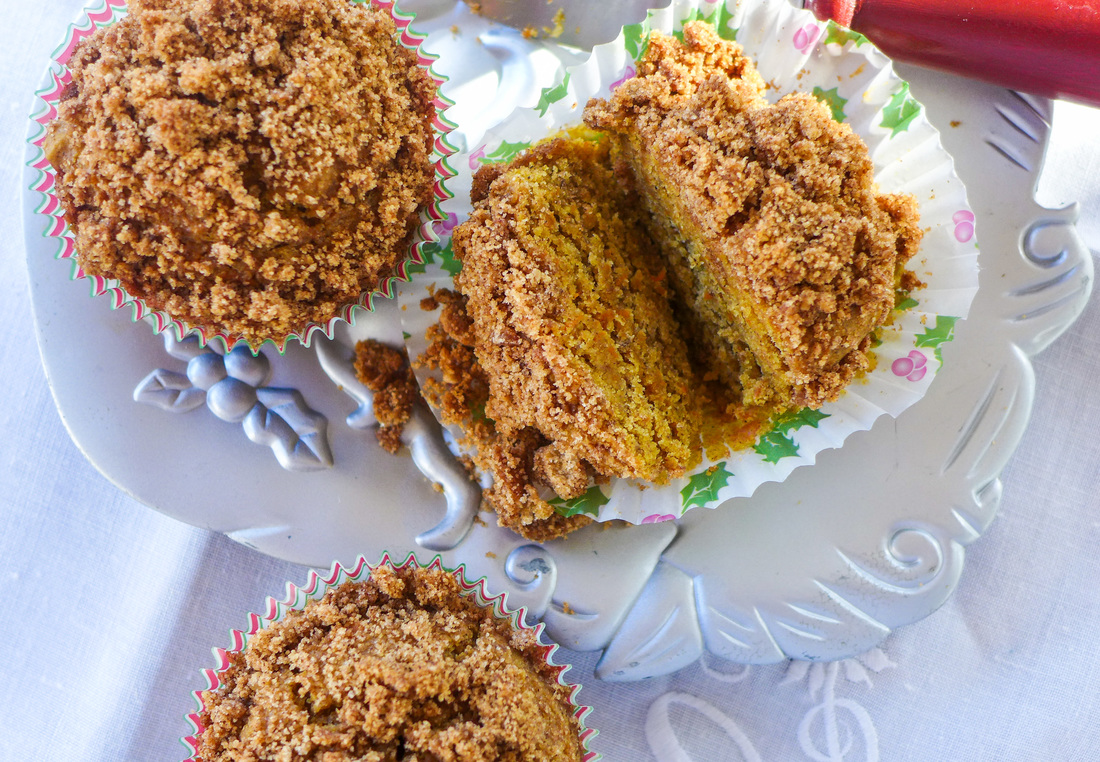 My next holiday baking post is one that could be enjoyed all year round, either as a breakfast accompaniment, a snack or a simple dessert. I absolutely love coffee cake. When I grew up, I only knew what coffee cake was because of Entenmann's crumb cake. This isn't vegan, of course. It's also highly processed and loaded with stuff I would never eat now. It did taste good, though! 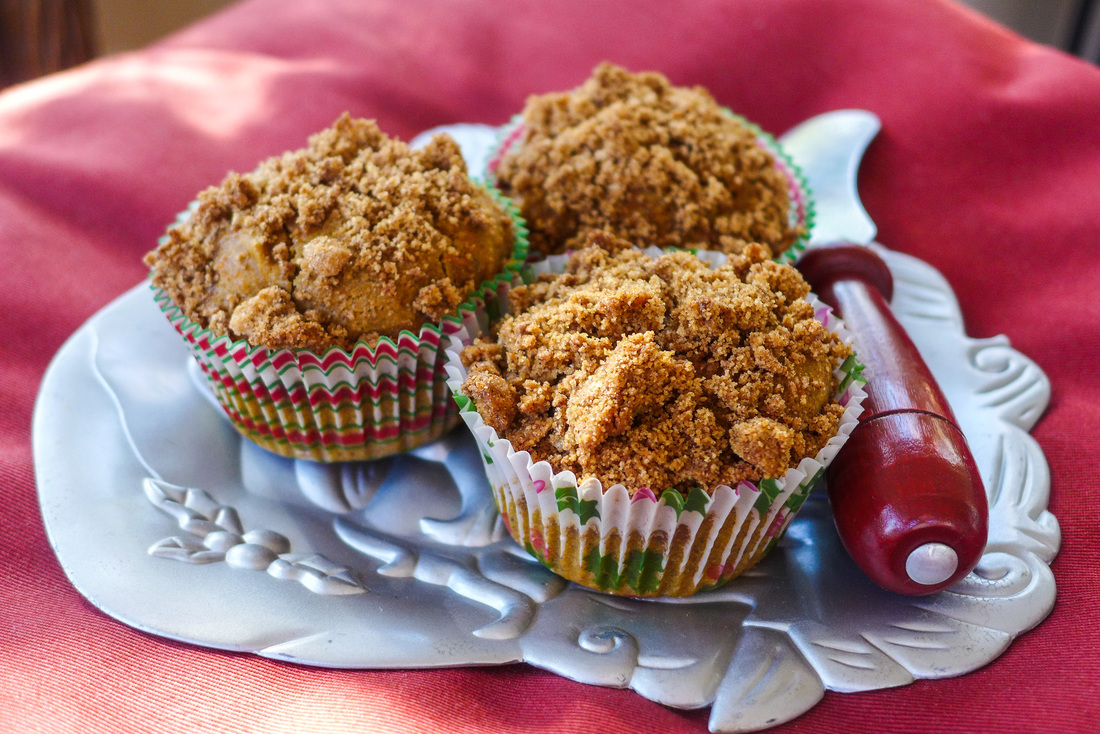 When I began to bake for myself, I made crumb cakes a few times. They were always delicious, but they got a little ho-hum. So, I tried to spice up my recipes with berries, chocolate and other types of ingredients. I realize now that I haven't made a "special" crumb cake in a long time. I'm well overdue. When I began to think of a cool combination of flavors, I stumbled upon the idea of a carrot coffee cake. Not that unique, right? Then, I thought, what if I put peanut butter with it?! I know, it seems like a strange combination. But, if you think about it, eating carrots and peanut butter for a snack is kinda delicious. I actually love peanut butter and carrots together! Why not bake with them and make it interesting? Exactly. This coffee cake is moist, slightly sweet, warm and spicy with cinnamon, bright and earthy with carrots and super nutty! It's great as a snack or a quick breakfast. It's also great with...you guessed it. Coffee. You can also feel good about snacking on this cake because it is made with mostly whole grain flours. Feel free to substitute your own flour blends, but be aware that the texture may change. You may also need to alter the amount of non-dairy milk you add. I'm definitely suggesting you make this either as a full cake or as individual cupcakes for any holiday breakfasts you might be having. This recipe is quick enough to whip up on the weekend and save for the rest of the week too. Grab 'em and go. Sit and stay. Whatever you want to do, these guys will be there for you. Enjoy! <3 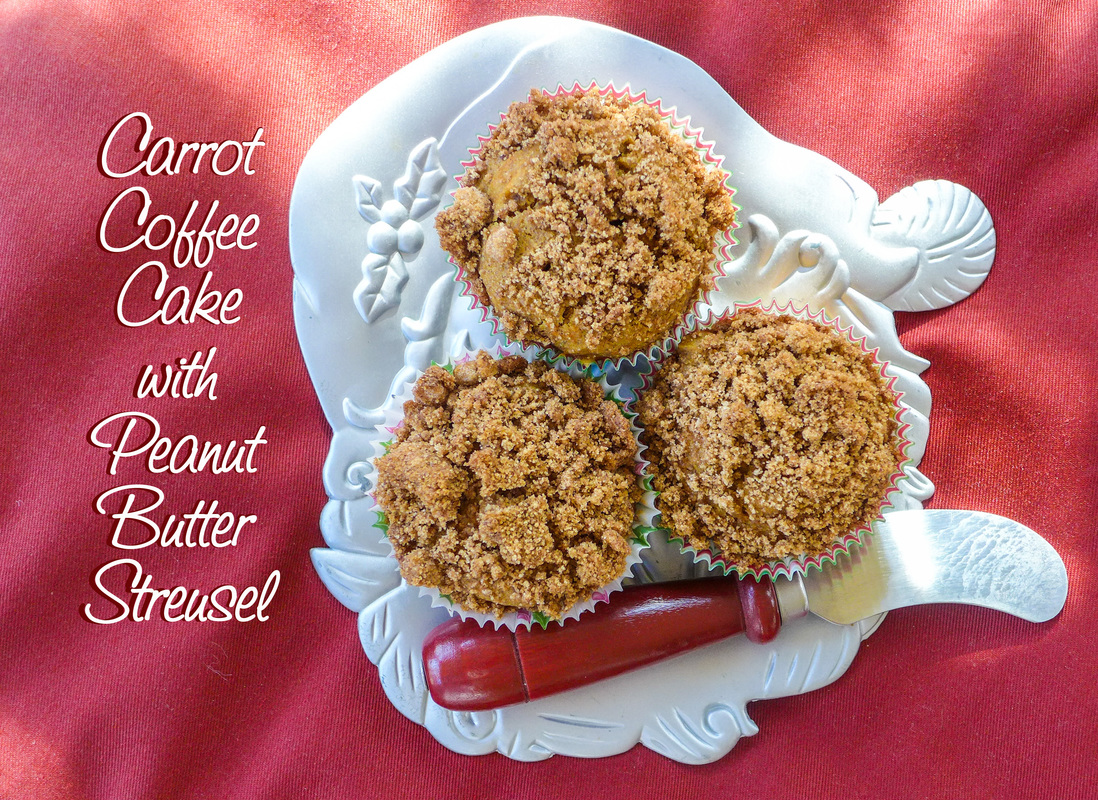 Carrot Coffee Cake with Peanut Butter StreuselYield: 10 individual cupcakes or 1 - 9x9 cake Free from: Soy, Gluten, Nuts* Ingredients Cake
Streusel
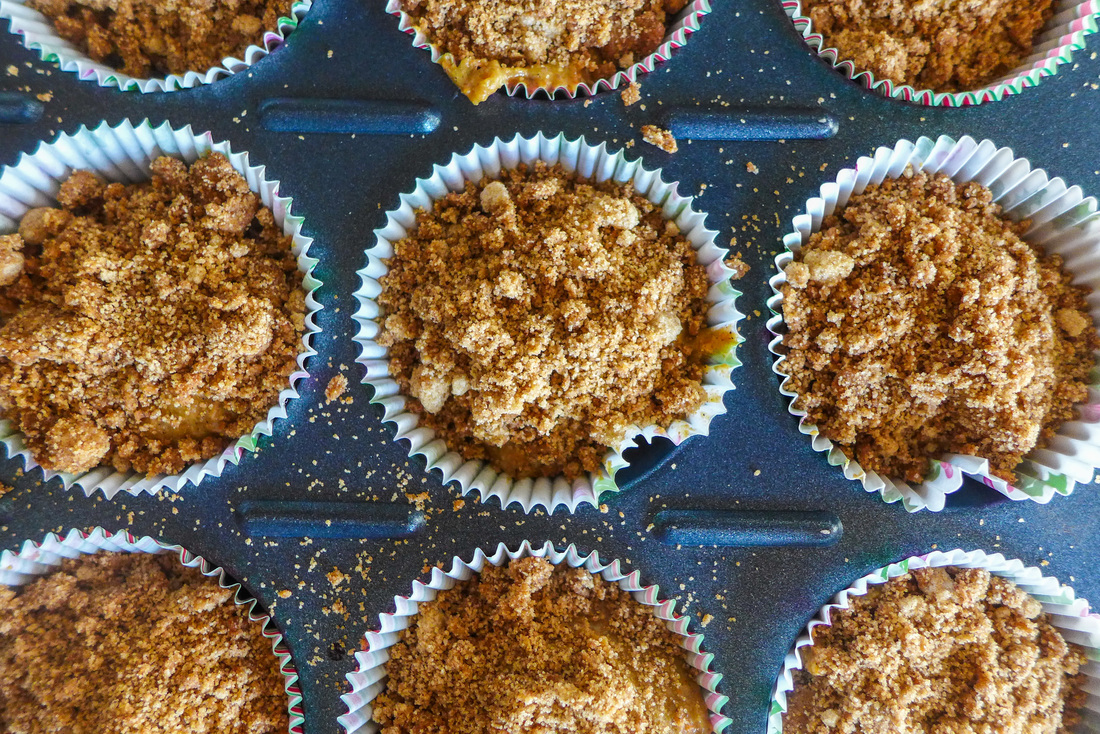 Instructions Preheat oven to 345 F.
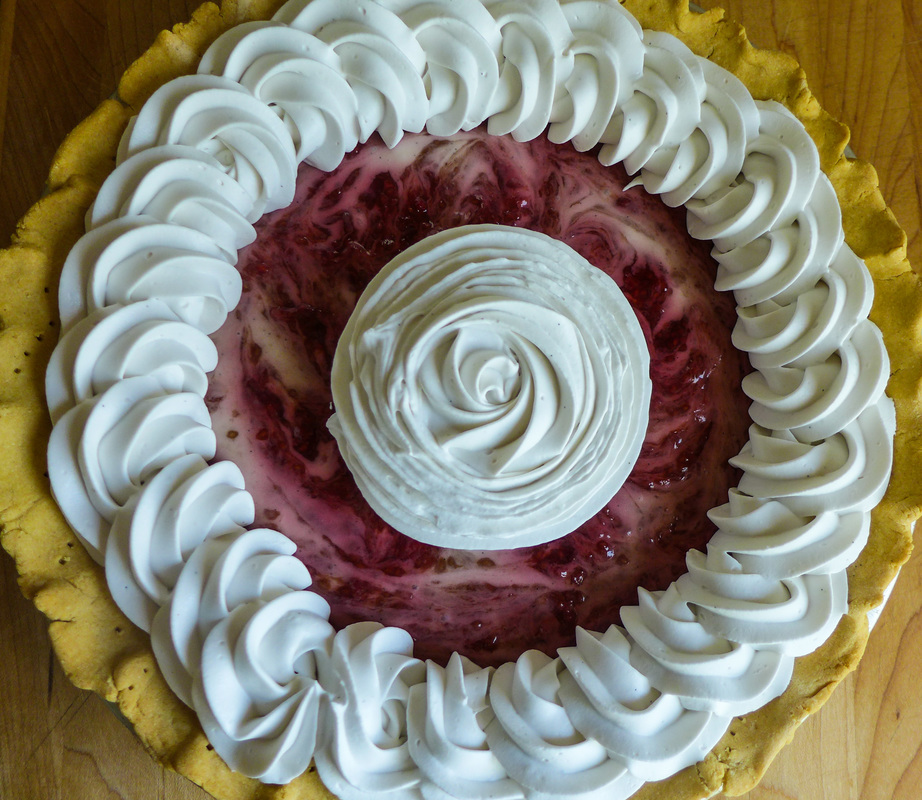
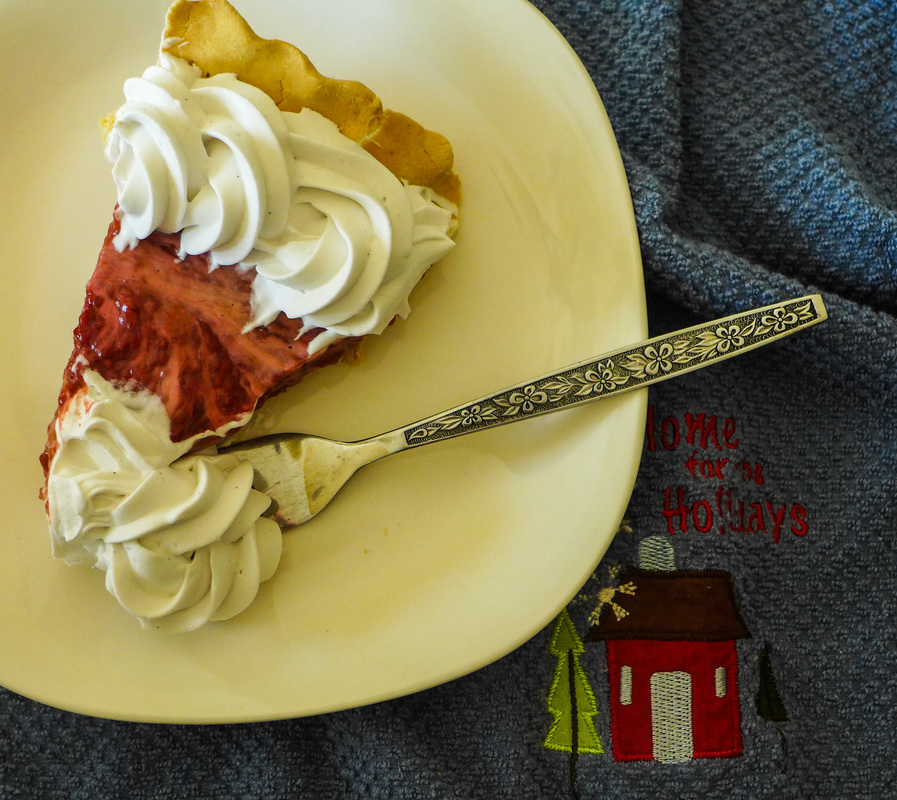
  It's a perfect autumn day. I've got a pumpkin candle burning, hot coffee and a turtleneck. What could be more perfect? Oh, pie? Yeah, that would be cool. I'm going to begin my long string of posts leading up to Thanksgiving with a pie recipe. This pie isn't your typical holiday fruit or squash custard pie. Nope. It's actually a recipe that seems more like something you could bring to a Fourth of July barbecue. This is a cold refrigerated pie that only requires baking if you are making your crust from scratch. What a weird thing to feature for the holidays, you may think. My reasoning behind this recipe was to feature something that could be as quick and easy as you need it to be. The recipe is great because it can be made totally from scratch the day before you need it or only as "scratch" as you have time for. Many elements of this pie can be store-bought and thrown together with all the other components when you assemble everything. Another great thing about this pie is that it's light and simple as it features classic flavors such as raspberry and vanilla. There is definitely room for tinkering if you'd like to make the pie more custom. I wanted to keep mine simple, though. The base recipe I've written for you is something that most will enjoy. The coconut filling is basically a vegan stove top pudding that tastes like vanilla bean ice cream. Wonderful. I've also included a sugar-free option. The flavor of jam and/or pie crusts you use are totally up to you. I used a basic gluten-free pie crust and I've included the recipe if you are ever in need of it. It's a great thing to have a basic single pie crust recipe on hand for anything you may need to make. This recipe is simple and can be made quickly. If you'd like to up the flavor, try substituting some of the flour (maybe 1/4 cup) for cocoa powder. Chocolate raspberry pie? Sign me up. The raspberry jam recipe I've included is also homemade. If you find that you would rather save time (I don't blame you!), definitely substitute your favorite store bought jam or fruit preserves. So, if you're looking for a dessert that will surely please a crowd, need something quick and simple, and are aiming to please herbivores and gluten-freers alike, give this recipe a try. It is almost Thanksgiving, after all. Who doesn't want a pie? ;D 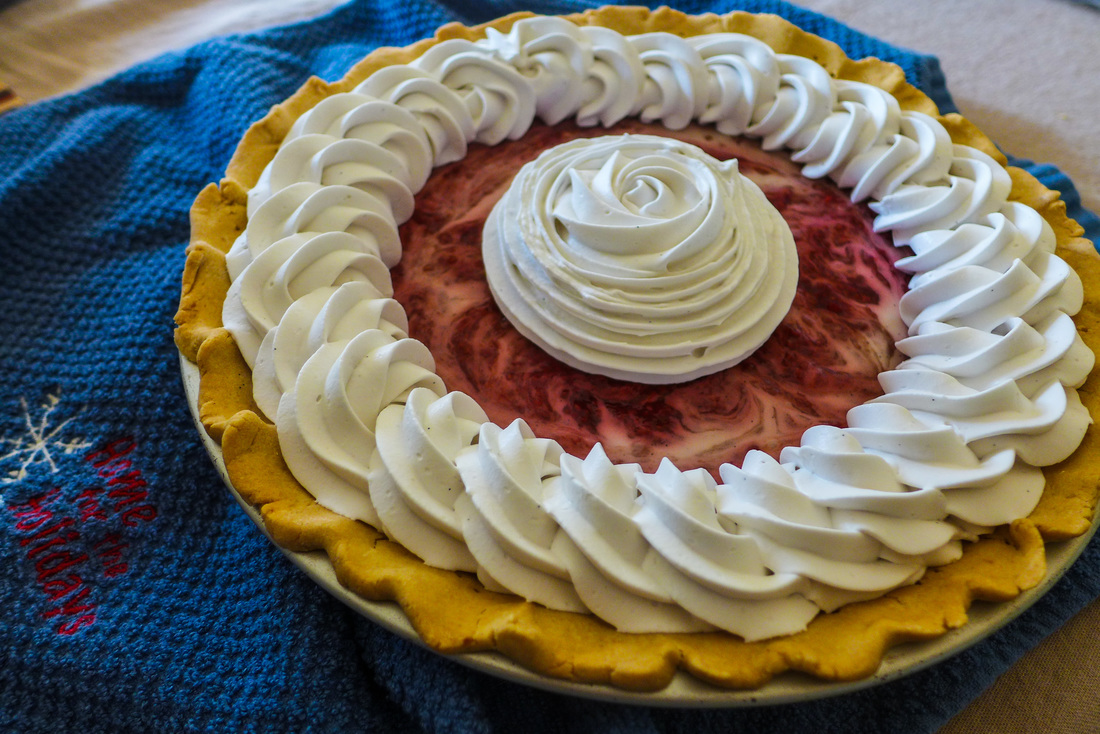 Raspberry Coconut Cream PieYield: 1 - 9 inch pie Free from: Gluten, Soy Ingredients Crust
Raspberry Jam
Garnish:
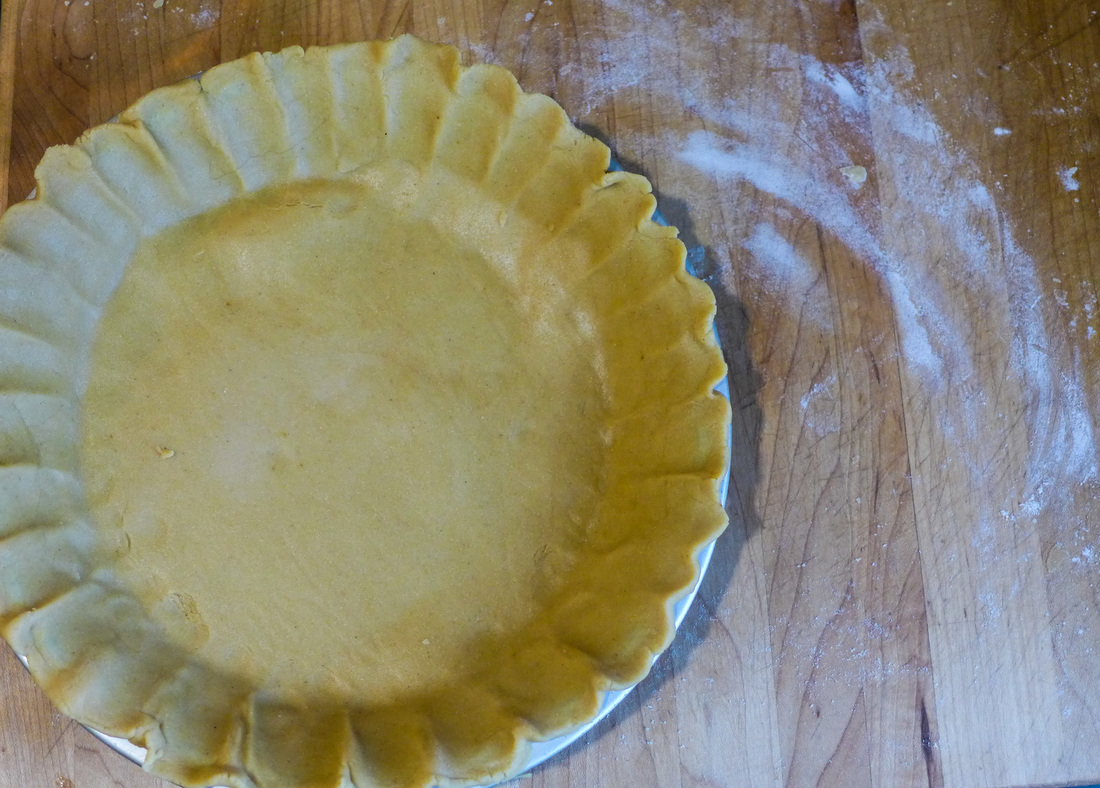 Instructions Crust Preheat oven 345 F.
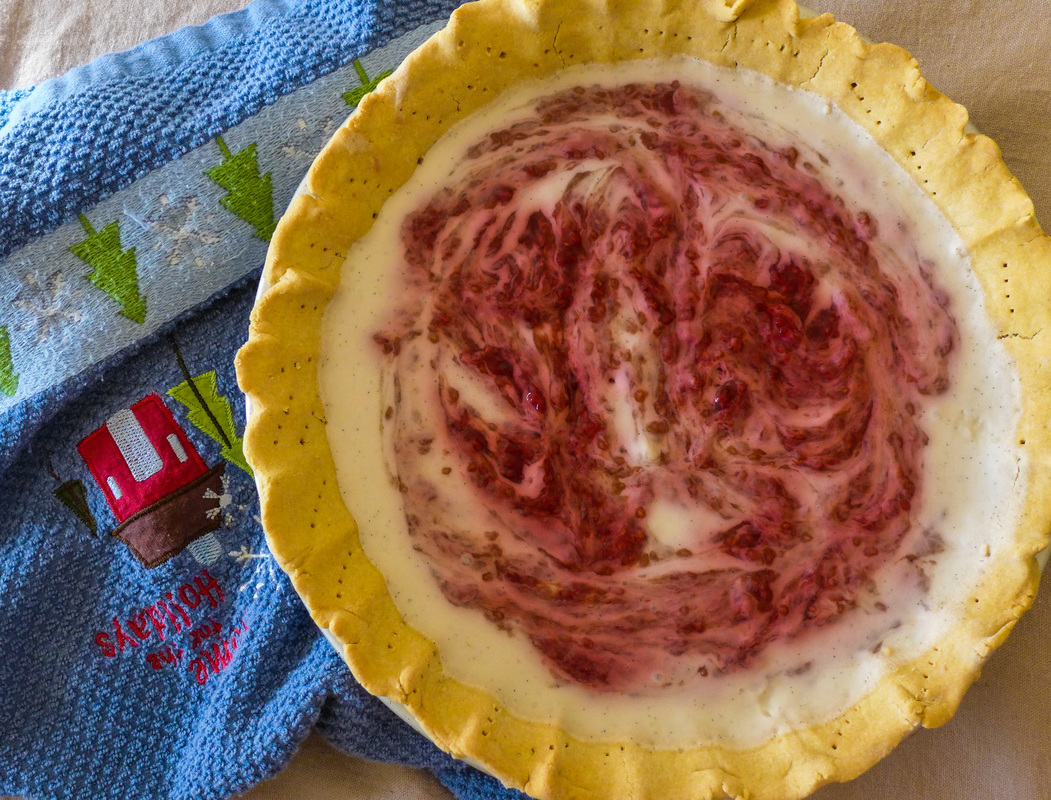 Coconut Cream Filling
Raspberry Jam
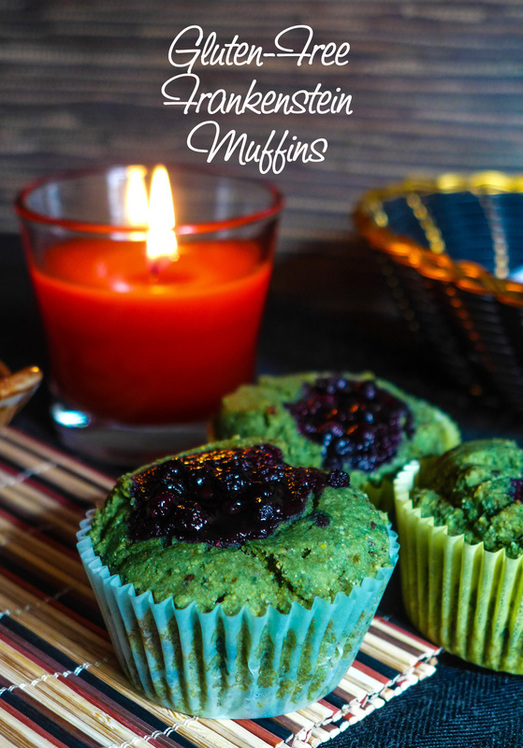
  This is my first entry into the Earth Balance Holiday Bake-Off contest! I encourage everyone else who loves to bake to enter. The prizes seem pretty awesome and it's a great way to spark some creative juices for others who are wondering what to make this holiday season! Click on the image below and it will bring you to a page with more information about how to enter! Happy Baking! <3  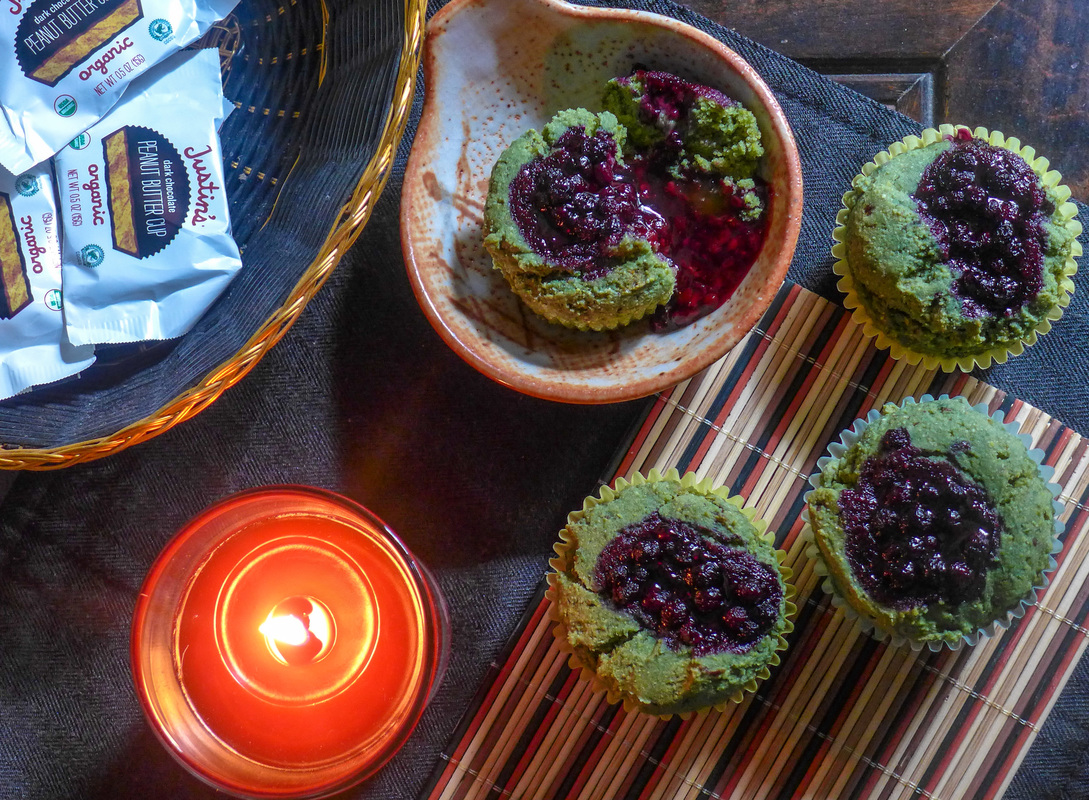 HAPPY HALLOWEEN! I've enjoyed all the previous pumpkin posts (PPP's, if you will), but I wanted to do something different for my Halloween recipe this year. What's a better way to celebrate the holiday that revolves around sugar with the healthiest and most naturally delicious muffins you can make that also happen to resemble a very popular monster? I can't think of anything either. =) These muffins are easy to whip up and are a great canvas for your favorite jam or preserves. I decided to use blueberry jam that I whipped up quickly on the stove for the filling, but you are welcome to sub it for your favorite fruit. The blueberries give the muffins their "Frankenstein-esque" coloring, though. Blackberries would also be wonderful! 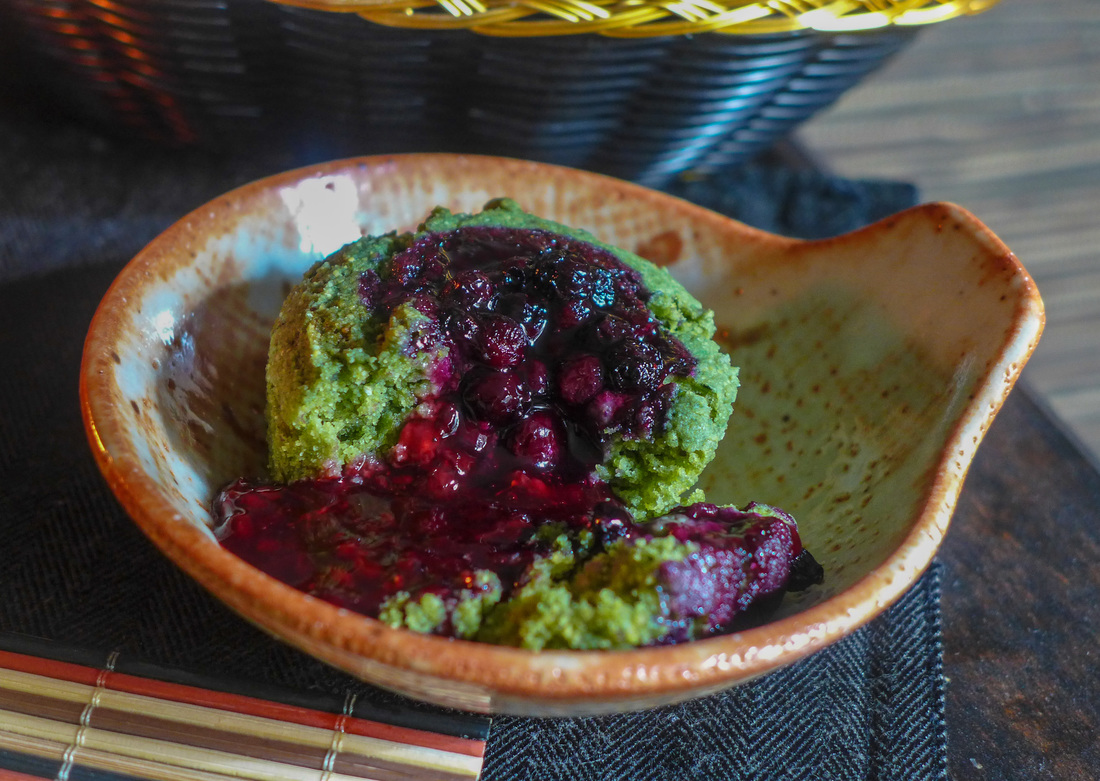 Muffins with both blueberry AND blackberry jams. I love the colors. The muffins are a wonderfully vibrant green color, but they are 100% natural! I used spirulina powder to color the batter green. When they came out of the oven, the green had intensified. What an awesome thing! Spirulina is a type of algae that is an awesome superfood supplement. I use it in my green smoothies for the most part. This is my first time ever using it as an ingredient in baking. I'm never going to buy green food coloring again! The spirulina did not impart any flavor into the muffins which was great. I added some maple syrup and orange juice into the batter so that it would balance out any flavor that the spirulina might have. The result was a slightly sweet yet mild-tasting muffin with a hint of tartness from the blueberry jam. It's a perfect breakfast or snack on the go. Make a batch for your family if you're hanging at home tonight to hand out candy. Or, you can always bring some to a Halloween party. Or, you can always just make a batch for yourself. Bam. Breakfast for the week. ;) Be safe tonight, everyone! Have a Happy Halloween and enjoy the extra sleep tonight. ^_^ Frankenstein Muffins
Quick Stove Top Jam
Instructions Preheat oven 400 F.
Jam Instructions

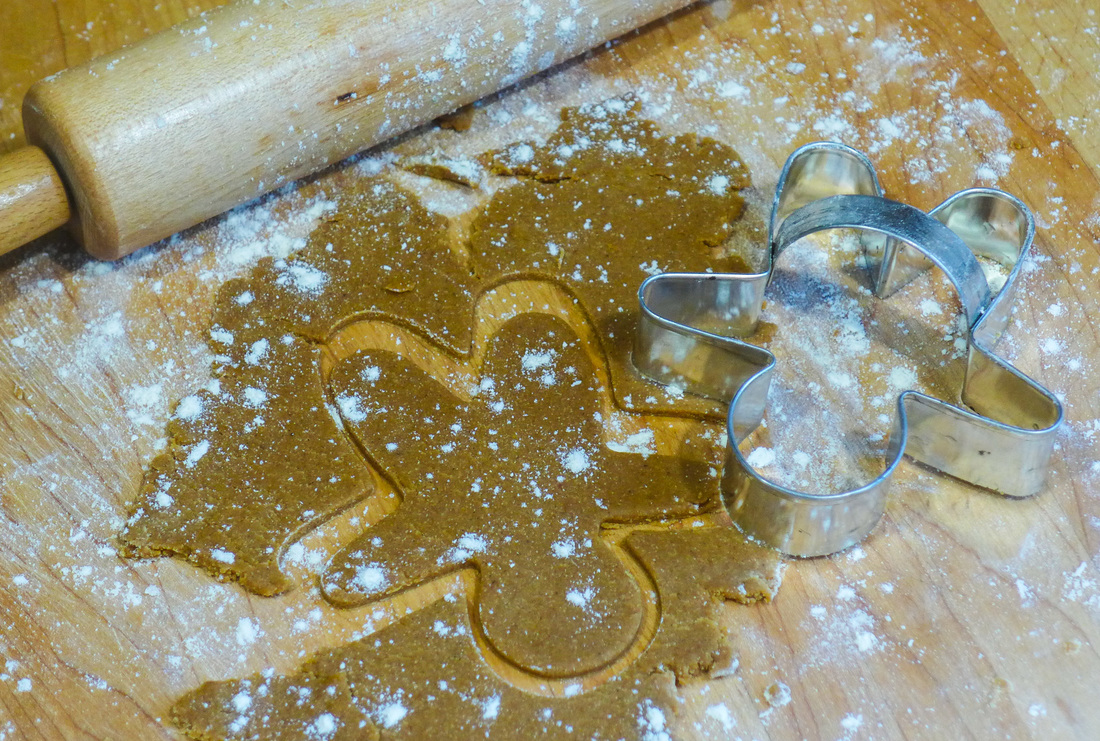
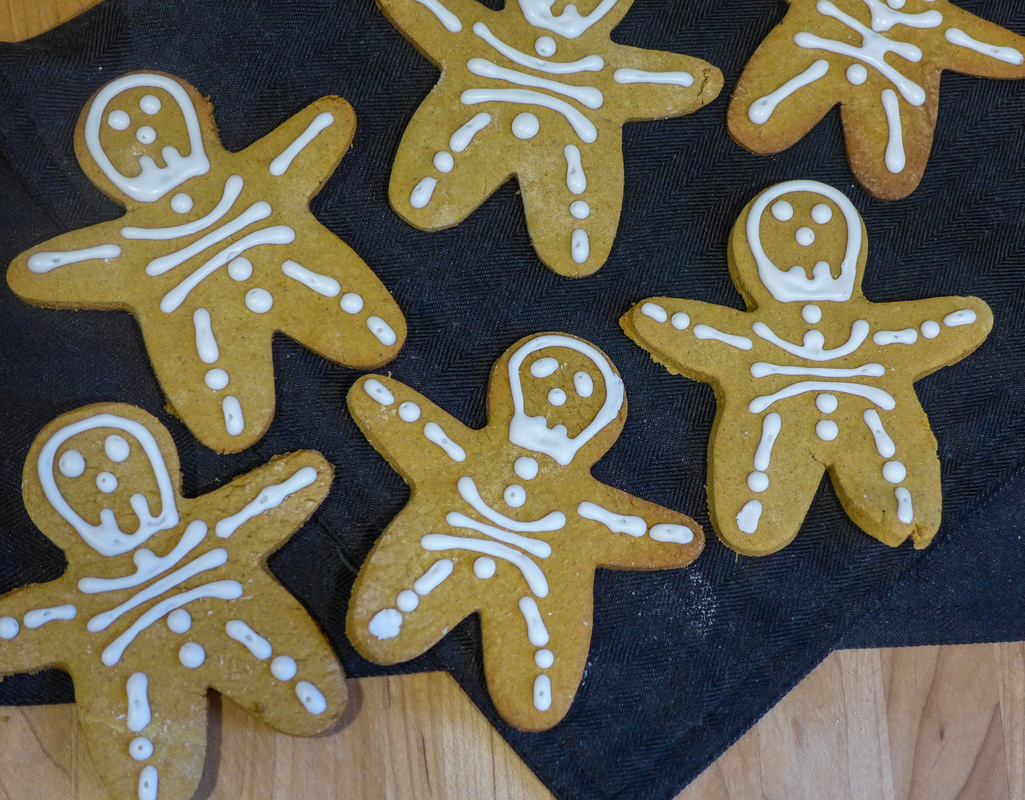
This vegan royal icing is easy to pipe, sets quickly and isn't too sweet. It's everything I've ever wanted out of an icing. It's also egg-free, soy-free and fat-free. What else could you want? The cookies themselves are very simple to make. They are an adaption of a simple rolled sugar cookie recipe from one of my favorite cookbooks (non-veg). The fact that they are gluten-free is great because they never change in consistency no matter how many times you roll them out. It's pretty wonderful. =) I love that the cookies are aromatic without being too sweet. You can easily add up to 1/4 cup more coconut sugar (or regular sugar) if you want them sweeter. I prefer them more buttery because I don't like cookies to be too sweet after they are iced. That is entirely up to you, though! Feel free to play around with the design/cookie cutter you choose. I made mine look like skeletons and used a gingerbread man cutter. These would also be great as pumpkin shapes (of course) and even circles (ghosts? skulls?). Since the cookies are pumpkin flavored, you could easily make these for Thanksgiving and change up your cutter/design for that too! The possibilities are (almost) endless! Happy cutting, everyone! ;D  Pumpkin Cutout Cookies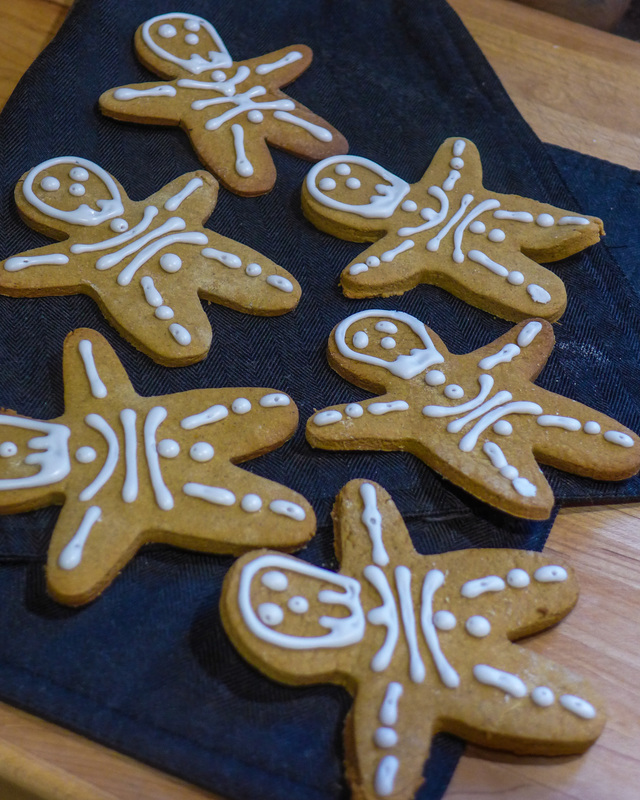 Yield: Approx. 24-36 cookies (depending on the shape) Free of: Gluten, Soy, Nuts Ingredients Cookies
Royal Icing Adapted from The Blenderist's Recipe
 Instructions Cookies
Royal Icing Instructions
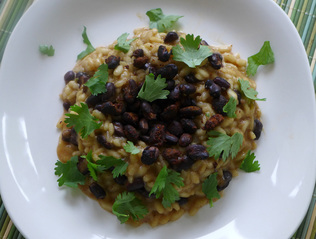
 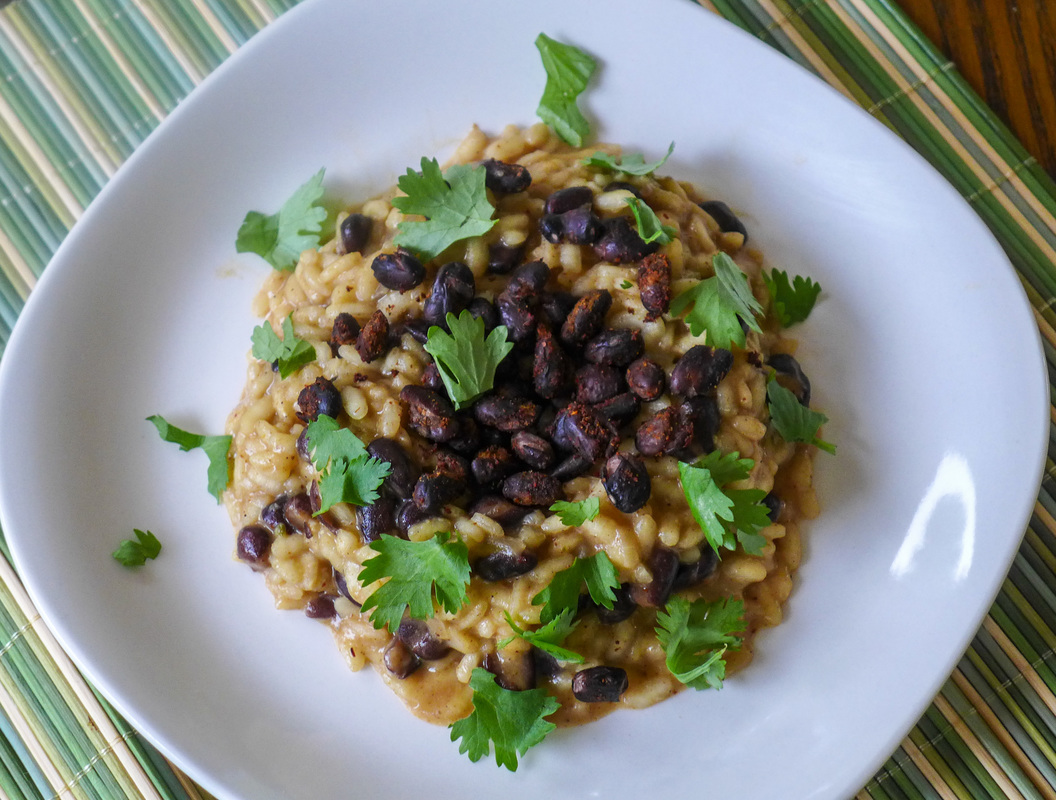 It's the last day of VeganMoFo 2015!!!! ='( I'm very sad to see this month come to an end. Even though I faced a bit of a challenge making sure I posted every day while working full time, I managed to pull it off! Phew! Although it was tiring, it was the most fun I've had in the kitchen in a very long time. I loved being able to come up with creative ideas (sometimes on the fly...eheh) and see them come to life. Tasting them wasn't bad, either. ;) Best of all, I got to share my dishes with all the vegan blogging community! I've never felt so supported and humbled at the same time. I think everyone did an amazing job and I want to commend all those who participated! My final dish for you this month is my answer to the Fusion Challenge: Chipotle Risotto & Beans! It took everything I had to not make a Japanese fusion dish, but I'm glad I didn't. I have to credit by boyfriend for this idea. He helped me when I was second guessing what to make and he suggested this dish. What an amazing thing. 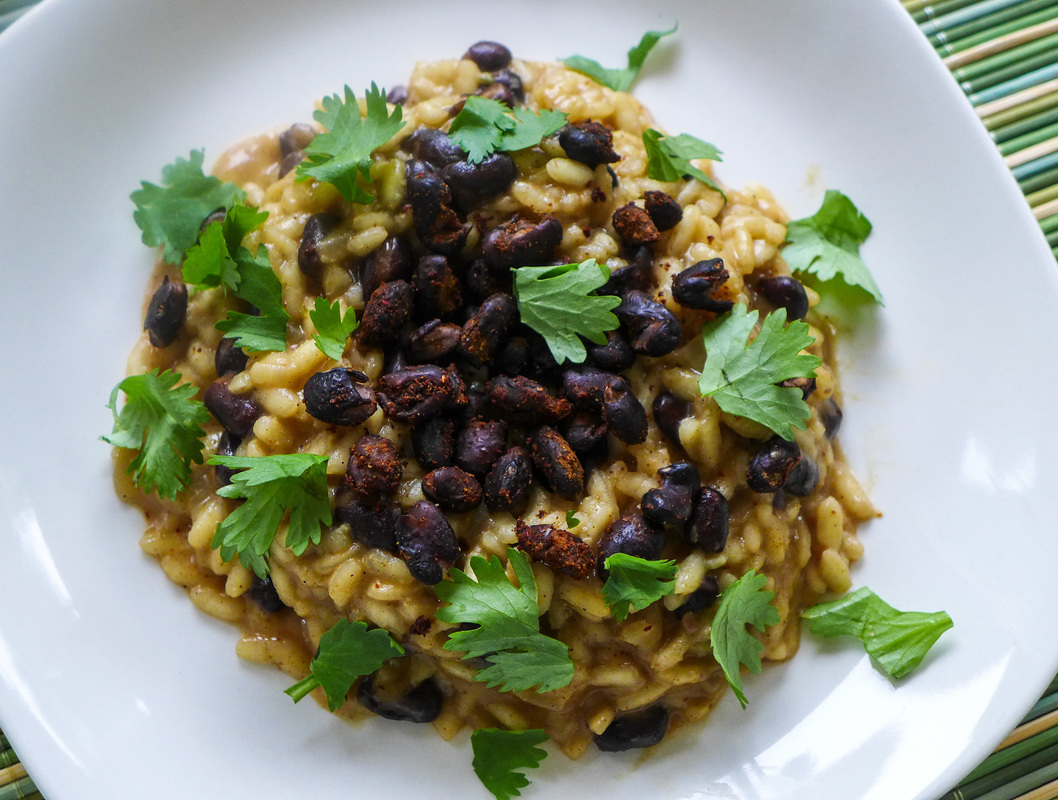 What I love about risotto is that it's very easy to customize once you know how to cook it correctly. The first time I made risotto, I did it right but it took forever! I didn't prep adequately so I spent forever gathering all my ingredients. Now, I feel that simple is better. This risotto may look complicated, but it really isn't. I basically took a "rice and beans" approach to this with regards to flavor. I coated back beans in chorizo-type spices and roasted them to give them a little bit of texture. The beans pair nicely with the creamy risotto. The risotto is a tad spicy and buttery, while the beans are warm and smokey. I garnished everything with some bright cilantro and my goodness it was perfection! The smell of this dish is great just by itself. Serve this risotto in small portions for an appetizer or larger ones for an entree. You can also make them into arancini. I won't stop you. ^_^ Thanks for reading, everyone! I'm stoked for next year's MoFo already. Keep reading for my rocky adventure into the holiday season! ;) Chipotle Risotto & Beans
Instructions
Today's Vegan MoFo prompt intersects with another promotion I'm contributing to: Nuts.com is featuring healthy tailgating snacks! This recipe is a big of flavor with a combination of my favorite spices and low sugar, gluten-free, healthy fats that will be your best friend when you need something healthy on the go. I know how frustrating it is being stuck anywhere without something healthy to eat that's readily available. I always try to travel with trail mix or other whole food snacks to satiate my hunger until the next meal. Why not add some amazing fall spices in while you're at it? ;) 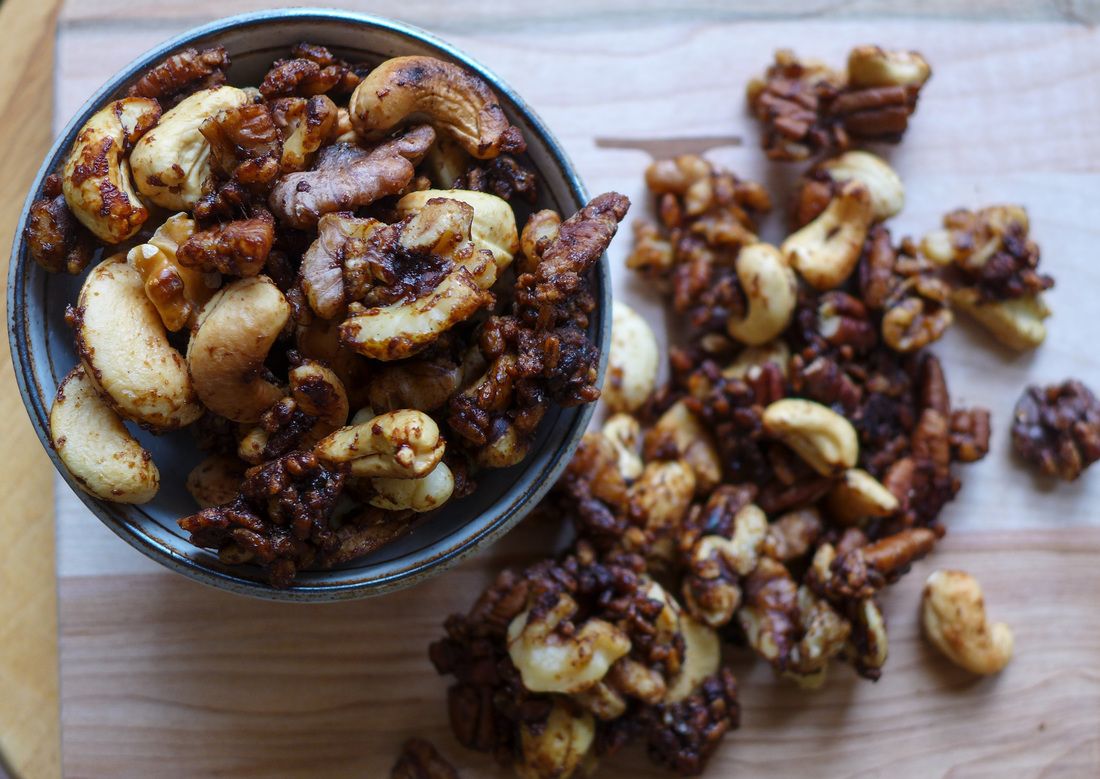 The spices I'm featuring today are: caradamom, cinnamon, allspice, cloves and ginger. These spices are always in my pantry at the ready for use in baking, cooking, sprinkling, you name it. I'd probably say that cinnamon is my absolute favorite spice of them all. But, since I've been making a lot of things with just cinnamon in them, I wanted to mix it up a little! I mixed all the spices that I like from masala chai with the addition of allspice, which I love! I like to use allspice in savory dishes sometimes as well, especially in chili, curry, and sometimes pho broth. When I mixed all the spices together and toasted them in the oven, they gave off an amazingly warm aroma that reminded me of the holidays. What a great thing to look forward to! ^_^ I guarantee if you whip these rice and nut clusters out at a game, bring them to a get-together, or give them to a friend as a gift, everyone will be blown away by how amazing they smell. Go ahead and share them with everybody. Spread the healthy love! <3 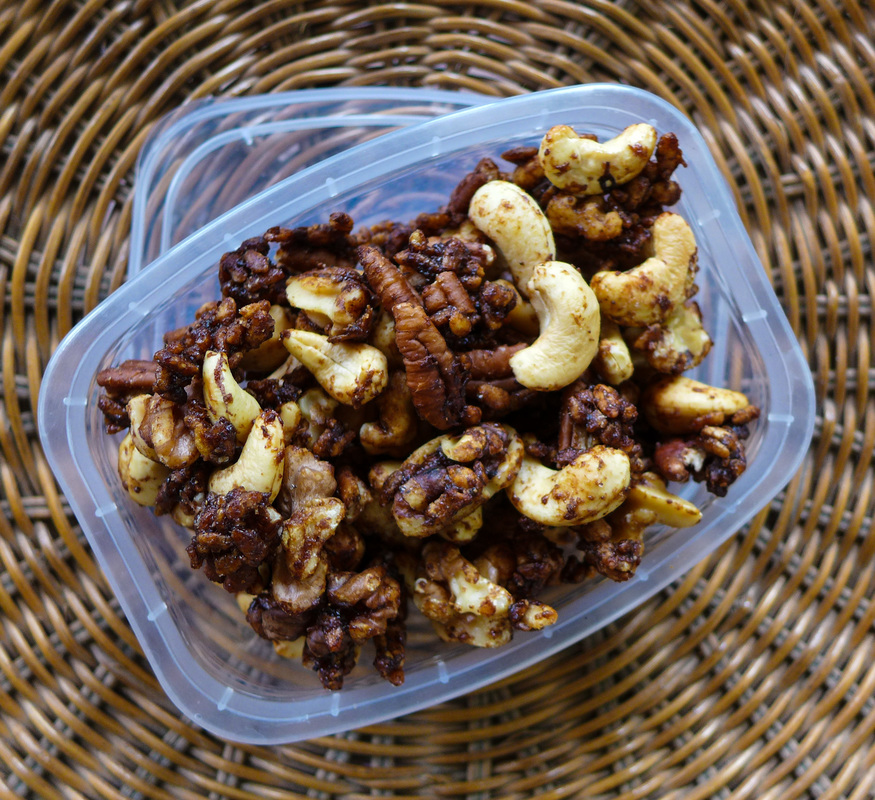 Pack 'em and take 'em! They're wonderful travel companions! =P Spiced Rice & Nut ClustersYield: 3-4 cups Free of: Gluten, Refined Sugar, Soy (You can substitute mixed seeds for the nuts if you need to! It will be just as delicious!) Ingredients
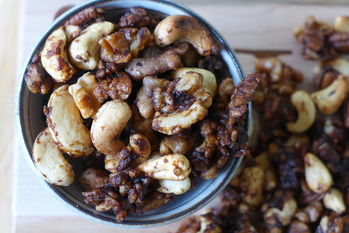 Instructions
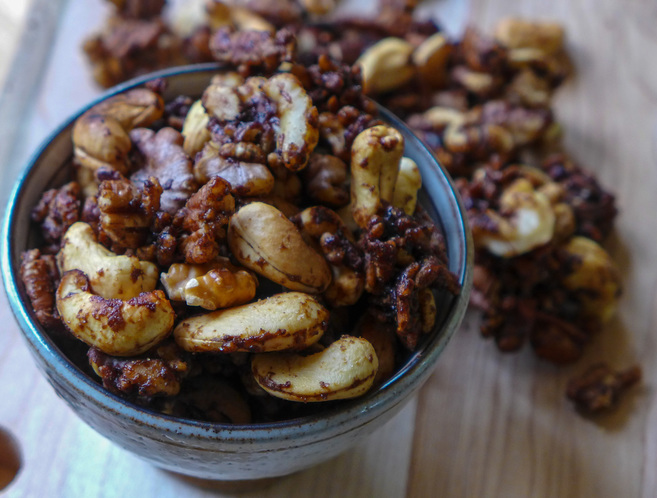 To see Nuts.com's awesome variety of healthy snacks (and some specifically vegan), click here! They're also a great source of bulk items from candy to nuts, seeds and fruit. Definitely worth checking out! ^_^
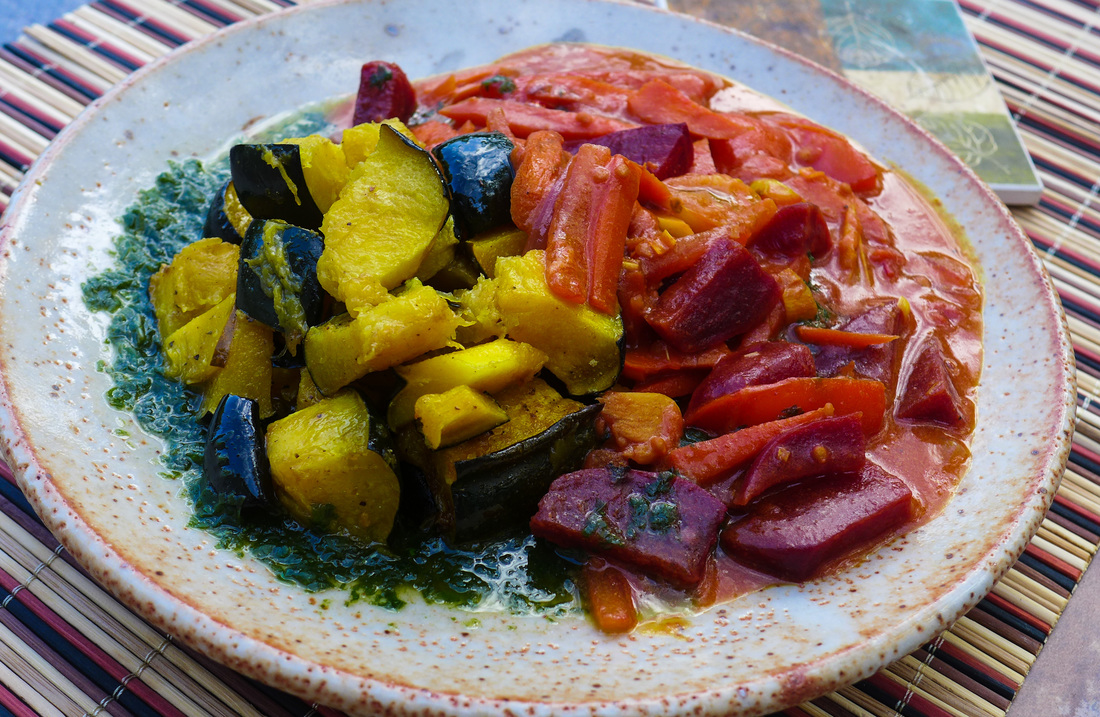
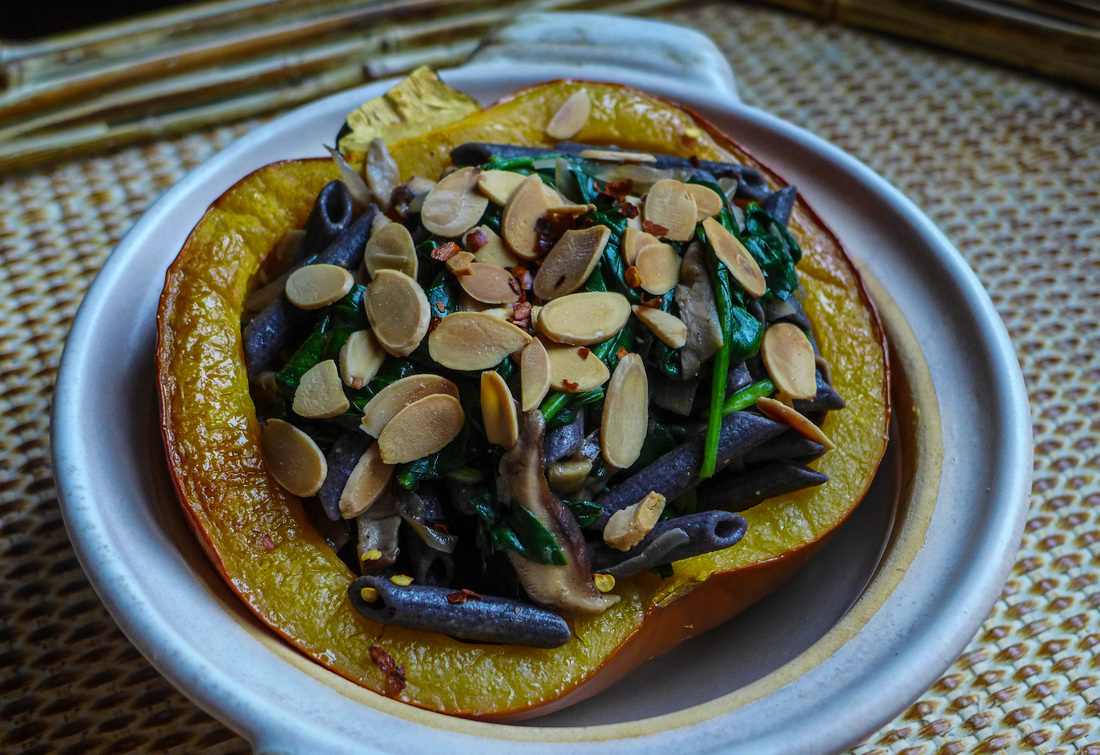 It's not even October and I want Thanksgiving already. So, to celebrate the Autumnal Equinox, I've decided to go full throttle Halloween-Thanksgiving theme. Not only is my dish black, orange and green, but it's hearty and savory enough for a celebratory entree. I'd love to serve this at Thanksgiving...what a departure from my normal formula of making a bunch of vegan side dishes. I mean, I don't mind making a meal out of salad, stuffing, potatoes and pie. Not at all! However, it is nice to sit down to a special and festive entree that will satisfy any stomach. This pumpkin is just that. Not only is it totally adorable and seasonally festive, it's delicious and nutritious. It adds wonderful soft and creamy texture to the toothsome pasta filling. It's quite wonderful, if I do say so. I may have eaten an entire half by myself. Maybe. ;)  This pumpkin looks huge in my photo, but it wasn't much larger than my hand (and I have small hands, I swear). I would recommend a 3 pound pumpkin for this recipe. It will serve 2-4 people. Roasting the pumpkin was actually a breeze. I cut my pumpkin in half length-wise like any other winter squash being used for stuffing, rather than cutting a hole in the top like you would for carving. The pumpkin cooked in only a little over a half hour and was perfectly caramelized and fork tender. Mmmm! ^_^ I decided to stuff my pumpkin with a sautee of shiitake mushrooms, garlic, shallots and baby spinach, all dressed simply in olive oil, salt and pepper. Nothing too crazy here. I didn't want to overwhelm the delicate sweetness of the pumpkin. Also, I decided to use black bean penne pasta because it has a gorgeous black color and it's a great gluten-free and protein-rich product that I had never used before. It cooked very well and didn't disappoint in texture! Oh, and for a toasty, crunchy treat, I topped it all with toasted sliced almonds. Delicious. Welcome, Fall. It's been a year and I've missed you so! <3 (Please last longer this year before you give way to the bitter cold, plz & thnx.) 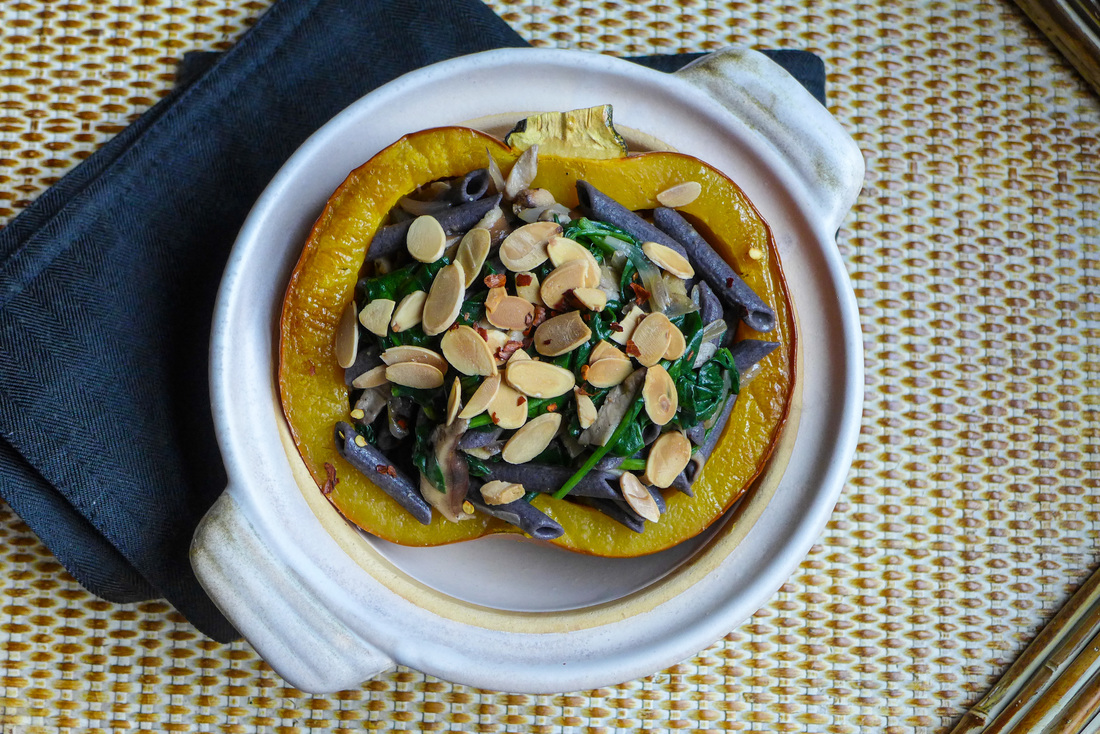 Pasta Stuffed Sugar PumpkinYield: 2-4 servings (2 stuffed halves of the pumpkin) Free of: Soy, Gluten, *Nuts, optional Ingredients
Instructions Preheat oven 350 F.
Oh, and for dessert, I indulged in a tiny piece of chocolate heaven that I happened upon this afternoon. It was a Fall miracle and I'm so happy I know about this wonderful company that makes amazing vegan chocolate. Yes, that's vegan rice milk chocolate surrounding pumpkin spice caramel on the inside.
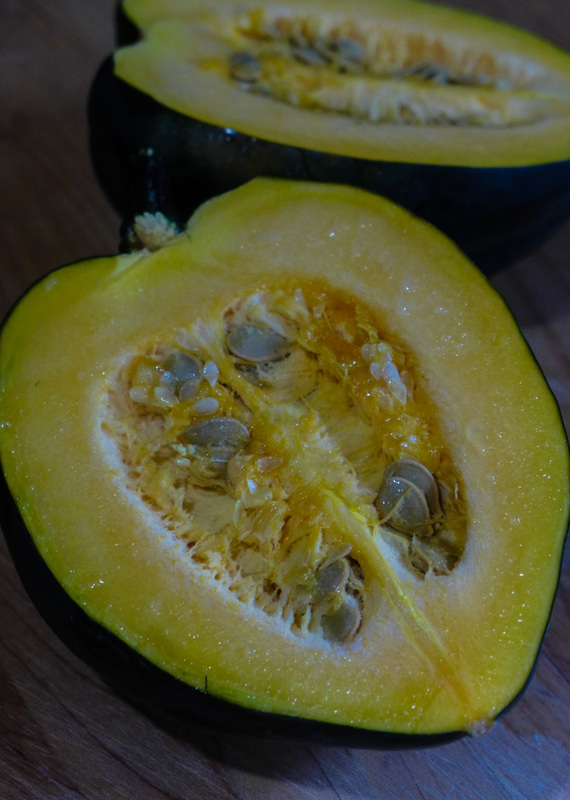
You're welcome. ;D 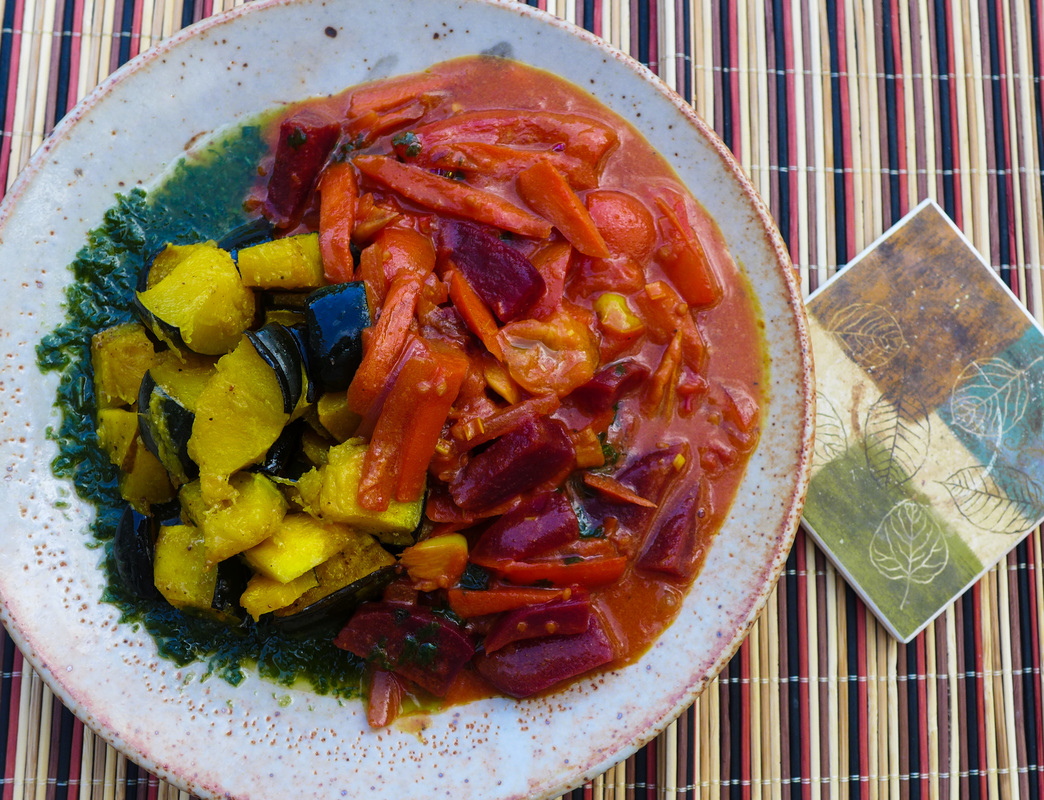 I'm fortunate enough to live in the Garden State. Many think of New Jersey as a bunch of factories and a boardwalk here and there. Throughout the state, however, there are so many amazing farms, vineyards and farmers markets. There are so many farms right near my house and they have all been operating for generations. It's an amazing thing to see. I was excited to go out looking for late summer/early fall veggies today. I had some idea in mind of what I wanted to cook, but I wasn't sure how to tie all my ingredients together. I knew that root vegetables would be available as well as the late harvest of nightshades like tomatoes and peppers. I found some delights that I just had to grab. I also got to pet a cute dog. So, I win. 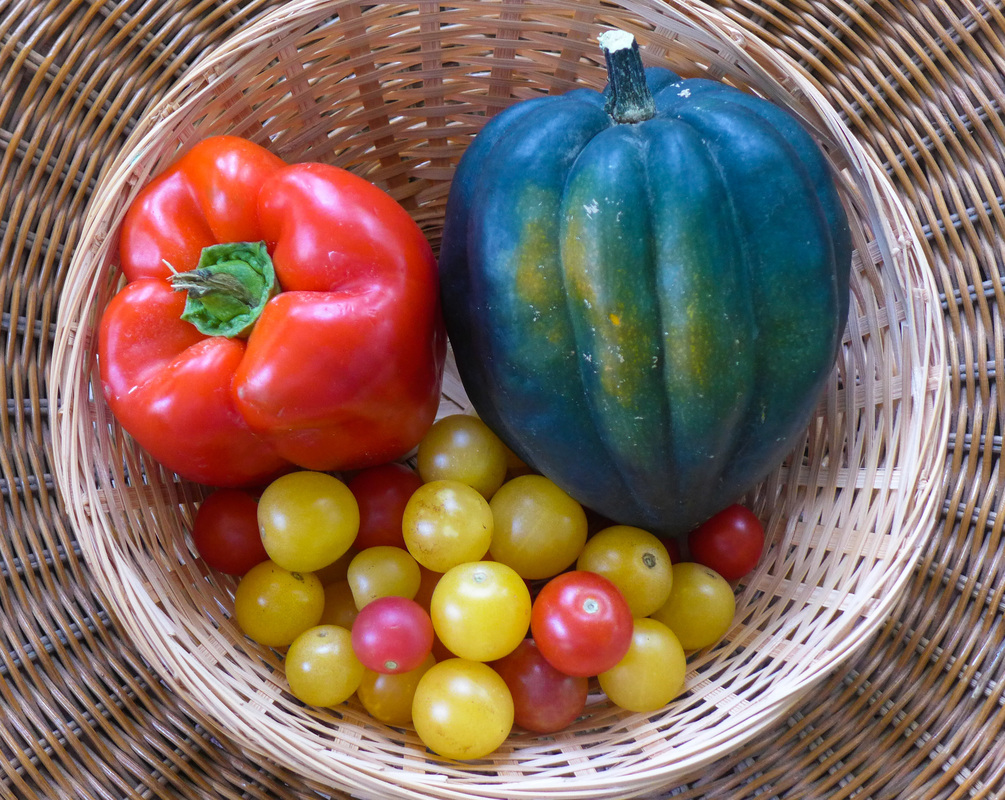 So, my haul today: a huge red pepper, cute little grape heirloom tomatoes and a beautiful acorn squash. I absolutely love their colors. It says everything about September that I love: light yet filling stews with sweet, vibrant flavor. I had to make a stew. No, I had to make curry! I have made Indian style curry before, but never Thai. I have eaten some Thai coconut curry at restaurants and absolutely loved them, but I never ventured to make them at home. Today had to be the day. The resulting dish had to be different, though. Something with a local flare and a seasonal spin. So, I took delicious and hearty root veggies and roasted them (including the acorn squash) to bring out their sweetness. Then, I made a sautee of the tomatoes, peppers, onion, garlic and spices. Then, I drenched all the veggies with coconut milk (I'm drooling). The result was a velvety, sweet, earthy, slightly spicy stew that was filling without being overly heavy. I also garnished with some freshly made basil oil. Why not?! The flavors were so bright and balanced. What a treat! Thanks, VeganMoFo for the inspiration. I was just gonna have leftovers for dinner. ;) 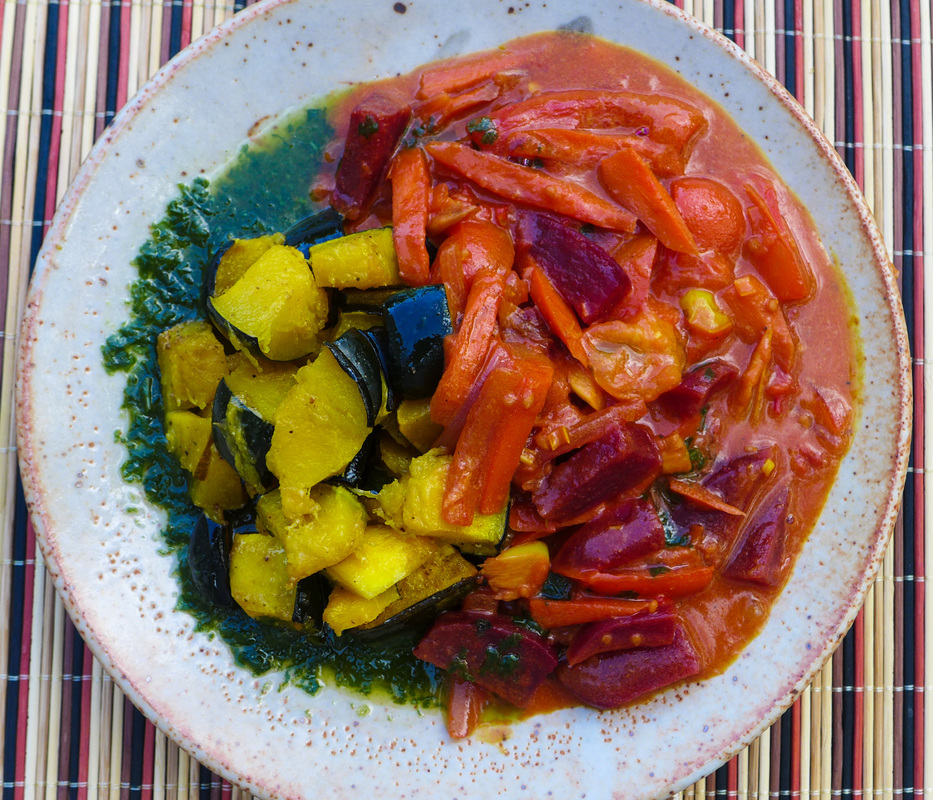 Seasonal Coconut Curry with Acorn Squash
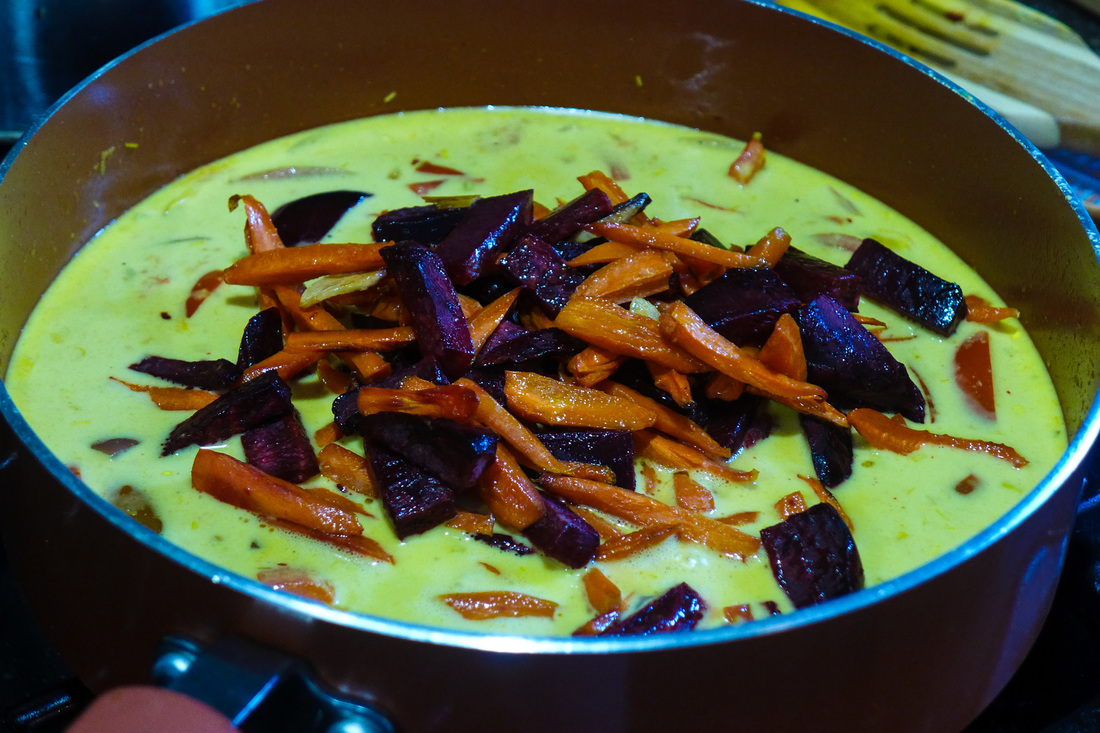 It looks like fall in a pan! Curry Ingredients
Instructions
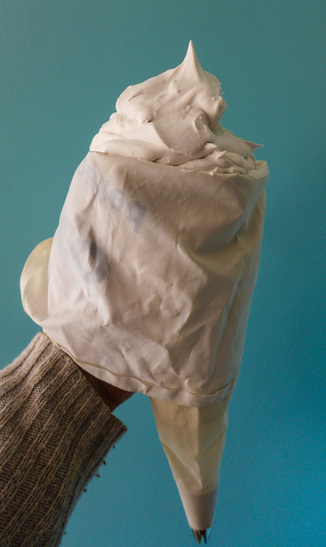
 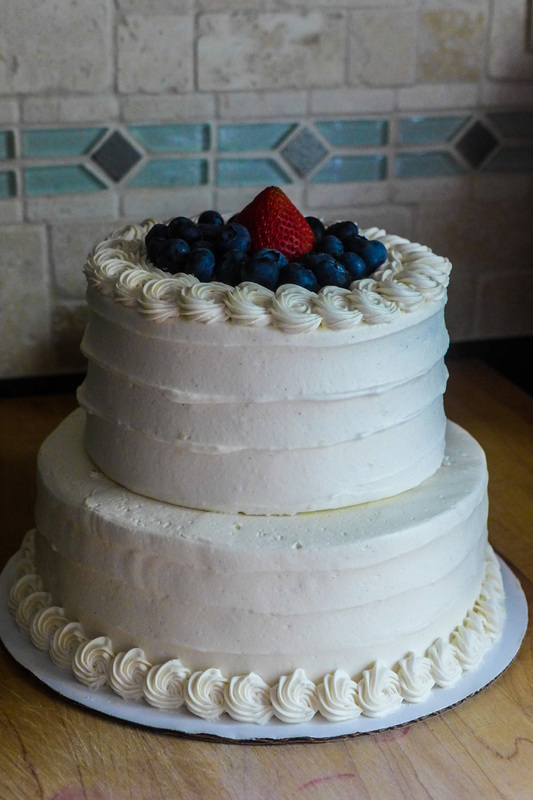 When I first became enamored with baking cakes and cupcakes, I struggled to match them with a good icing recipe. Even as a non-vegan hobby baker, I had a pretty strong dislike for most icing that I could make. The standard American buttercream (usually a mixture between shortening and/or butter and powdered sugar with some milk and vanilla added) always seemed too sweet for me. Also, what a pain it is to make! So much of each ingredient needed to go into the recipe in order to do anything with it. I usually use a ratio of equal parts powdered sugar and shortening/butter (or Earth Balance) divided, so it would be for example: 1 cup shortening 1 cup butter/non-dairy substitute 2 cups powdered sugar milk vanilla This is a lot of each ingredient to yield enough icing to ice a cake or some cupcakes...Also, look at the amount of fat and sugar goes into it! A bit much, I think. I prefer things to be slightly sweet and more rounded in flavor when it comes to desserts...I've mentioned this many times in my posts! But, when it comes to icing, it seems almost impossible to balance flavor in an icing that has a stable texture for decorating...well, until now!! ;) 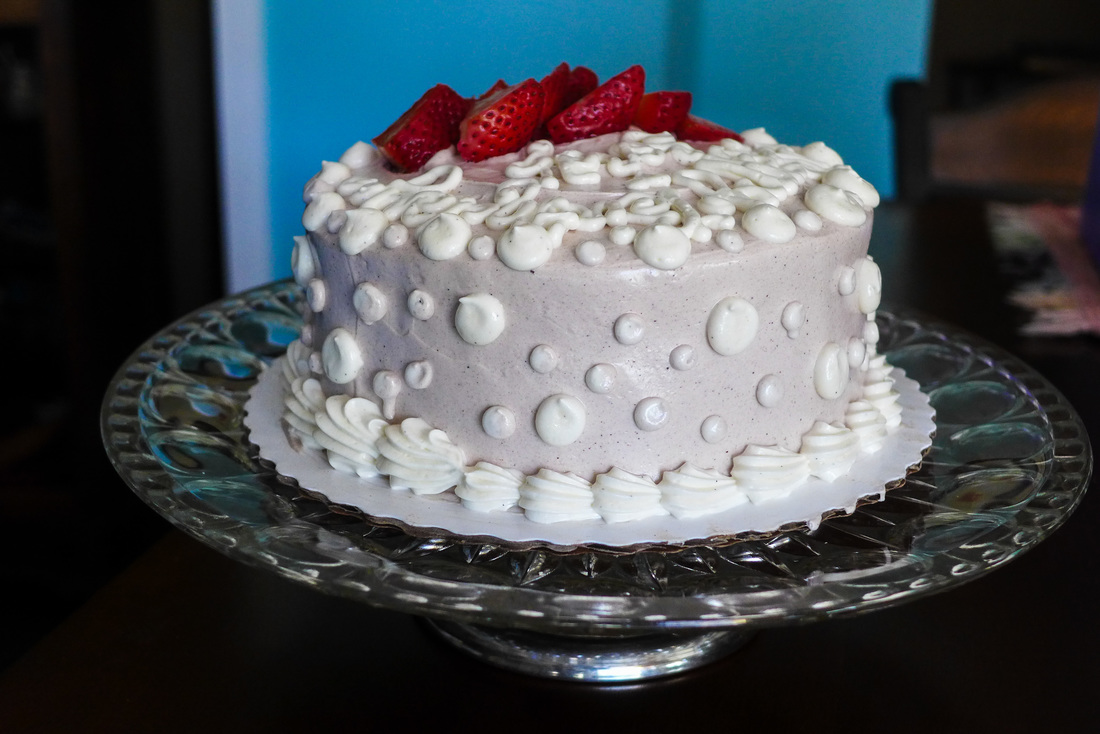 With the amazing discovery of aquafaba, I have learned how to create amazing Swiss Meringue-style buttercream that is free of eggs or dairy! I have worked with this type of buttercream for years now at my job and I love working with it because it is always smooth and easy to work with for decorating cakes. It also hardens when it's cold so your cakes are more stable once they have set in the fridge for a while. The only issue with it is that it is an egg white-based recipe. I learned to make this type of buttercream by cooking granulated sugar and egg whites, whipping them and then adding a ton of butter to them until the entire mixture emulsifies and becomes soft, smooth buttercream. The process is quite long, especially if you are making a large batch. This batch that I've created is a small one, ideal for a 6 inch round cake or 12 cupcakes. It is ideal for the home kitchen because it is quick, does not require any cooking, and is only reliant on 1 cup of non-dairy butter substitute. The amount of sugar is dependent on your taste, as well! I believe that you might be able to substitute the sweetener if you choose, but make sure you are ready to experiment a little with the ratios of the other ingredients as it may change the texture. The goal is for this buttercream to firm up enough to pipe and ice, so make sure there is still some structure there. I love that I managed to make this buttercream work! I like the way it looks compared to other vegan icings I've used. A veganized American buttercream can sometimes be bubbly if it is over-whipped. This buttercream is always smooth and silky, ideal for piping roses/flowers, borders, etc. on your cake or cupcakes! I'm so happy I've found a way to make this recipe and I'm so excited to share it with all of you! Feel free to sub the non-dairy butter with coconut oi. I've tried this and it works beautifully. As long as you refrigerate your cake prior to serving, the icing will stay in its proper place! Leaving it out of the fridge, as long as it is in a cool environment for a couple hours is fine, too. Here are a couple of cakes I've used this buttercream for (one was for yesterday's VeganMoFo post!) I hope they inspire you to do your own homemade cakes or cupcakes! =) Happy icing! Vegan Swiss Meringue Buttercream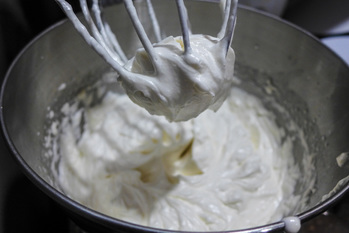 Yeild: About 4 cups, finished Enough to ice: 1-6" cake/12 cupcakes Free of: Gluten, Soy*, Nuts *Depending on your non-dairy butter Ingredients
Instructions
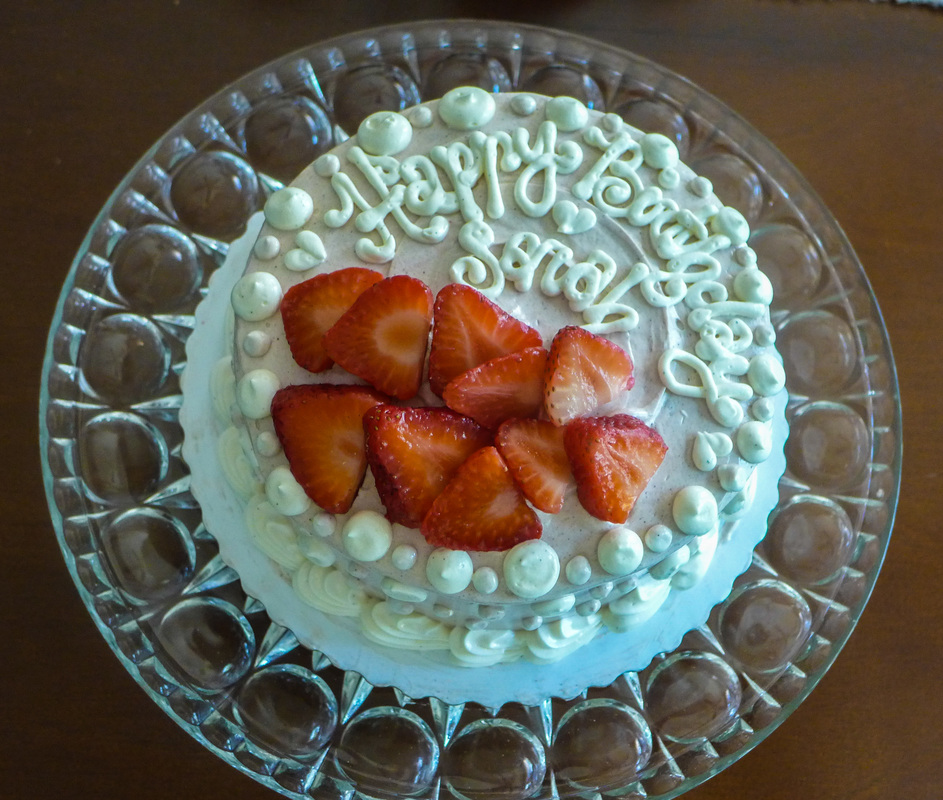 Pssst! That cake has booze in it! =P |
I'm Jess!This is my very first food blog! I post revised conventional recipes of foods that I hold near and dear to my heart. My cooking here is all gluten-free and cruelty-free, but full of flavor and comfort.  


 Archives
December 2017
Categories
All
|


 RSS Feed
