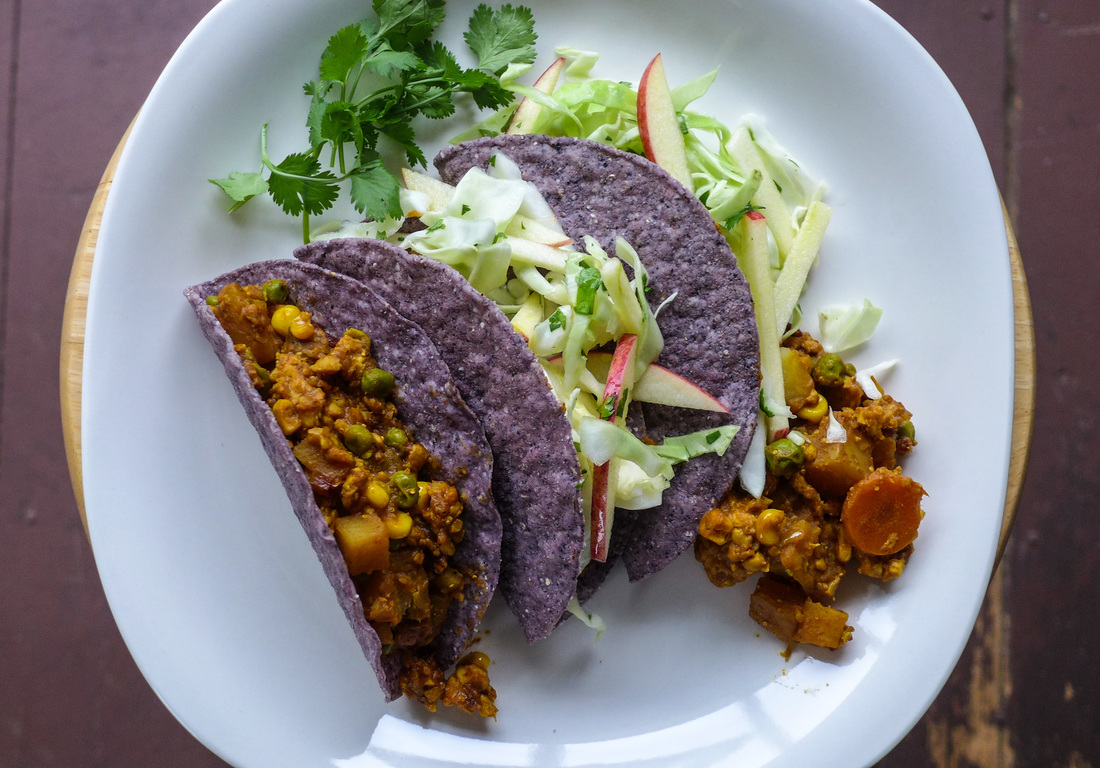
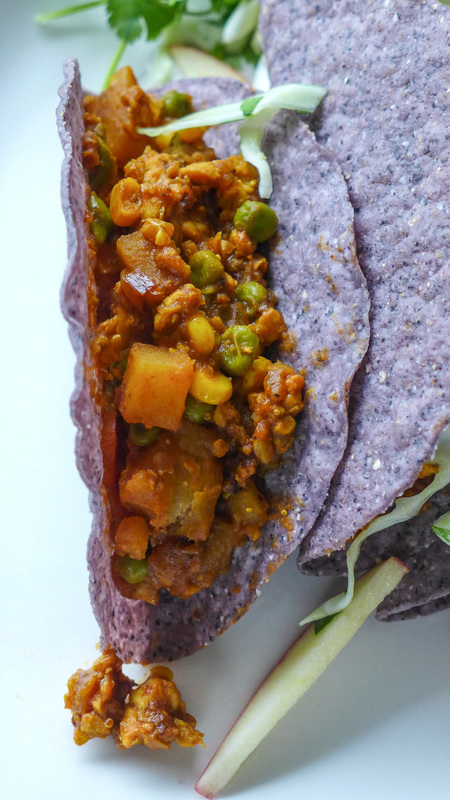
 I'm. Finally. Back! I apologize for my absence these past few months, but I've been very preoccupied with moving! The process was not as extensive as I expected, although it still took me over a month to finally get everything from point A to point B. Luckily, I'm just about settled. Not being able to cook in my own kitchen has been tough, but I am slowly adapting to my new one. I definitely like the layout (plus it has an island!). I do miss having a gas range, but I actually don't mind my new stove. The change in temp is pretty immediate, which is all I ever need! Since tomorrow is Cinco de Mayo, I'm going to make my come back with a fusion taco recipe. I was going to feature another dessert, but I'm not really sure I can top last year's Tres Leches Cake! No, I wanted to go savory and simple this year. Tacos are indeed a Cinco de Mayo staple, but they rarely ever look like these. I filled organic taco shells (which you can always use soft, if you prefer) with a curried tempeh filling. The tempeh is crumbled into a stew of veggies and spices and resembles "beef" when it is fully cooked. The vegetables are those that you may find in a basic curry, such as potatoes, carrots, peas...I added some corn in for sweetness as well. Japanese curry, in my experience, has always been slightly sweeter and more earthy than Indian or Thai curry. I gave the filling this flavor by adding in a bit of cinnamon and mirin to offset the savory garlic and cumin-based curry spice. The resulting flavor is rich, but not hot. Feel free to add chilies or red pepper flakes to increase the hotness. I left this batch mild to accompany the slightly sweet and acidic cabbage slaw I made as a topping! Enjoy these with any and all taco fixings, a festive drink, and maybe some guac and chips if you're extra hungry. ;) It's good to be back! <3 Japanese Curry Tempeh TacosFree of: Gluten, Oil (dressing only) Yield: about 6 servings Curried Tempeh Filling
Apple Slaw Ingredients
Garnish (optional)
 Instructions Filling
Slaw
  Well, it's Cinco de Mayo again! Cinco de Mayo is a holiday that I normally don't celebrate. It's in the same category as St. Patrick's Day for me. Growing up, my family and I would have themed dinners for these holidays. When I got older, I came to know these two holidays as excuses to drink themed alcoholic beverages. Although I do not partake in either of these traditions anymore, I still like to look at different themed recipes for the sake of inspiration. This year, I decided to make a cake that I did not think I was going to like. Tres Leches cake is something that I make during the day at work but not something I've ever wanted to actually eat. The idea of soaking a cake in sweetened condensed milk, evaporated milk, and whole milk makes me a little queasy. It seems incredibly rich and sweet, which are two things I do not enjoy very much in my desserts. I like either one of them, but not both in one recipe. In order to broaden my baking horizons, I decided to create my own version of a tres leches cake that was gluten free, vegan, and less rich and sweet. The result of my efforts was surprisingly delightful! I absolutely loved the way that my cake turned out. I've jumped on the aquafaba wave (egg white substitute made from chickpea brine). I learned of the magical powers of chickpea brine from this Facebook group. Ever since I became vegan, I've dreamed of creating something that mimicked angel food cake, sponge cake, castella, etc. I loved the spongy, almost dry texture. It's something that I never wanted to eat a lot of, but I loved baking cakes that came out this way. They're beautiful, perfect for decorating, and lower in fats for perfectly light summer desserts. When I went in search of a traditional tres leches cake recipe, I found a cake that seems sponge-like in its description. The cake contained a lots of eggs and dry ingredients. They did not call for fats or liquids of any kind. I thought this was the perfect opportunity to try my first attempt at making vegan chickpea egg whites!  The rest of the tres leches recipe was quite simple when I found a way to make the cake. There is a soaking liquid, which I just substituted non-dairy milk for (and some cinnamon for flavor). ;) The whipped cream topping was a simple fix: coconut whipped cream! Coconut whipped cream is the stuff dreams are made of. I love eating it in the summer. It's basically the most delicious and simple dessert to make if you have nothing else on hand. I always try to keep my pantry stocked with cans of coconut milk for last minute dessert ideas. In the end, I made the cake successfully. I soaked the cake in my milk and cinnamon mixture. Then, I topped the entire thing with mounds of delicious coconut cream that I made in my Vitamix (no need for a mixer if you have this handy). To top the cake off and add some acidity, I dropped some frozen raspberries into the cream. I'm a changed vegan. I do like tres leches cake and I'm going to eat it all. ^_^  Vegan Tres Leches Cake This cake has a delightful texture and is a bit dry...perfect for soaking! This cake has a delightful texture and is a bit dry...perfect for soaking! Ingredients Cake recipe adapted from Latina Magazine Yields: 6-8 servings Gluten-free, Dairy-Free, Egg-free, Oil-free Cake:
Chickpea Egg Whites:
Soaking Liquid:
* If you have dietary restrictions/allergies regarding these types of milk, feel free to use your preferred non-dairy milk! It also does not have to be two types. If you have only one, the cake will still come out fine. =) Coconut Whipped Cream
Instructions For the cake: Mix all dry ingredients in a large mixing bowl together with a wooden spoon/whisk. Place chickpea brine in a large food processor/mixing bowl fitted with a whip. Whip chickpea brine and slowly add in the sugar. Add cream of tartar and Ener-G powder slowly as well. Continue to whip brine mixture until it turns into a meringue-type consistency, about 12 minutes. Check periodically for firmness. Different machines will take longer or shorter. In my food processor it took approximately 12-14 minutes. After the meringue is ready, add half of it to the bowl of dry ingredients and fold in gently. Fold in the second half of the meringue gently, making sure not to over-work the batter. Pour the batter into a greased 8x8 square cake pan. Bake on 360 F for about 20 minutes or until a tester comes out clean. Chill the cake in the fridge until completely cooled, about 1 hour. For the soaking liquid: Combine both non-dairy milks (or just 1 if using) with cinnamon in a blender. Once the cinnamon is dissolved, set the milk aside and grab the cake from the fridge. Poke some holes in the cake that should be completely cooled by now. Pour the milk mixture over the cake, making sure to soak the entire cake. Place the cake back in the fridge to soak while you make the coconut whipped cream. For the coconut whipped cream: Open the can of coconut cream that has been chilling in the fridge. Scrape the cream from the top of the can with a spoon and place in a blender/mixer bowl, being careful not to get much liquid in the process. Set the liquid aside for another use. Add some sweetener to the coconut cream and extract, if using. Blend the coconut cream until it is thick and spreadable, about 2 minutes. If using a mixer, beat the coconut cream (preferably with a whip) mixture until desired whipped consistency is achieved. When you are ready to serve the cake, remove it from the fridge and top it with the coconut cream. Cut the cake into individual squares for serving and top with some fresh/frozen fruit for a deliciously refreshing dessert! Enjoy!  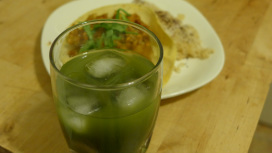 Cinco de Mayo was never much of a holiday for me. Once I became vegan, however, I began to eat a lot more Mexican influenced food. I've always loved tacos, but I never knew how versatile they could be. I love to stuff things in tacos that I normally would never think of before. Vegetarian Times has a recipe that pretty much sums up what I'm talking about. PB&J a whole new way! ^_^' Or, if you're feeling sassy: S'mores Burritos (minus the bacon, obviously, and vegan marshmallows...or, you could use coconut bacon! =O...) I smell a future post in the works. ;) As for last night, I decided to embellish a recipe I found by Mark Bittman. If you haven't watched his cooking show, The Minimalist, you really should. I used to watch it in the early mornings on the Cooking Channel while I ran on the treadmill. He is so dry and witty. His approach to cooking is something magical yet so hard for some to appreciate: simple and to the point. He doesn't fuss with his ingredients too much. He prepares them as simply as possible so as to bring out of the best in their flavor and nothing more. He's also really entertaining to watch because he's very nonchalant about his cooking. He takes his time casually putting his dishes together while making jokes here and there. He seems like an awesome guy. Oh, and he advocates being vegan/vegetarian for those who aren't subscribed to the lifestyle, which really means a lot. Way to go, Mark! For Cinco de Mayo, I had to make a taco recipe with a punch of flavor. I found one of Mark's recipes online and decided to amp it up a little. I beefed up the filling (no pun intended) with some chickpeas and cauliflower. I also threw in a few more spices and, oh yeah, tequila! I browned the filling and deglazed with some cuervo...twice. ^_^' 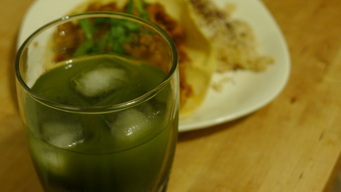 I used the remnants of tequila for some spiked green juice. It's the healthy way to get buzzed! I must say I enjoyed that drink a little more than my male companion. More for me! 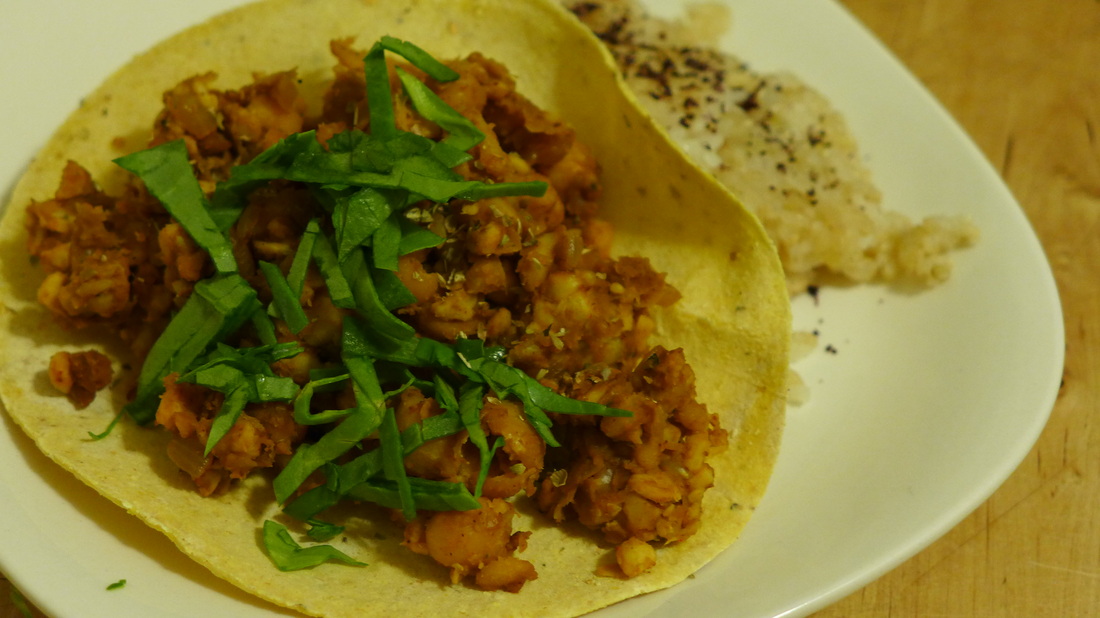
Tempeh Chorizo Tacos
adapted from Mark Bittman's VB6 Cookbook recipe Yield: 4 Servings
Cooked rice for serving (1/4 cup per person), opt. 1. Heat the oven to 400°F. Stack the tortillas on a large square of foil and wrap them loosely. 2. Heat the coconut oil over medium-high in a large skillet. Add the onion and garlic; sprinkle with salt and pepper. Cook, stirring occasionally until the vegetables soften, 3 to 5 minutes. 3. Add the spices into the pan and stir to combine with the vegetables. Add the cauliflower to the pan. Crumble the tempeh into the pan and cook, stirring and scraping the bottom of the skillet occasionally, and adjusting the heat as necessary (I kept mine at a steady medium-high). Brown the tempeh for a few minutes and then add in the chickpeas. Keep stirring the ingredients until everything is evenly browned. Once the mixture is dry, deglaze with a splash or two of tequila. Wait for the liquid to burn off before proceeding. 4. When the filling is almost ready, put the tortillas in the oven. Let them warm for about 5 minutes. Add in splashes of tamari to the filling mixture and fully incorporate. 5. Squeeze the citrus juice over the filling when it's finished cooking. Garnish with cilantro and/or spinach, and serve with the tortillas. and rice. Cheers! =D |
I'm Jess!This is my very first food blog! I post revised conventional recipes of foods that I hold near and dear to my heart. My cooking here is all gluten-free and cruelty-free, but full of flavor and comfort.  


 Archives
December 2017
Categories
All
|
 RSS Feed
