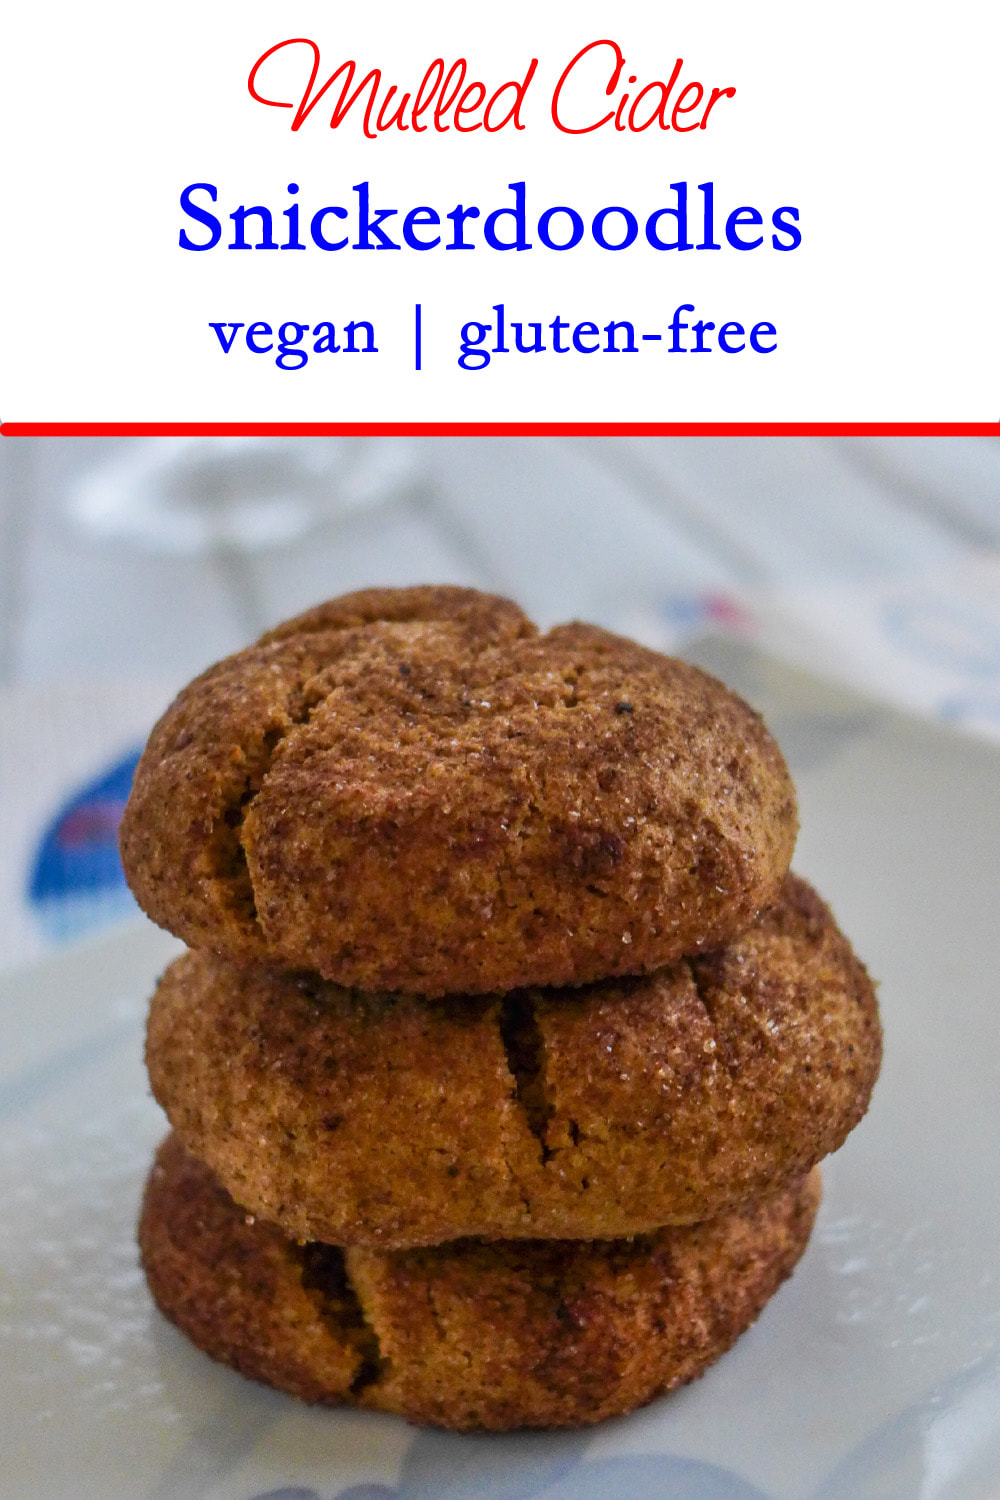
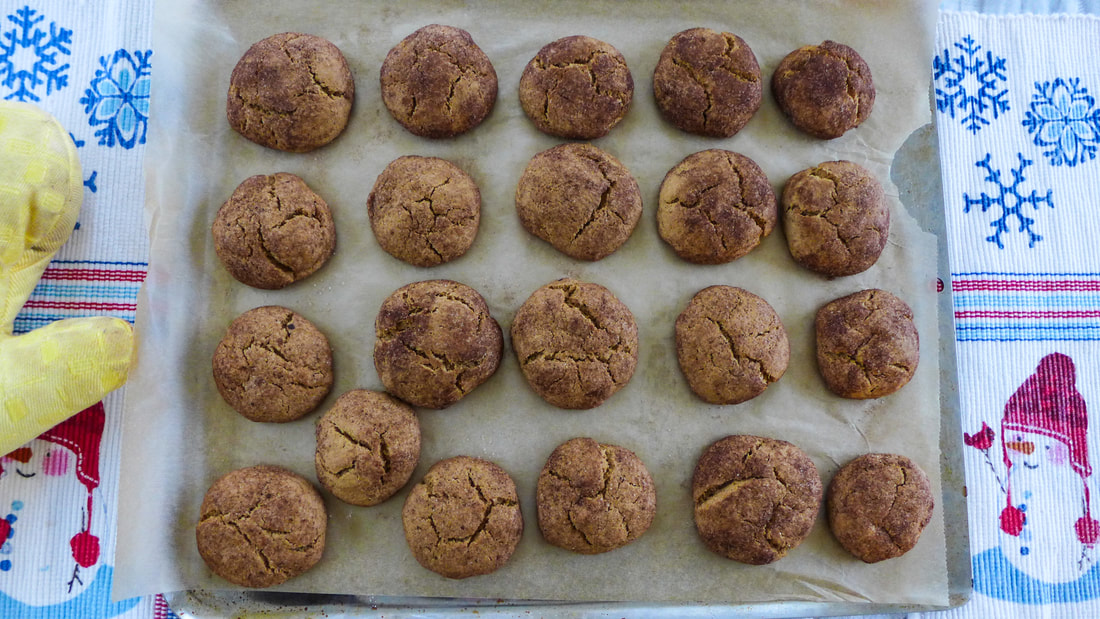
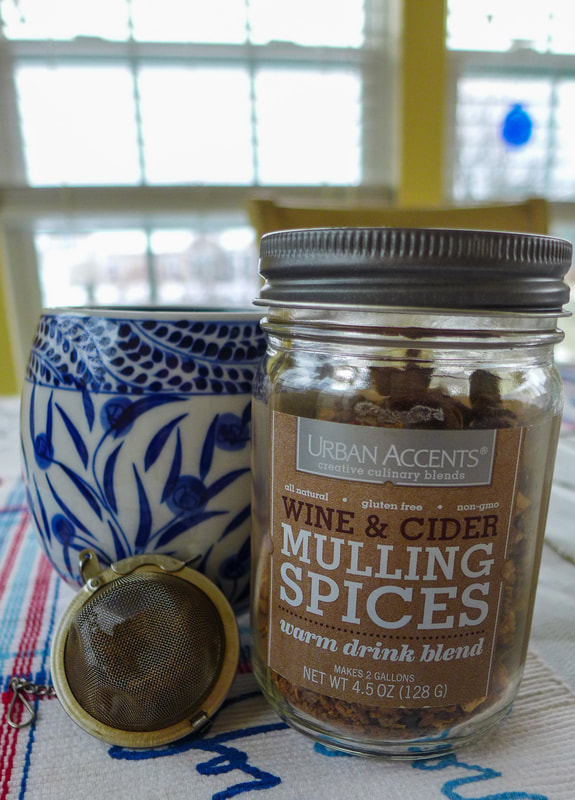
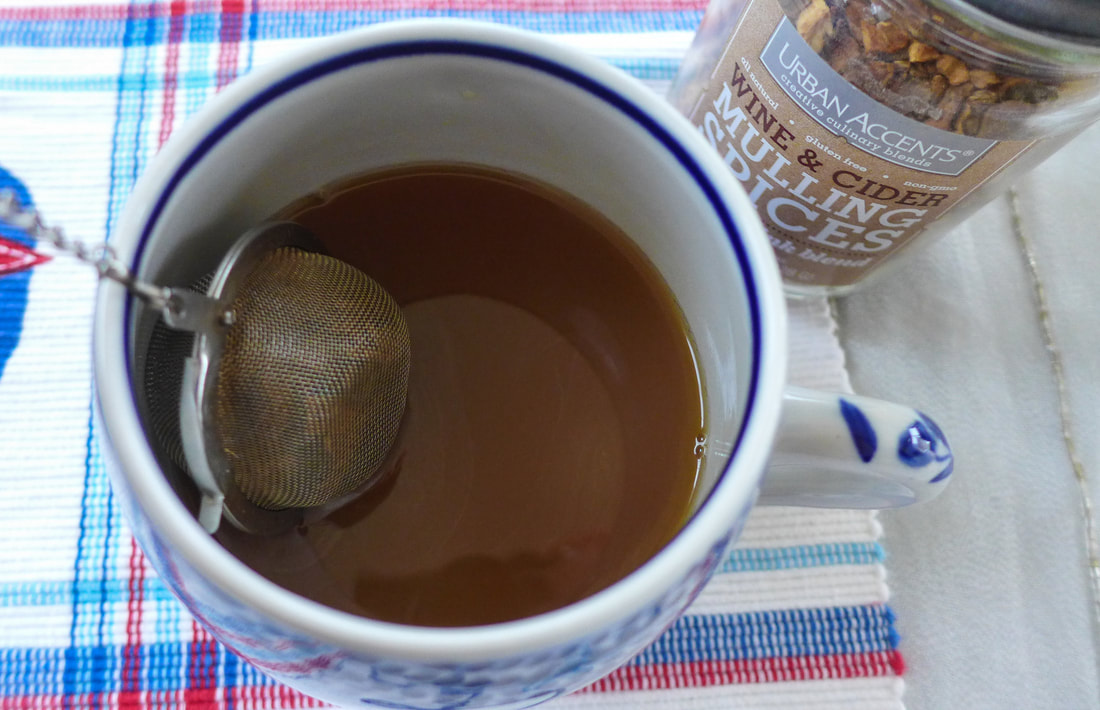
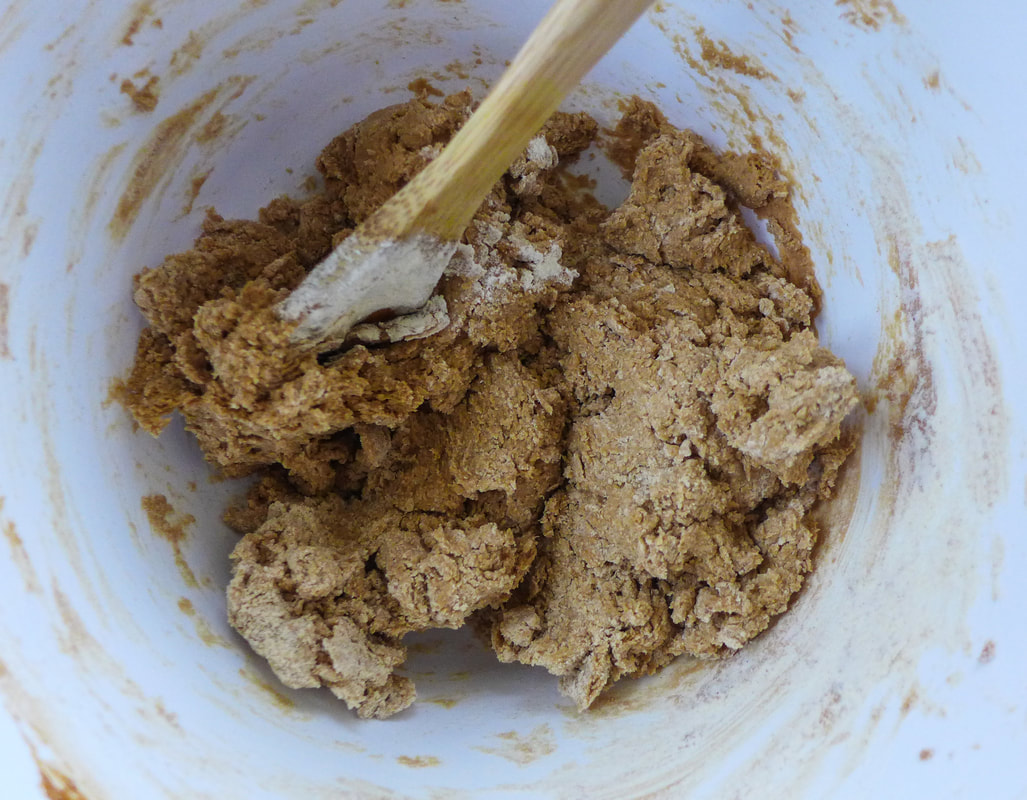
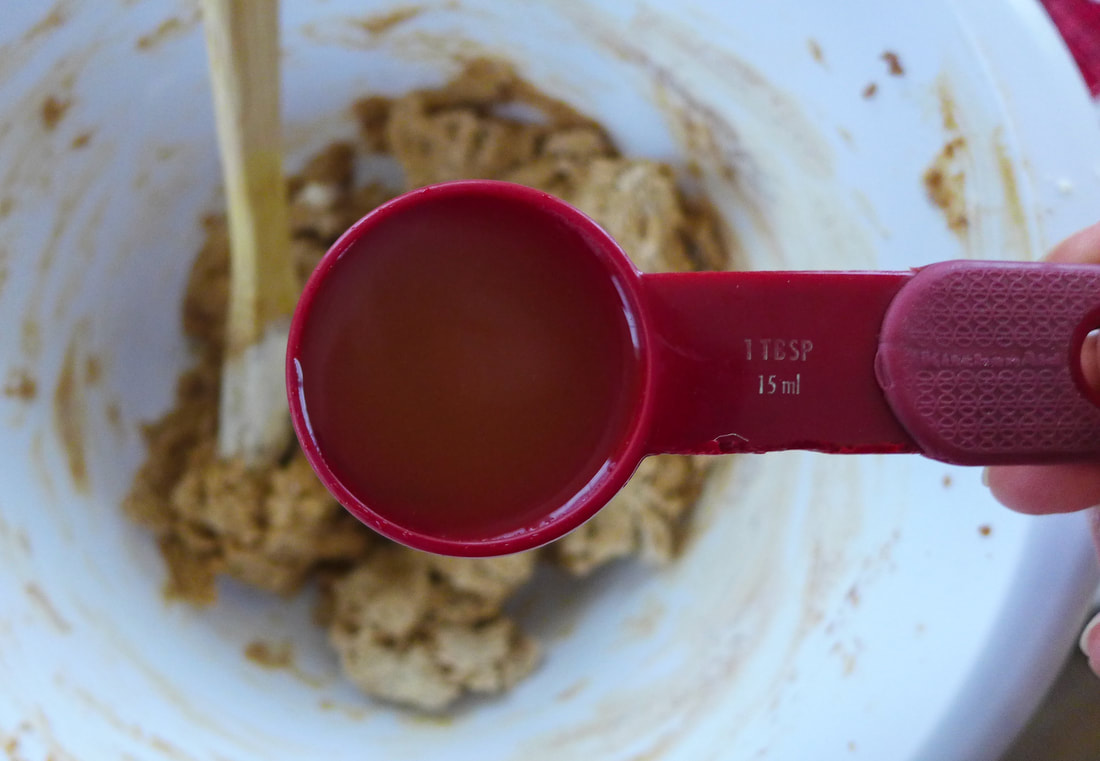
 It's been awhile, I know... It's been forever it seems since my last post (Halloween, anyone?!). I have been finding it difficult to juggle photography with my work schedule since it now gets dark around 4:30 PM. Not the best situation for light quality! I haven't stopped cooking or baking, though. I've already made many batches of Christmas cookies for various events. It's great that I get to try recipes out beforehand. There are many more I'm going to try before the month is out too! This recipe that I'm sharing with you today is a riff on my staple snickerdoodle recipe. I love snickerdoodles. They're my favorite cookie. I've said this many times. So, you can imagine, i am quite particular with their taste. I love a simple coating of cinnamon and sugar. Nothing beats it. Nothing, except, maybe chai snickerdoodles? Chocolate snickerdoodles? MULLED CIDER SNICKERDOODLES?! Nevermind. I'm not that particular. As long as they taste wonderful. And let me tell you: these "doods" taste wonderful. That is now their official nickname. These cookies have only a couple, albeit important modifications. Instead of the original recipe's addition of non-dairy milk to the dough, I added two tablespoons of mulled (spiced) apple cider. You can buy spiced cider at the store now, which is a nice time saver. If you don't want to purchase it, you can make it at home much like a cup of tea. I put some whole mulling spices in a tea ball and steeped them in a mug of hot cider until the liquid cooled. Since you only need two tablespoons (if that), you can drink the rest. You deserve it. As for the coating of the cookies, I added the same spices that I used for the cider. My blend included anise, cloves, cinnamon, and allspice. A wonderful and aromatic combo that makes the whole kitchen smell like the holidays. That's really all you need to do to these to change them from their base form to totally festive AF. The texture can change quickly if you add too much liquid to the dough, however. Be careful to evaluate the dough for its moisture content before adding the second tablespoon of cider at the end. You may not need it! Mulled Cider Snickerdoodles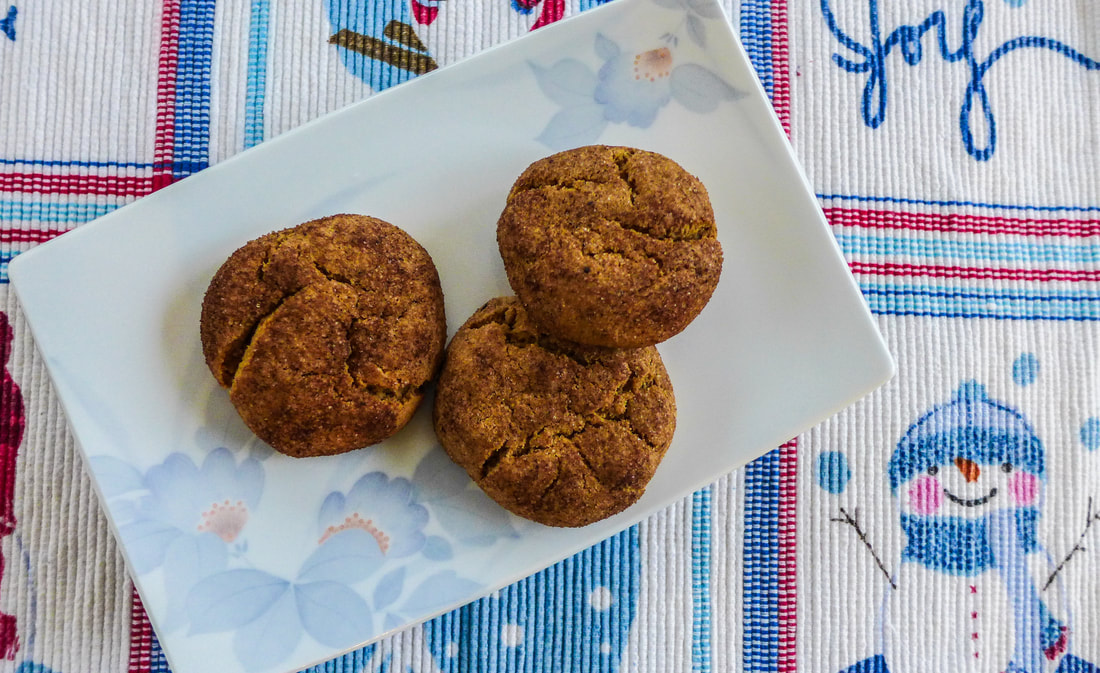
Instructions Oven set to 375 F.
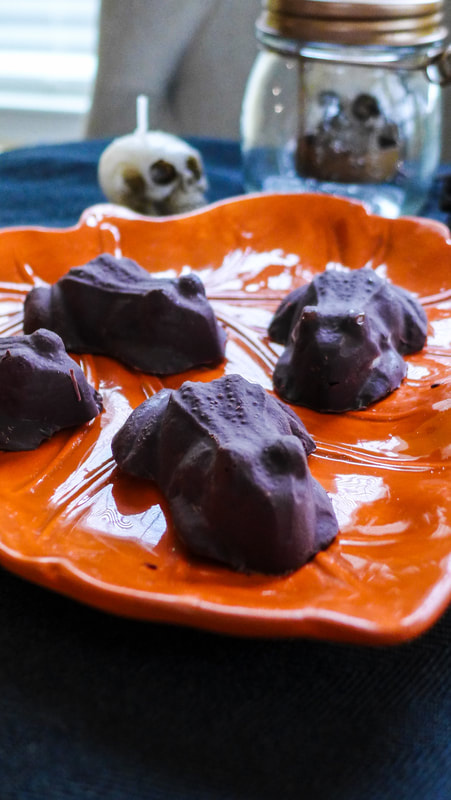
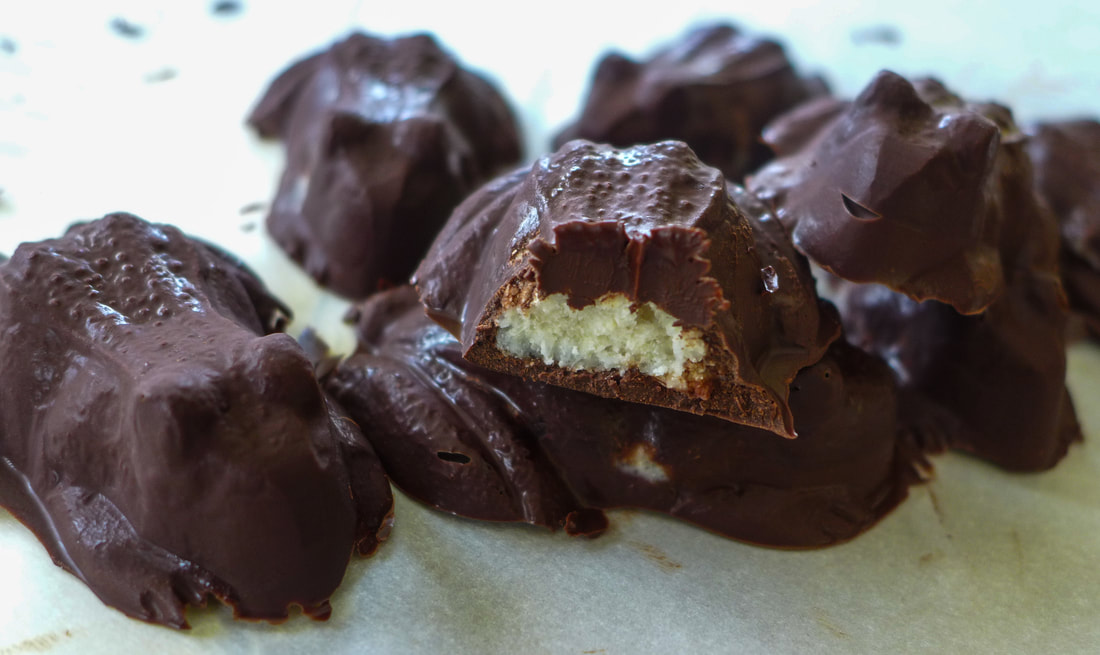
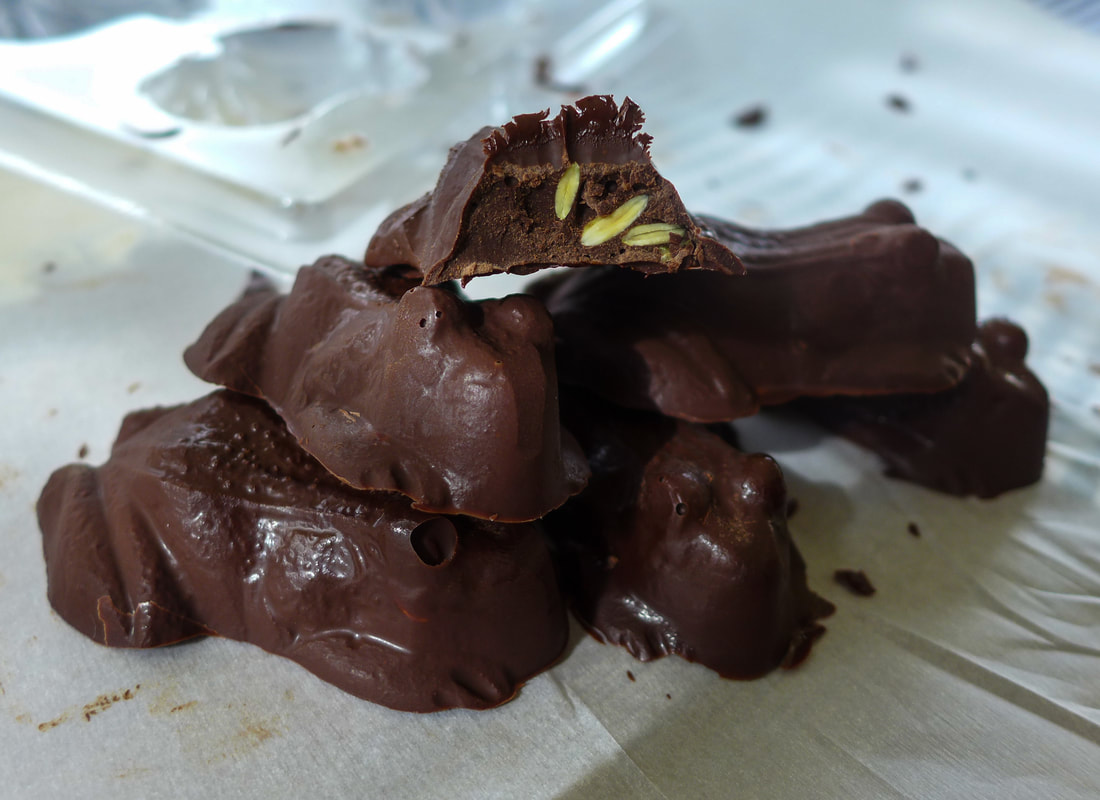
 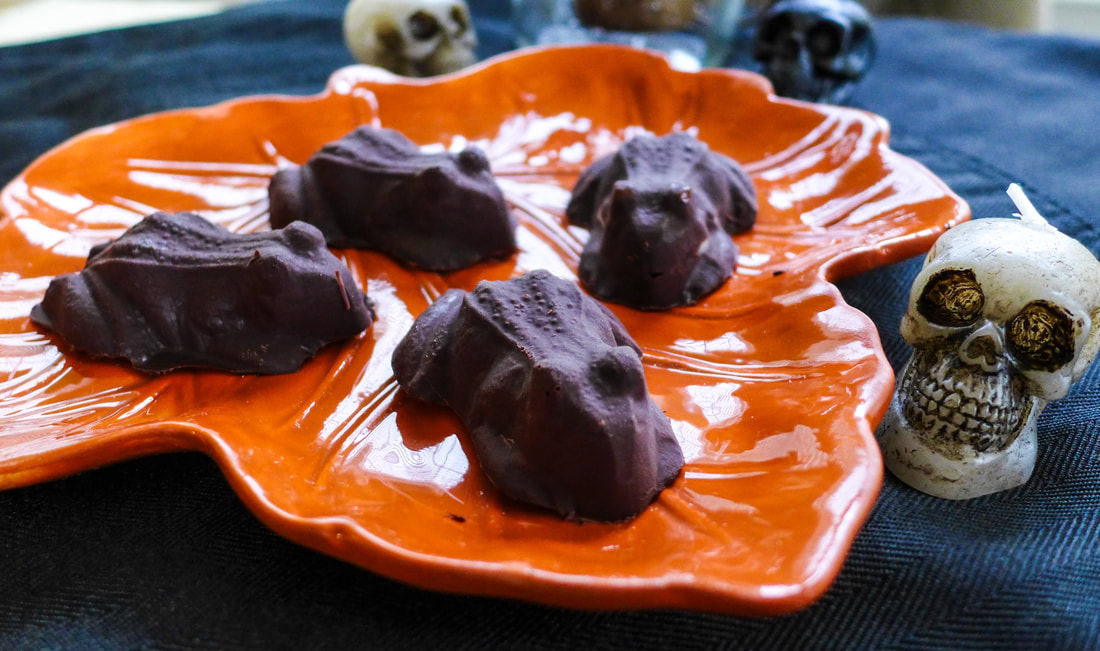 For my Halloween post, I wanted to make something chocolate and fun, but still pretty simple. So often it is difficult to come across vegan chocolate candy to purchase. I love all the chocolate bars...they were my favorites growing up. I'm not a huge fan of fruit flavored candy with the exception of Skittles and Twizzlers. Luckily, they're both vegan (though not healthy at all) so I still get to indulge in them once in a while. Chocolate bars, at least conventional ones, are very much not vegan (with the exception of Peanut Chews, which are accidentally vegan). I usually just end up buying a bar of Endangered Species dark chocolate as a treat sometimes. I'll break off a square here and there if I want something sweet, bitter and caffeinated. Sometimes, though, I like to have a little fun with my chocolate! It brings me back to my bakery days... We used to make chocolates using various molds for holidays, cake garnishes, and special orders quite often. I decided, since I don't own one, to buy a chocolate mold for myself. This is my first investment: frog molds! Because, duh, CHOCOLATE FROGS! I've already posted a recipe for rock cakes this year. I decided to take my Harry Potter inspiration to this post with vegan chocolate frogs. I couldn't get these frogs to move on their own, unfortunately (but not from lack of trying). They are, however, delicious. The best part about them is that they are whatever chocolate you would like them to be. You can choose your own percentage of dark chocolate, make chocolate from scratch, buy vegan milk chocolate, or even vegan white chocolate! I decided to use vegan chocolate chips for mine since they were readily available. There are a ton of raw chocolate recipes out there, though. Check them out and experiment! The mold will always be there waiting for you. I made two flavors of frogs here. The first one is stuffed with vanilla coconut butter. I wanted to try my hand at making homemade coconut butter finally. I saw a post from Chocolate Covered Katie forever ago about how to do this and I've wanted to ever since! The Minimalist Baker also has a great tutorial. But, in a nutshell, you're basically pulverizing dried coconut until it becomes a paste (nut butter-like) consistency. It takes a lot of patience, but it's so worth it! Coconut butter comes with a high price tag in stores otherwise. This is a great economical option if you're going to use it for a recipe especially. The other frogs are pumpkin spice flavored. No, there's no actual pumpkin in them. However, there are pumpkin seeds and pumpkin pie spices. They're deliciously festive for Halloween! The pumpkin seeds are also a good nut-free alternative for those who are allergic. There are instructions provided here for you, but feel free to take the idea and run with it! Chocolates are easy to make and even easier to customize. I recommend storing these in the freezer long term. If you want one, take it out and let it come to room temp before enjoying! If you will be consuming these quickly, keep them in the fridge. Have a spooky day, everyone! 🤡😈☠👻👹🌕 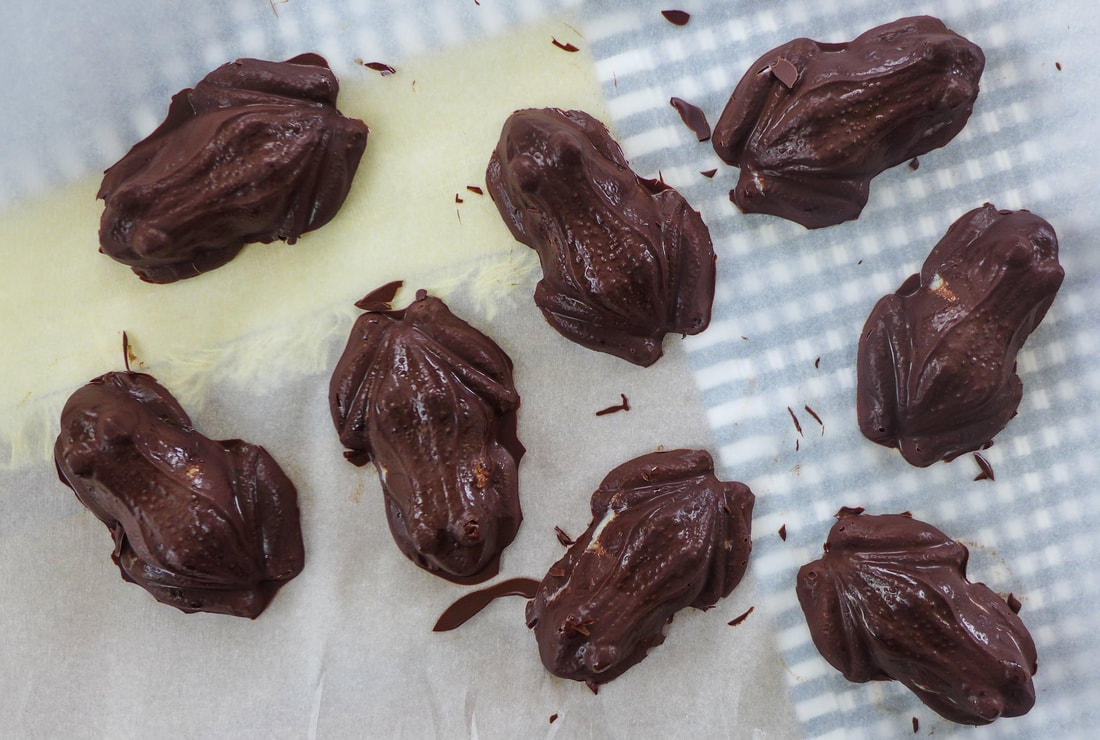 Vegan Chocolate FrogsIngredients Yield: Makes about 12 frogs depending on the size mold you use Free from: Nuts, Gluten, Soy* *Use soy-free chocolate for this option
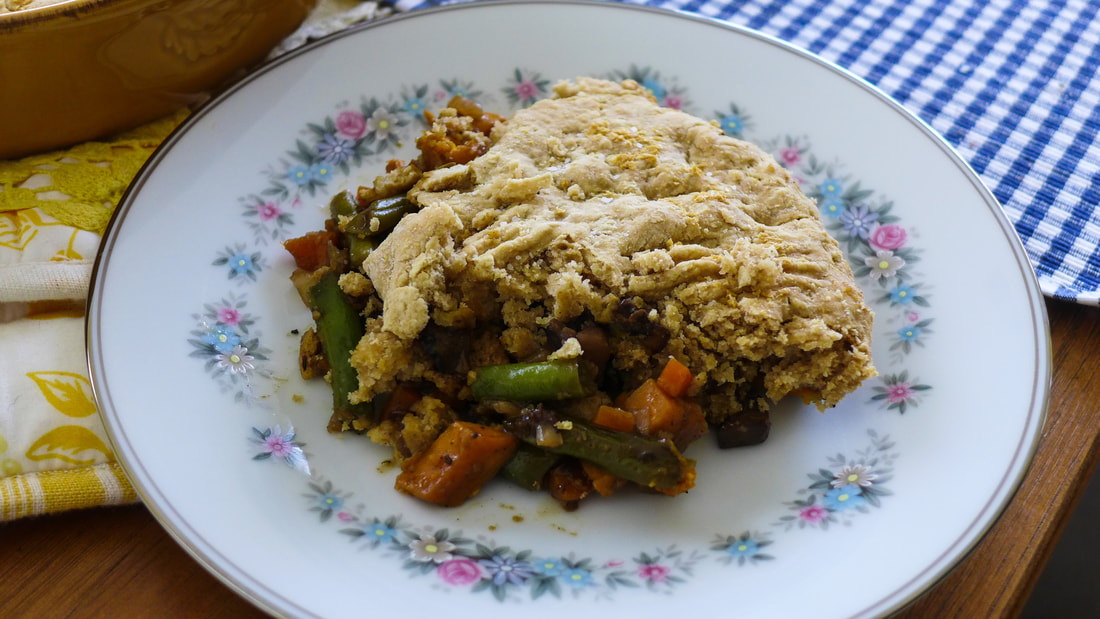
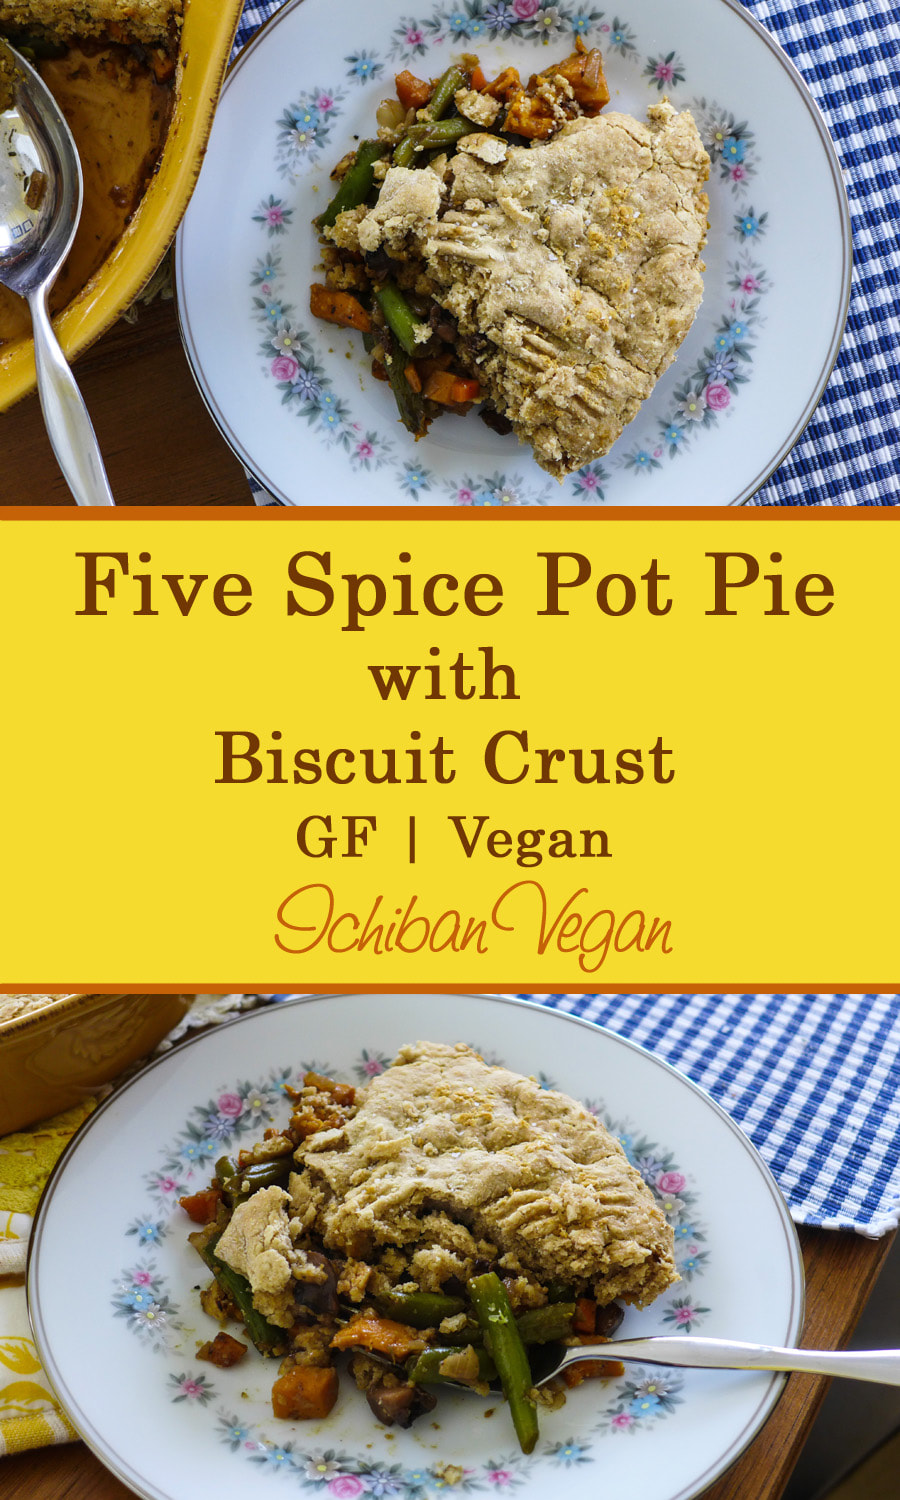 Five Spice Pot PieIngredients Yield: 1 pie, about 5 servings Free from: Gluten*, Nuts *Use appropriate ingredients
Instructions Preheat oven 350 F.
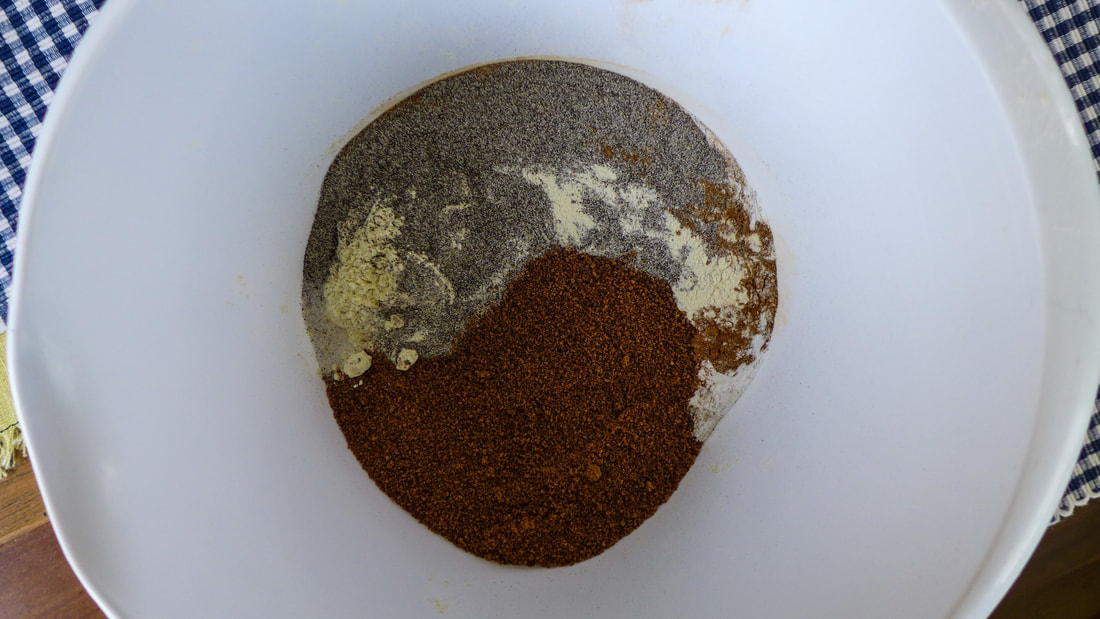
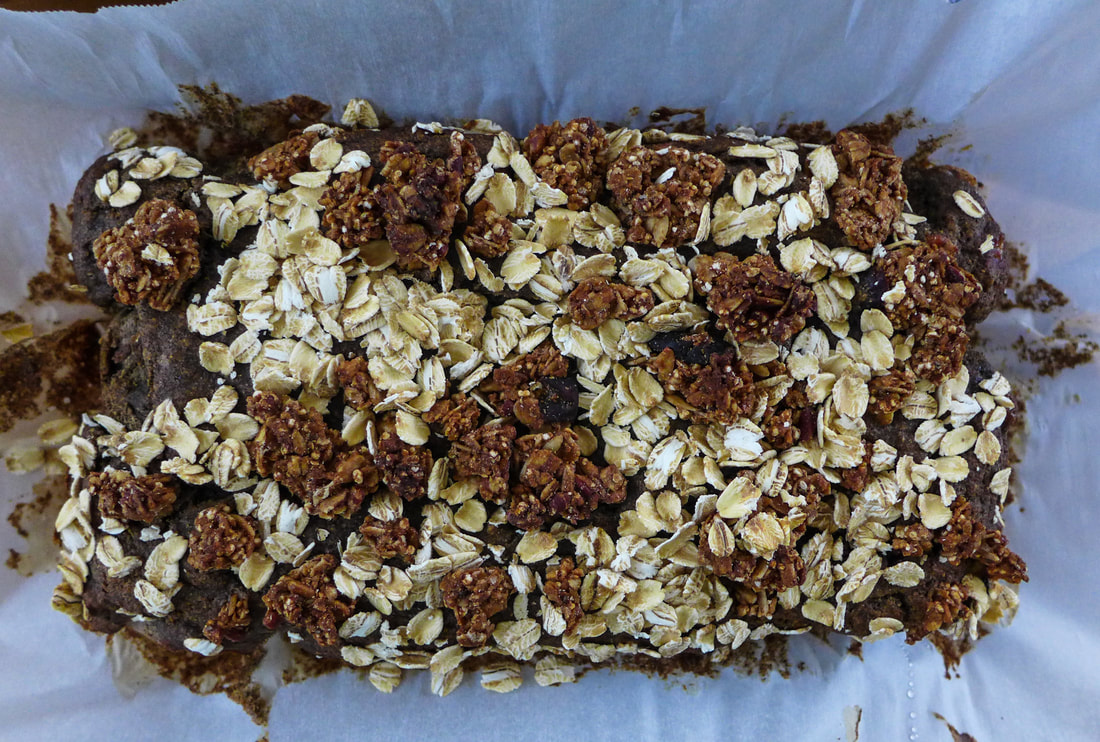
 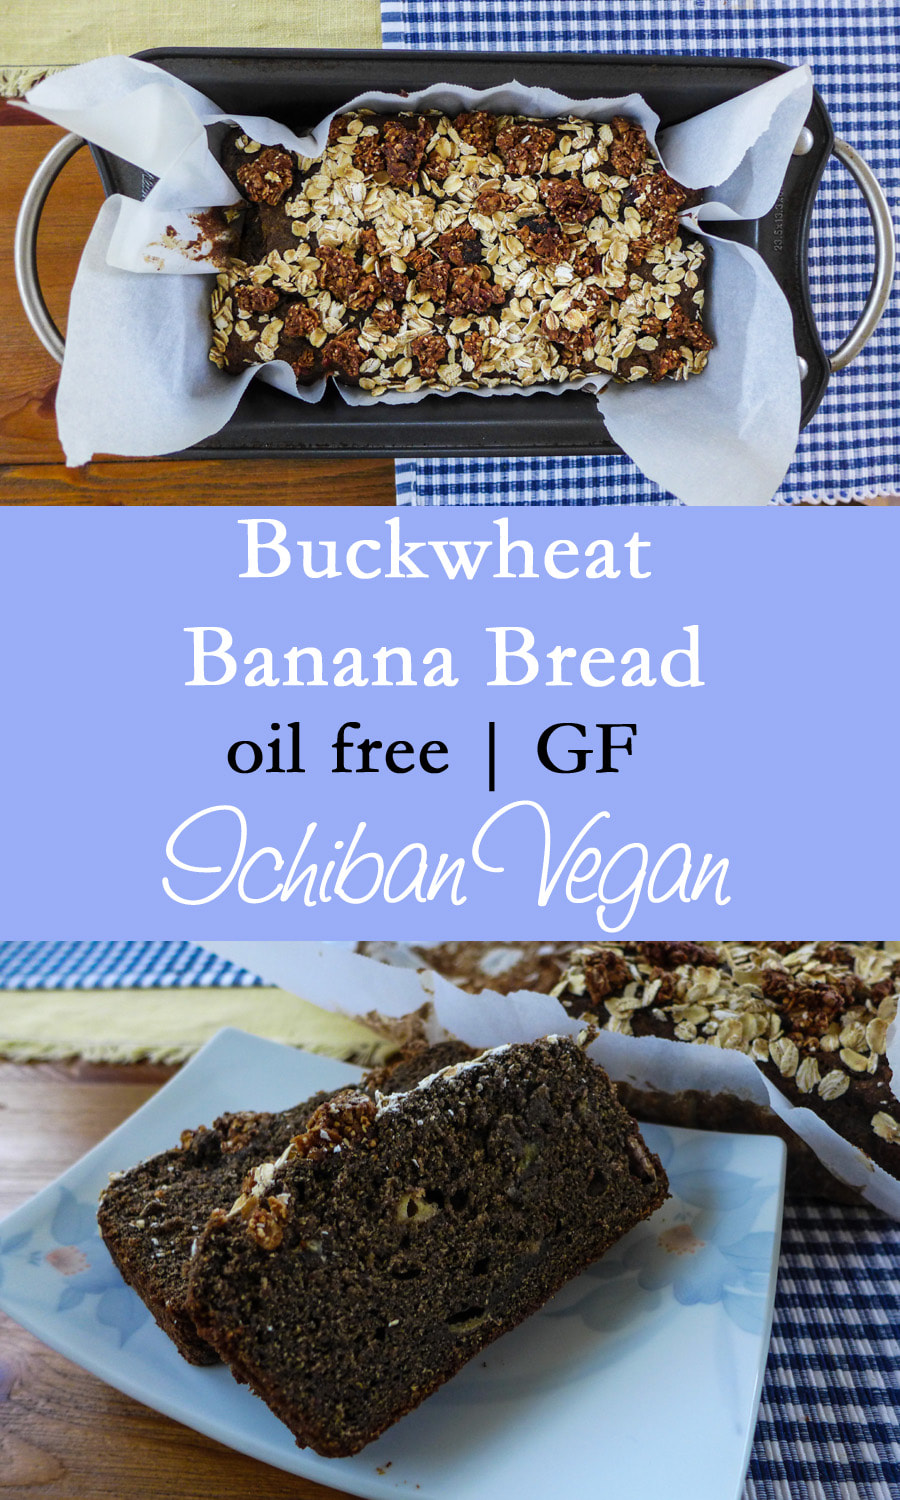 This is my response to the "unconventional grains" prompt! I love to bake with different grain flours often since most of my baking is gluten-free. I've experimented with all types of grain flours and some grain-free as well. I find that there is no "one" magical flour that can be substituted for wheat flour in a baking recipe. Gluten-free flours must be combined in order to achieve an optimal texture, fat content and taste for different applications. I find that my favorite "all purpose" gluten-free flour blend is good old Bob's Red Mill. I like to combine this all purpose blend with other grain flours for awesome texture. This flour is also good as a 1 to 1 substitute for my purposes, I find. I make roux with it, dust surfaces, and use it alone for simple baked goods like biscuits. I've never found another flour blend that does it quite like this one for me. I also really love the flavor, which some people might not be partial to because it contains chickpea flour. Some people say it makes whatever you cook taste like falafel. I'm not in this camp but it's all a matter of taste, I suppose. This recipe came to me one day when I was using leftover bananas to make banana bread. The original version was made with quinoa flour instead of buckwheat. Upon my second time using this recipe, I found that I actually like the buckwheat flour much more! The banana bread is wonderfully moist, sticks together, is dense but rises nicely, and has a depth of flavor that transcends just "banana and sugar". I also love the nutrition that the buckwheat flour brings to this recipe! It's got a good amount of protein and fiber! The only downside that I can possibly see with this recipe is its darker color. You can't really see the banana in there unless you look closely. I don't mind this too much. It's dang tasty and that's all I really care about. I took the liberty of sprinkling some granola and trail mix on top of my banana bread. You can do this if you want some more texture and crunch as well. Alternatively, whip up some streusel and sprinkle that on top! How can that be bad? Feel free to spread some of your favorite nut or seed butter on top of a slice of this for a hearty breakfast. Since there's no added oils or fats in this bread, you can control the type and amount of fats you add to it for a well-rounded meal! Enjoy! 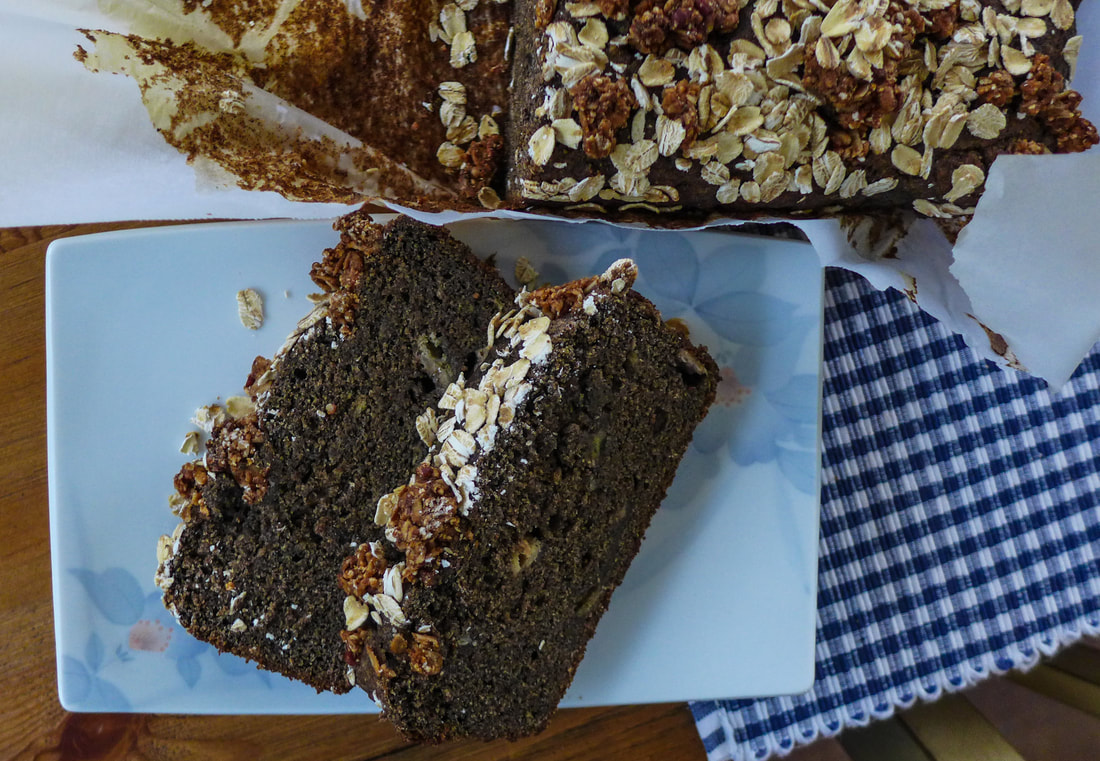 🍌🍌🍌🍌🍌🍌🍌 Buckwheat Banana Bread (Oil Free)Ingredients Yield: 1 loaf (9x5 pan) Free from: Gluten, Soy*, Oil*
 Instructions Preheat oven to 350 F.
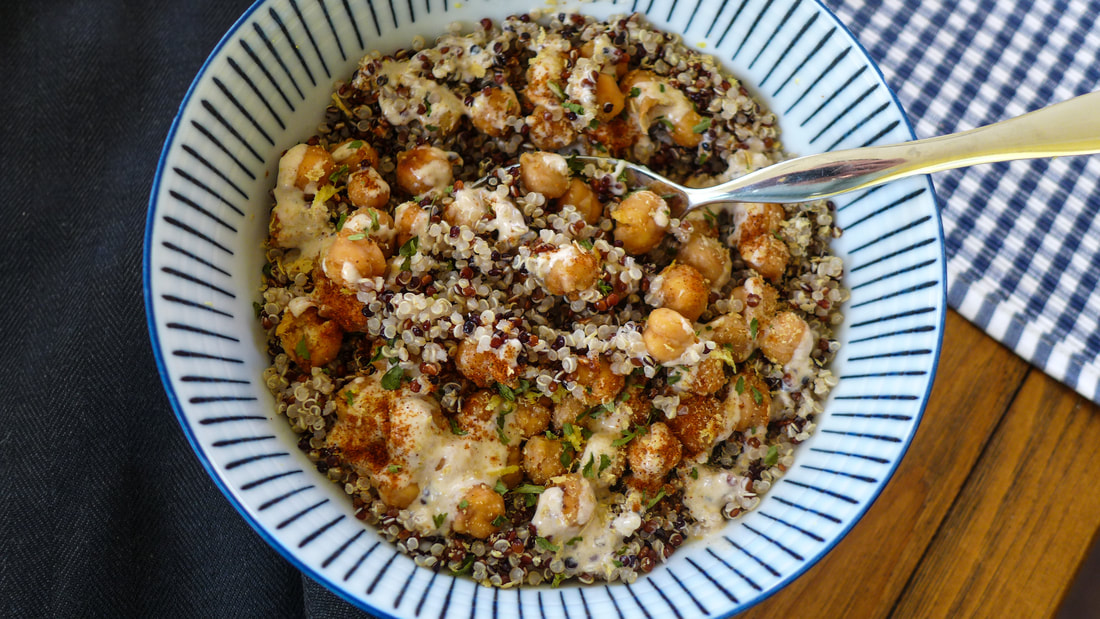
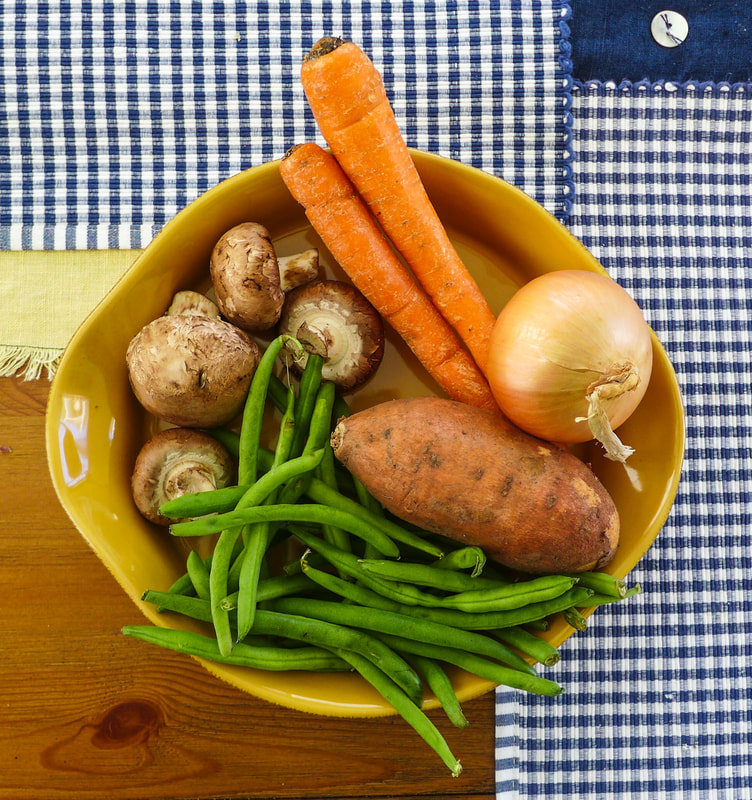
 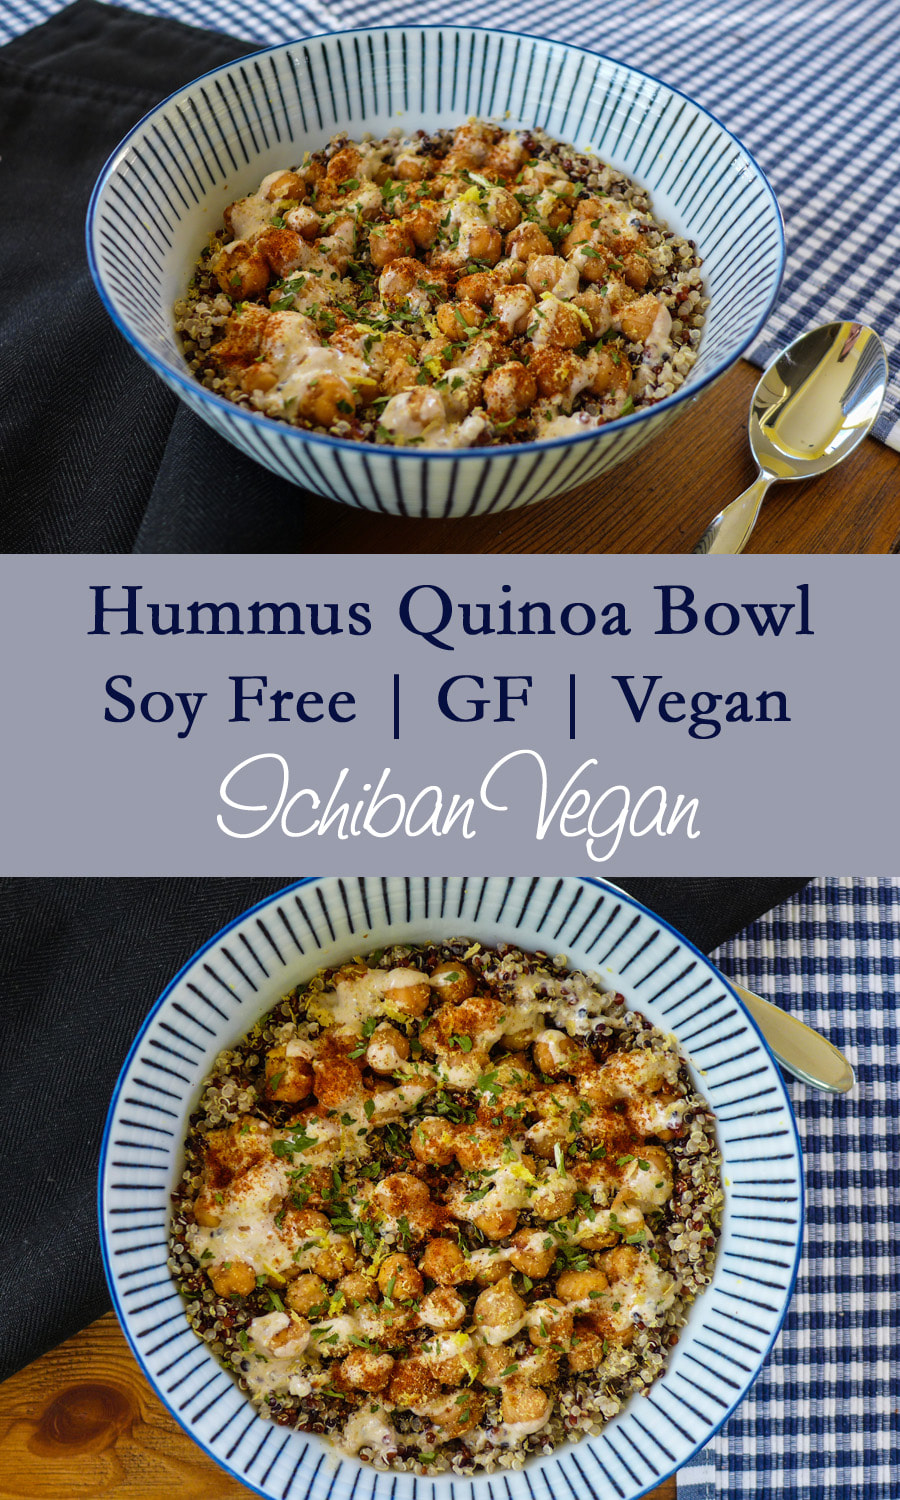 While I love today's prompt for "deconstructed" dishes, I didn't want to get too "fancy" with it. I'm all for fancy food, but not when I'm deconstructing something. I like deconstructing dishes into their individual star ingredients and just preparing them differently. I also love to eat food out of bowls, though. I'm not a huge fan of plates because I feel as though I have to work to eat my food off of a plate. When there are multiple elements to a dish, I find they are best enjoyed layered on top of one another. The only time I like to eat off a plate is when I'm eating a sandwich type food that is already contained. The hummus quinoa I made today would be TERRIBLE on a plate. Especially since quinoa likes to go everywhere. Whenever I make quinoa, I always find little grains on the counter no matter how careful I am while using it. This bowl is my answer. Keep that quinoa on the bottom and pile the stuff on top so it stays put! It also creates a soft little bed for everything to nestle into! I made the chickpeas the main star of the dish, of course, but I roasted them whole rather than their usual role in hummus as the puree. I love roasted chickpeas because they become nutty and almost "cheesy" if I can say that ("buttery" perhaps is a better description). Although they're the main component, I must say my favorite part is the sauce I made... Tahini is used in hummus often to create a creamy texture and add flavor. I used tahini here as a drizzling sauce mixed into whipped aquafaba. The resulting sauce is an oil-free (but not fat free, of course) aioli-type sauce. It holds up but isn't too thick. The flavor is delicious and nutty with a hint of mellow sweetness from mirin. Garlic is everywhere in there too, because garlic is one of the best parts of a good hummus. To keep this dish truly oil-free, you can omit wherever it calls for olive oil. It won't change your results too much at all. Deconstructed Hummus Quinoa BowlsIngredients Yield: about 5 servings Free from: Gluten, Soy, Nuts Roasted Chickpeas
Quinoa
Tahini Sauce
Garnish (optional): dry/fresh herbs, paprika, olive oil, raw cut veggie slices 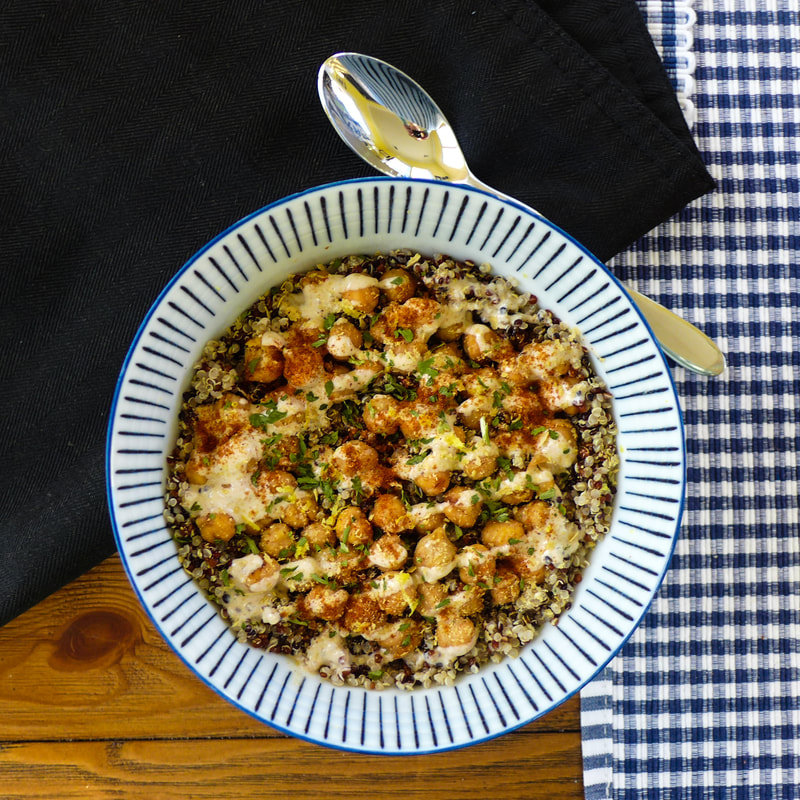 Instructions
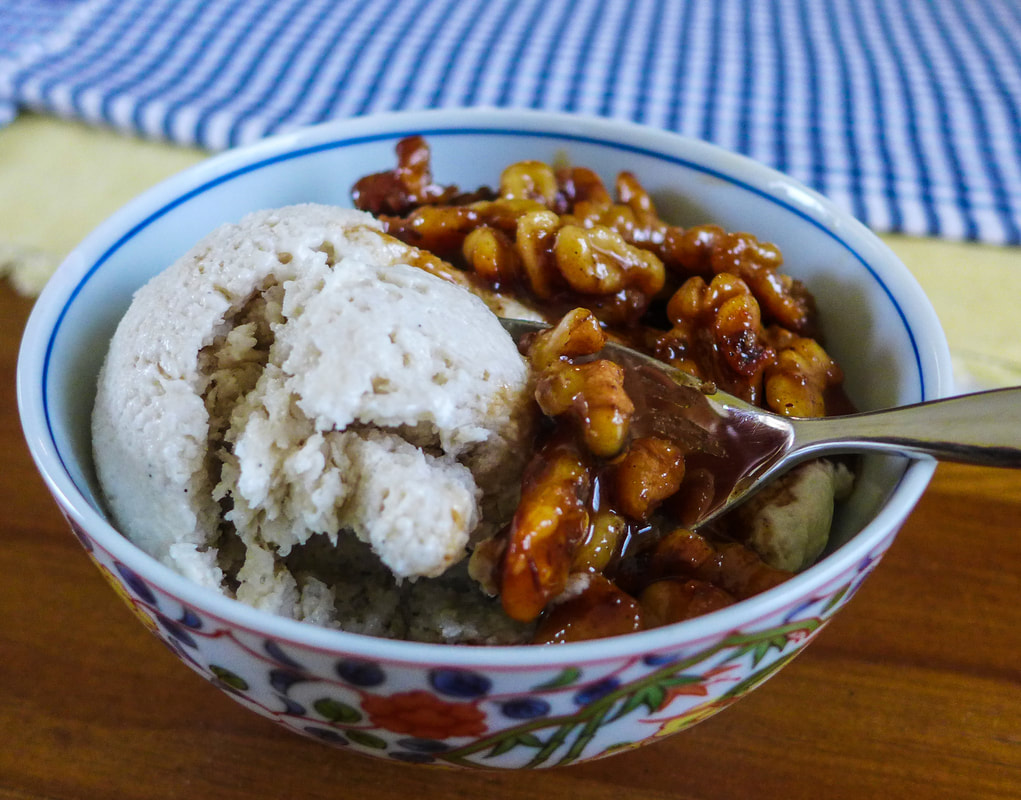
 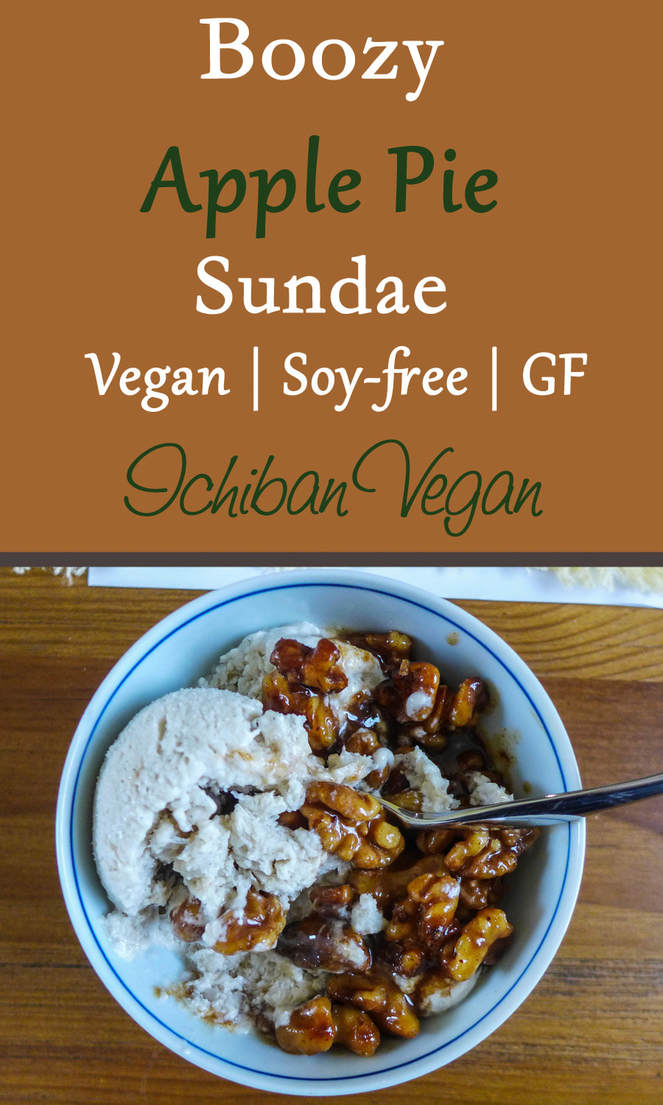 Today's post doesn't require much of an explanation. I love wet walnuts. I first encountered them at Dairy Queen (I worked there in high school). A lot of our customers loved them and I never understood why since they looked a little unappetizing. I tried the topping at one point and thought it tasted okay, but not fabulous. Later in life, I learned that I loved nuts in ice cream A LOT. One of my favorite flavors to this day is butter pecan. I also love rocky road, moose tracks, etc. The wet walnuts I made for this simple (yet boozy) sundae are infused with the tart bite of hard apple cider, sweet maple syrup, and apple pie spices. There isn't anything more "fall" than the smell of apple pie on your ice cream. The ice cream I made is a simple vanilla bean flavor (with bourbon, though). Again, I've always loved simple ice cream flavors. Vanilla is as basic as you can get with ice cream, but it's the base for EVERY FLAVOR. Any and all flavors of ice cream need to have vanilla extract in them (if they're sweet, of course). The vanilla gives the ice cream the essence that it needs to be rich and creamy and fragrant. I loved the fresh vanilla bean taste in this recipe. Using vanilla paste will give you a similar effect. ' The combination of the bourbon and cider is also very "fall". There's a great cocktail that calls for bourbon and apple cider. Not sure if it has a name, actually... Either way, it's pretty delicious hot or iced. The wet walnuts I made were chilled when I served them over the ice cream. If you're not opposed to your ice cream melting a bit, heat the walnuts up slightly for a gooey treat! I also included a link below to a recipe for raw apple pie filling, which would be a wonderful addition to this sundae. There's already a delicious apple bite from the walnuts, but why not accentuate it?! Enjoy and don't sundae and drive. ;) Boozy Apple Pie Sundae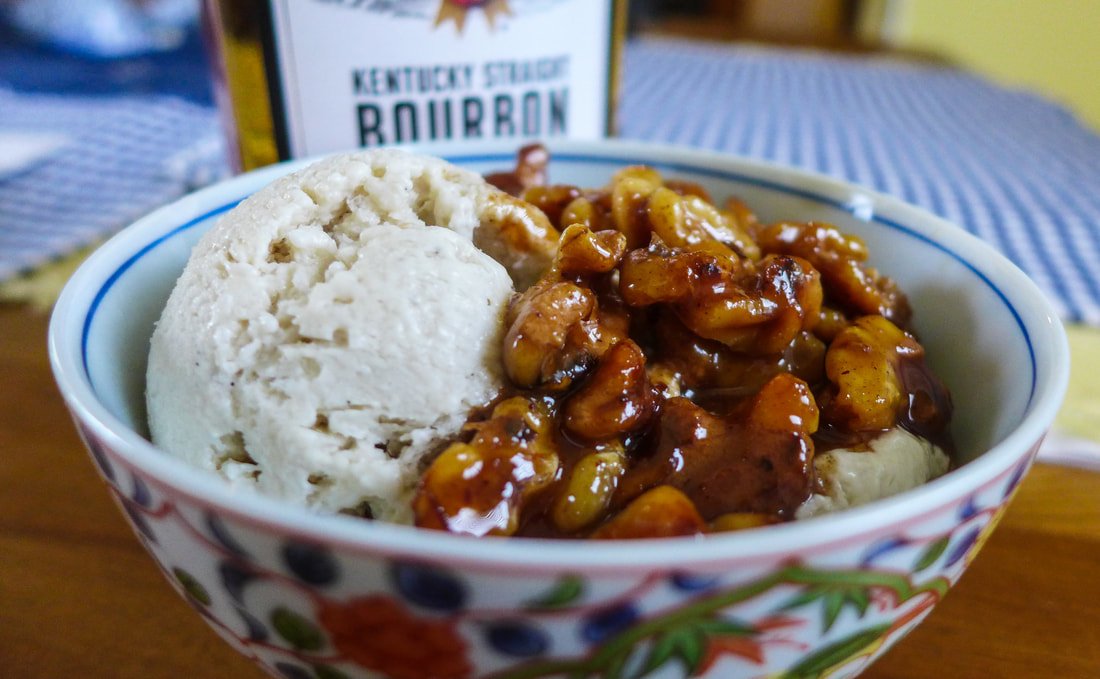 Ingredients Yield: about 6 servings Free from: Soy*, Gluten *Use appropriate ingredients for this option Bourbon Vanilla Ice Cream
Hard Cider Wet Walnuts
Toppings of choice (here's my raw apple pie filling) 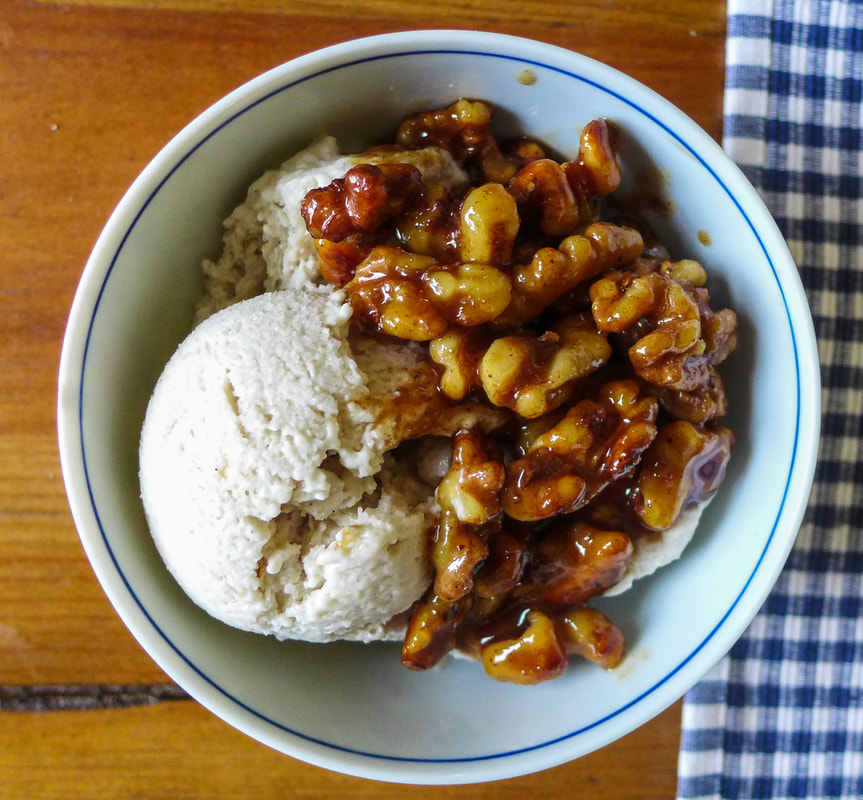 Instructions
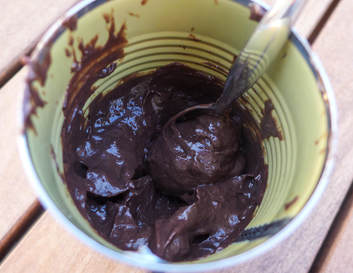
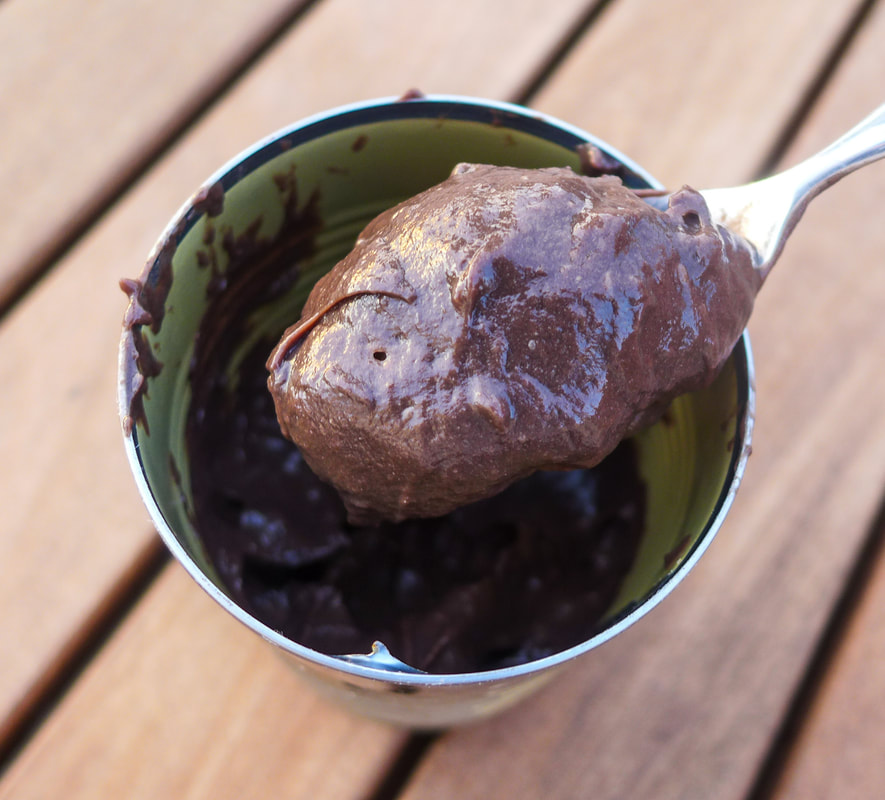
 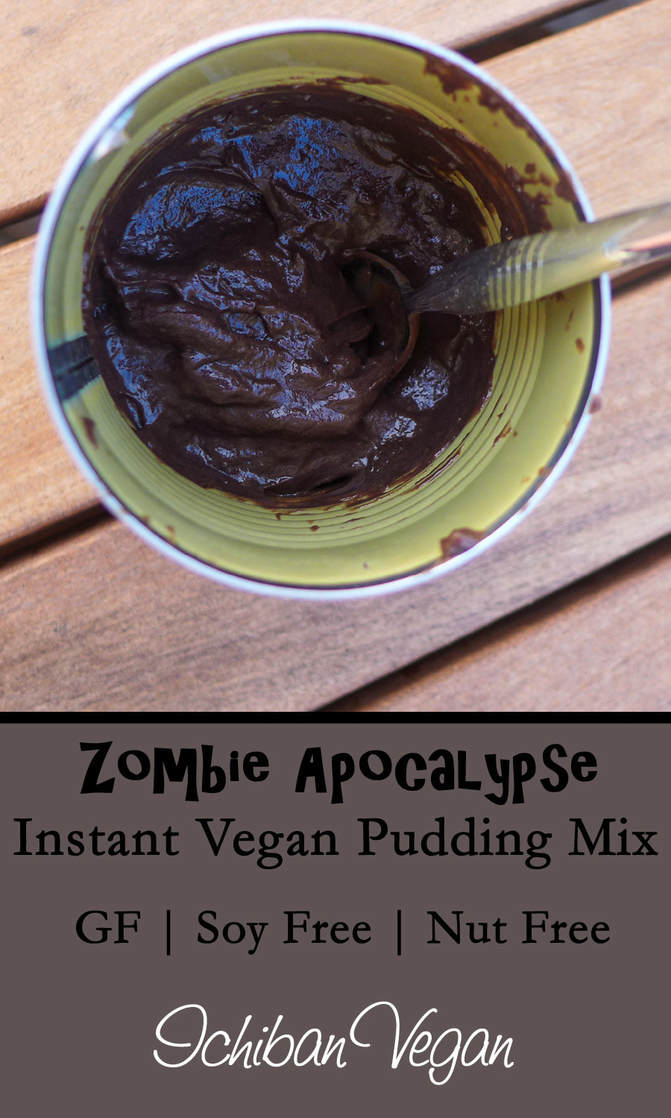 So, I don't always think about zombies taking over the world... But, when I do, I think about what I would eat (like, as a human still. otherwise, brains? faces?). Anyway. As a vegan, you're pretty limited out in the wild. Unless you're on a tropical island that has coconut and banana trees, you're stuck foraging in the woods for mushrooms and plants to eat. And, unless you're very knowledgeable, picking out which wild mushrooms to eat is a risky task. Then again, you could be zombie chow at any moment, so go ahead and eat that mushroom over there. What's the worst thing that can happen, right? Other than toughing it in the wild, we vegans can subsist on found pantry foods while looting grocery stores and empty (hopefully) houses. I like to imagine myself busting into someone's pantry who has since either passed, turned, or just wandered away from home in search of chocolate pudding. Little did they know, they had everything they needed right there!  And apparently they used to shop at Whole Foods! I took inspiration for today's prompt from The Walking Dead. I'm a long time watcher of the show and I've read a bit of the comic, but not enough to call myself an expert by any means. I like the concept, most of the characters, and the dramatic moments that make me cringe with fear. Last season's premiere was absolutely brutal. Anyway. I've always had a dislike for Carl. Don't ask me why. The kid just annoys me. I did, however, like the scene in the TV show where he's pigging out on chocolate pudding out of a can that looks like it's probably over 10 years old. He's sitting on a roof with one shoe on while a zombie is trying to nom him from inside the house. This entire scene made me laugh because it's the only instance that Carl seemed relatable to me. I could see myself in his shoe at that moment. Sometimes you have to get away from it all and have some "me" time. Also, as I thought about it, I realized chocolate pudding would be the ultimate survival food if made from shelf stable ingredients. You could make it easily with a few ingredients that are fairly common, have a long shelf life, and only require minimal cooking (if you absolutely want it to be authentic). This is also a great meal if you add protein powder like I did. If you're gonna run from zombies, you better be well fueled. Alternatively, you could mix all the ingredients together with the shelf stable milk and just drink it like a protein shake. It's liquid pudding. If there's anything that separates us from the zombies its our ability to enjoy things like liquid pudding, everyone. On to the good stuff...☠🍫
Vegan Instant Chocolate Pudding MixIngredients (If you can find them! Mwahahaha) Yield: About 2 servings Free from: Soy*, Gluten, Nuts* *Use appropriate ingredients for these variations
Instructions
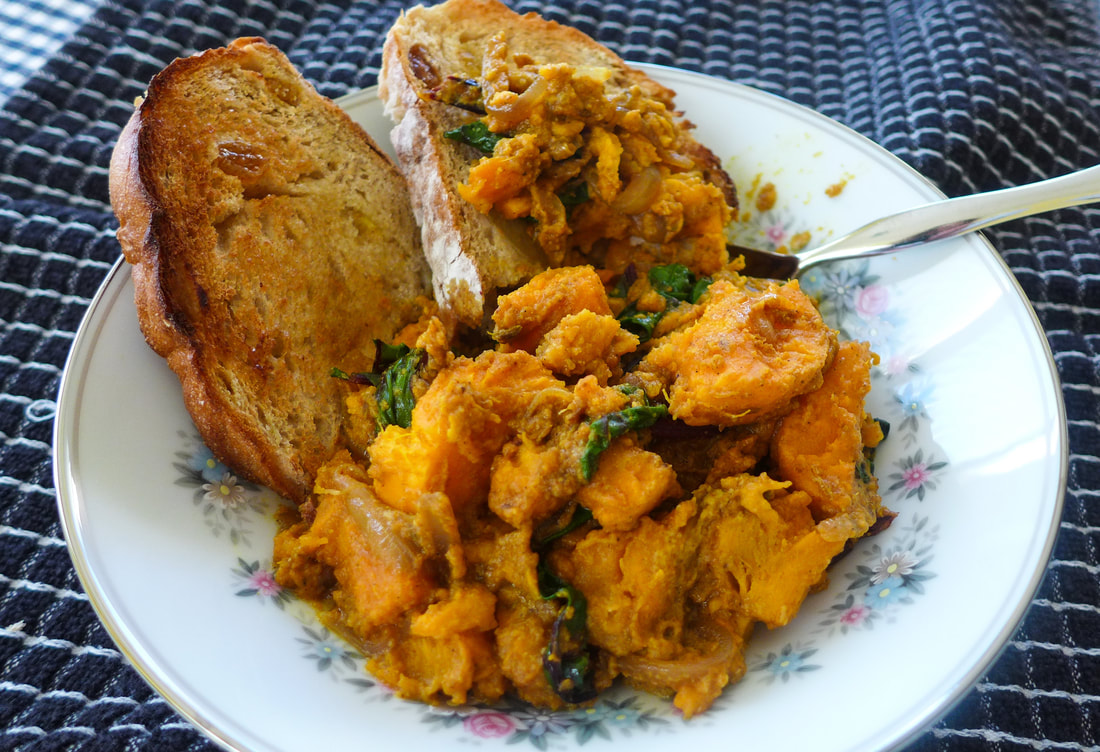
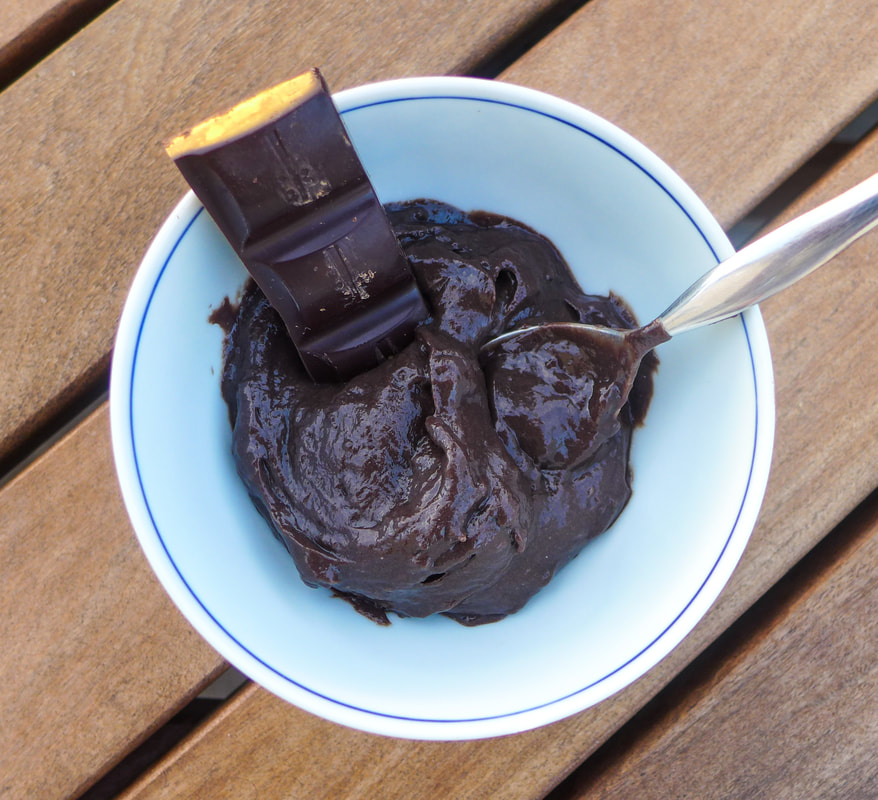 Here's a nicer photo...if you were to eat it while NOT running from zombies!  Best enjoyed from a can. 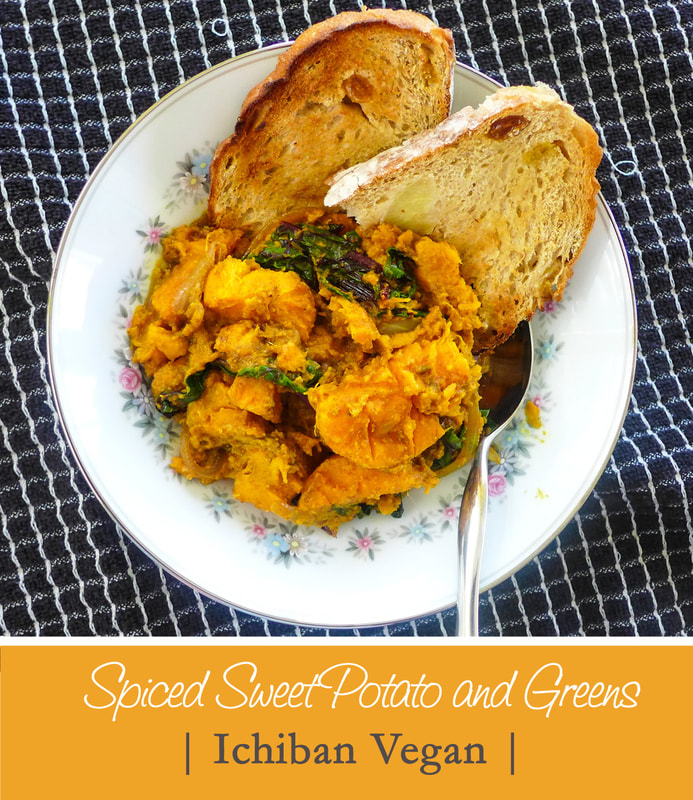 Today's prompt is everything that I love about this time of year: SPICES!  Not that spice... I love warm spices. They always seem to find their way into my recipes in some form or another. I use cinnamon in almost everything. As I developed a taste for other spices, I discovered that I loved curries and stews with warm spices as well. I think savory applications of spices are my favorite simply because they offer unique depths of flavor. I love how the addition of spices to a simple chili or stew can create so much aromatic flavor. One of my favorite foods in the fall and winter is sweet potato. Sweet potato is always known for its ability to carry sweet spices in desserts. I wanted to add spices to sweet potatoes this time in a more savory way. The blend that I created is nothing extraordinary, but it creates a wonderful combination of smoke, earthiness, and sweetness. The flavors are wonderful when mixed with the mellow sweetness of the potatoes. I added some bitter beet greens and sweet onions into the mixture as well. The simple blend of veggies is a wonderful meal on its own or can be served with a bread or grain of your choice. I didn't create my own garam masala, but definitely do so if you're feeling up to the challenge. One of these days, I'd like to create my own spice blends. I've heard that fresh whole spices ground at home are the best. In addition to these spices tasting great, they also offer some wonderful medicinal properties (especially that turmeric). This mixture would also be a great breakfast to avoid any sugar crash during your day. Also, it would make a fabulous side dish for Thanksgiving. Just throwing that out there (it is next month, after all). Enjoy and feel good about it! 🍁🍂🍃🌰🍠 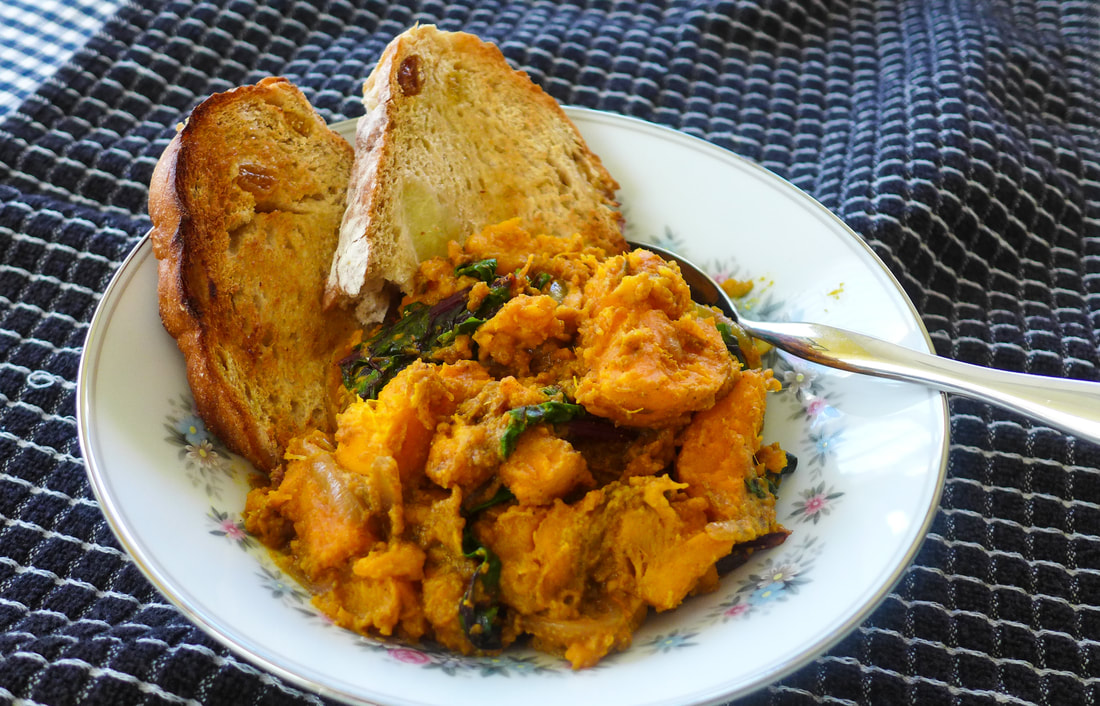 Spiced Sweet Potato and GreensYield: About 4 Servings Free from: Gluten*, Soy, Nuts, Grains Ingredients
Serve with bread or grain of choice, optional Instructions
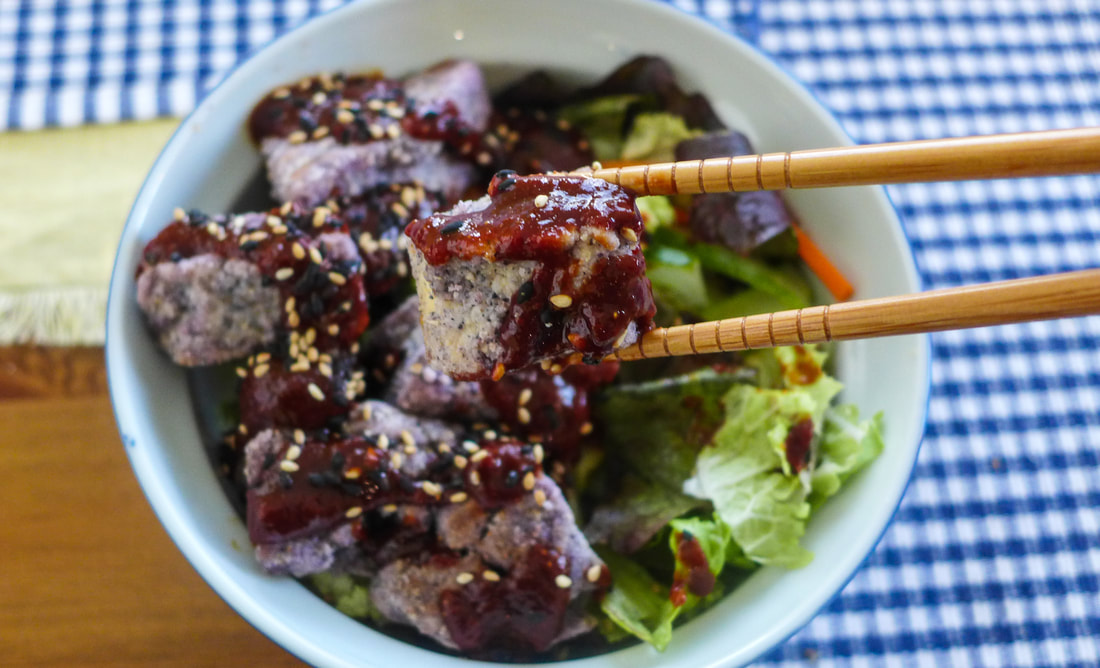
 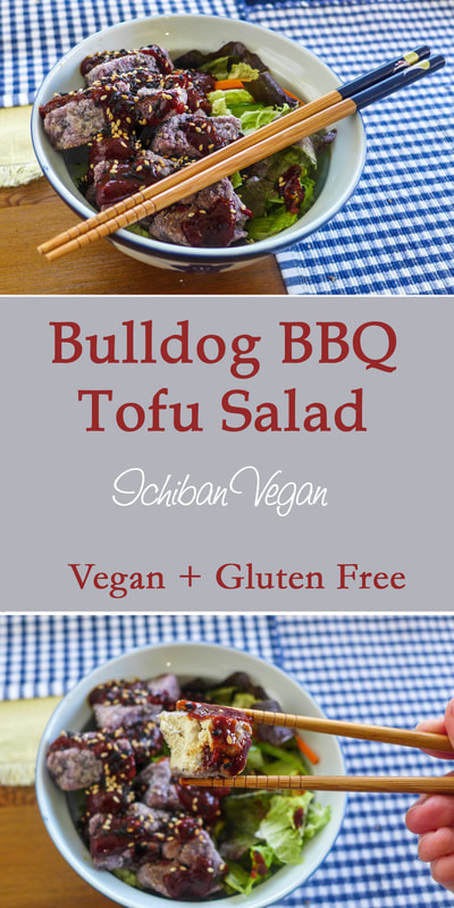 I think as vegans, we can all relate to Lisa Simpson on one level or another. Whether you're at work, with friends or family, or at a wedding (ugh), you can bet that you will be in the dietary minority (unless you're only around fellow vegans all the time, which, congrats). I get strange looks all the time from people when I politely decline their food and start to drink green juice instead. I've also gotten positive reactions from chefs willing to accommodate me to acquaintances asking insightful questions pertaining to the reasons why I went vegan, etc. Navigating social landscapes is definitely something that can be challenging but also rewarding as someone who lives this unique lifestyle. The most challenging dish to sell to people who aren't keen on vegan (or just "healthy" food in general) is plain old salad. Hence this...  Yep. I feel her pain. (#same) The funny thing about salad is, though, it can be just as easily mind-blowing as it can be boring and unappetizing. This rule applies to every food, though, in my humble opinion. Omnivores throw fried meat, potatoes and tons of cheese on their salads and say it makes them "tasty", so why can't vegans do their equivalent of the same? I love salads. They're great all year round. I love that they can consist of cooked and raw vegetables alike. I also like to mix pickled and fermented vegetables in mine to add flavor, texture and nutrition. A great, quick and easy lunch is some salad greens, chopped seasonal vegetables and some make-ahead protein to throw on top. When I'm feeling lazy, I'll throw beans on top that are barely seasoned. However, for VeganMofo, I decided to do something a little more involved and special... 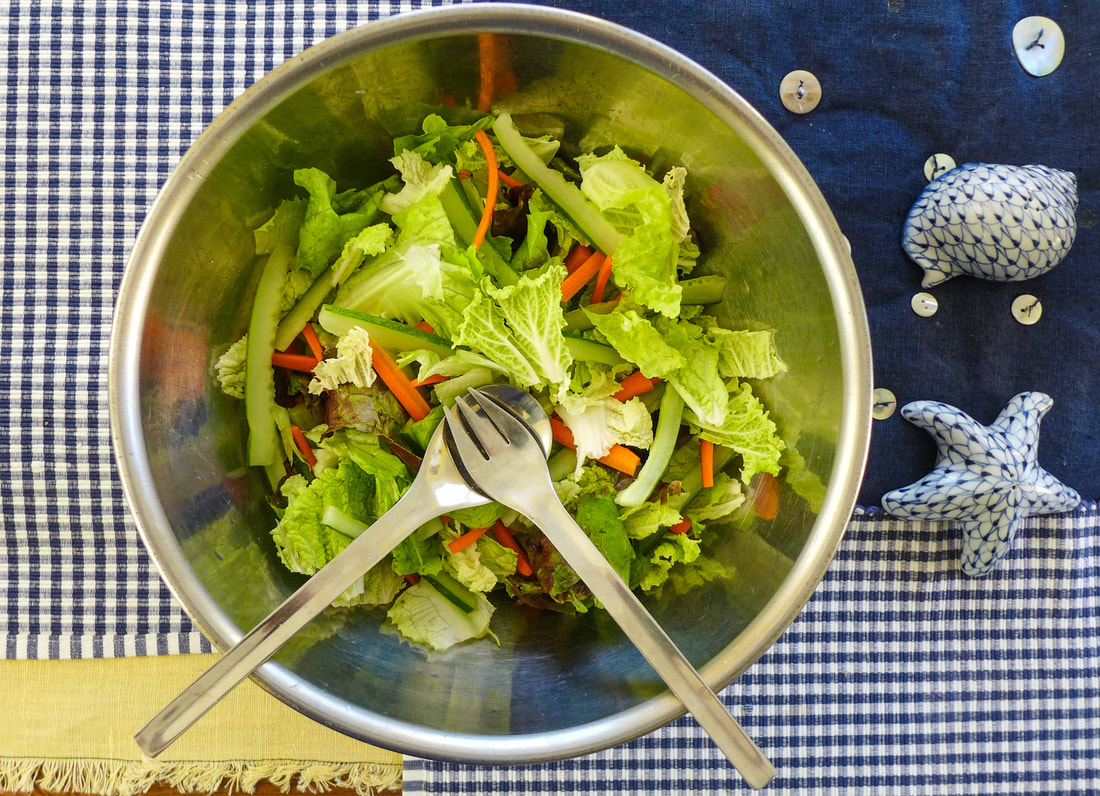 I made some oven-fried cornmeal crusted tofu. Not only did I make delicious and crispy tofu, but I made a Japanese bulldog sauce to go on top of it. What's bulldog sauce, you ask? Well, it's basically a sweet and sticky BBQ sauce that's usually served with tonkatsu (or fried pork cutlets). This is a classic and homey Japanese meal that I enjoyed as a young kid. I definitely recommend making a vegan version of the cutlets if you can (Here are a few ideas from some fellow bloggers: Vegan Ronin | Lazy Cat Kitchen). They're coated in panko breadcrumbs and are wonderfully addictive. The sauce itself is interesting because it has fruit purees in it that lend their sweetness. Along with the fruit, bulldog sauce has tomato paste in it as well as carrot. Instead of trying to automatically recreate the sauce itself, I decided to create my own vegan version with household ingredients that most people have already or can find easily at the store. I added a kick to mine by throwing some Frank's Red Hot sauce in there! You can definitely sub sriracha and that would be an excellent idea. The resulting sauce is slightly spicy, tangy, thick with a depth of sweetness from molasses and mirin. If you can't find mirin, you can always sub maple syrup or your favorite liquid sweetener. This sauce goes very well with the tofu and works as a dressing for the salad on its own. You can also dress your veggies with your favorite dressing if you'd like. I don't care for a lot of dressing so I left mine alone with the exception of a splash of apple cider vinegar, salt and pepper! The only thing I will tell you is this: if you're trying to impress someone with tofu, salad and your sauce making skills, use this recipe! There's no way anyone can deny that eating a vegan salad is a good time if you serve them this. (If they don't like it, then more for you!) Go out there and make some friends! 👯🥗 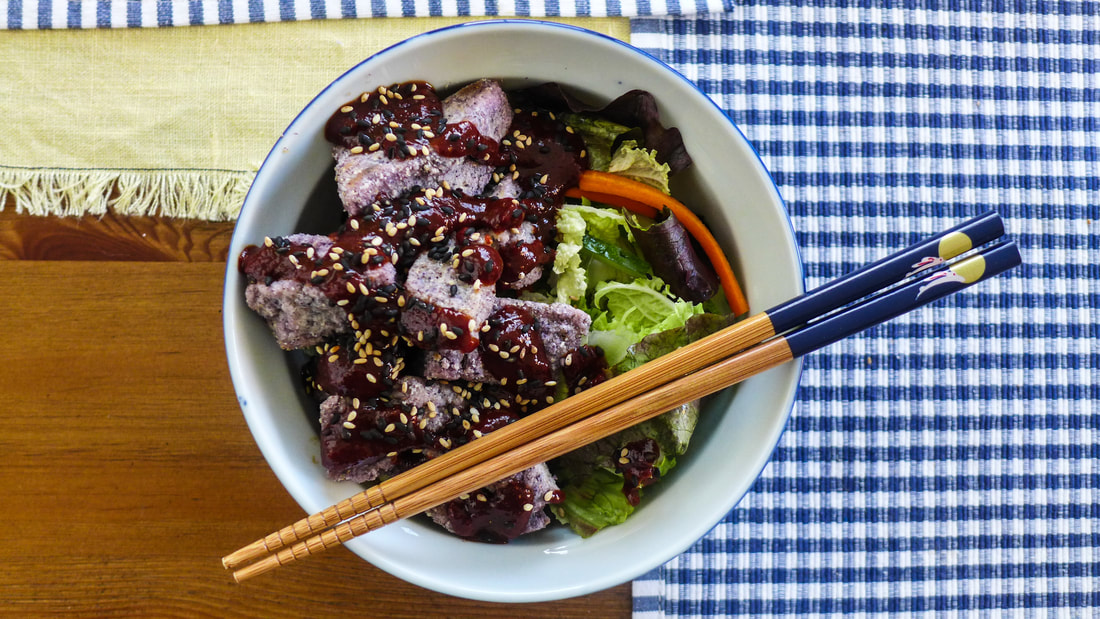 Bulldog BBQ Tofu SaladYield: About 5 Servings Free from: Nuts, Gluten Ingredients
Tofu
Bulldog Sauce
Instructions Preheat oven 400 F.
  Do you even protein, bro? So today's prompt is asking how I get my protein. I would imagine my question to this ever present question from non-vegans would be to show them a bit of a double whamey: a protein-packed breakfast. It's very difficult to come by vegan breakfast foods that are prepared in this country. It's ironic, too, because breakfast foods can so easily be made vegan. The foods that are used to make a nutritious vegan breakfast are also pretty cost effective on the whole. These two items that I'm featuring today are both very economical and keep for the entire week. The protein oatmeal squares are also a much cheaper substitute for store bought energy or meal replacement bars. I'm guilty of buying those to keep on hand in case I'm stuck on the go without food for a while (especially after I work out). However, if you make these, they certainly can save you some money. They're also more eco-friendly! These two recipes are very forgiving and are also great canvases for your own flavors. I chose chocolate because I had a tub of chocolate Sun Warrior protein on hand. Feel free to use your favorite flavor and brand of protein powder for these. Alternatively, you can also use natural sources of protein like flax and hemp seeds or nuts ground into a flour, The nice cream is great stored in the freezer but will most likely need to be warmed a bit before scooping since it hardens into a solid mass depending how cold your freezer is set. You can either leave it thaw at room temperature or nuke it in the microwave if you aren't opposed. I like to top mine with nuts and seeds for more added protein! It makes a great option if you don't feel like whipping up a smoothie in the morning (or want to wake your housemates because you get up at 4:30 AM for work like I do). Combine these two treats for a chocolate-filled yet also healthy and filling breakfast! I'm definitely going to come up with another post with flavor variations on these. The possibilities don't end! 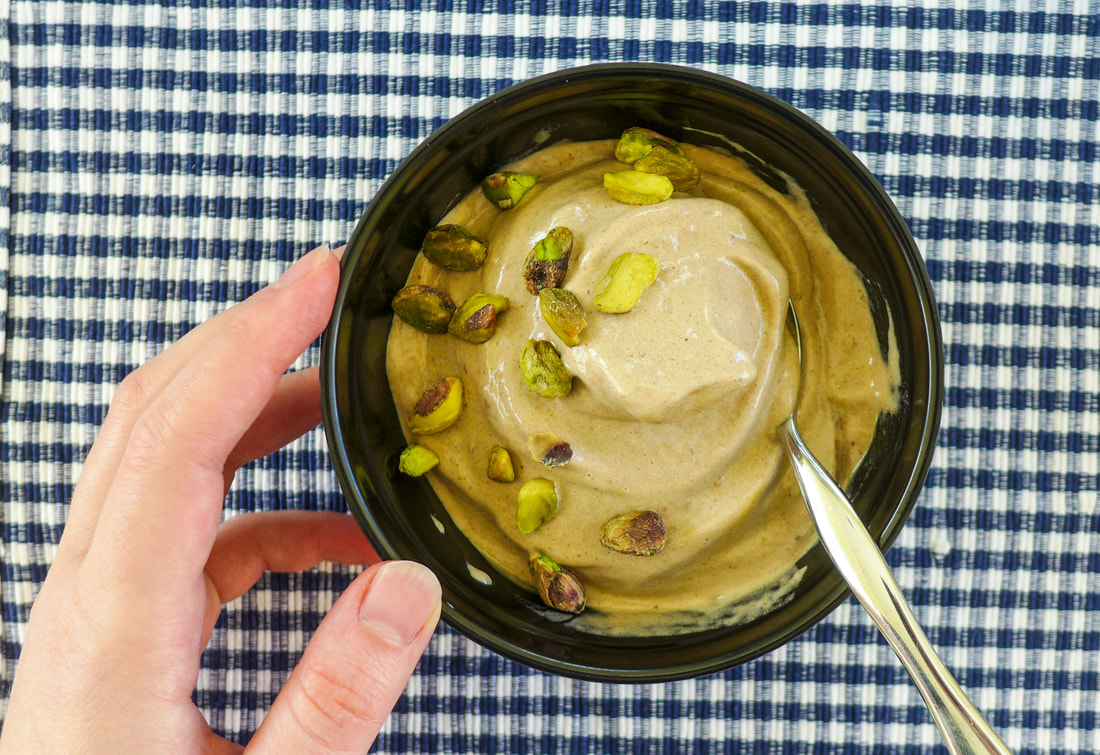 Chocolate Protein Nice CreamYield: approximately 7 servings Free from: gluten, nuts*, soy* *Use appropriate ingredients for these options Ingredients
Instructions Blend all those things above in a food processor or high speed blender until smooth! Images below. ✌️ Double Chocolate Oatmeal Protein Squares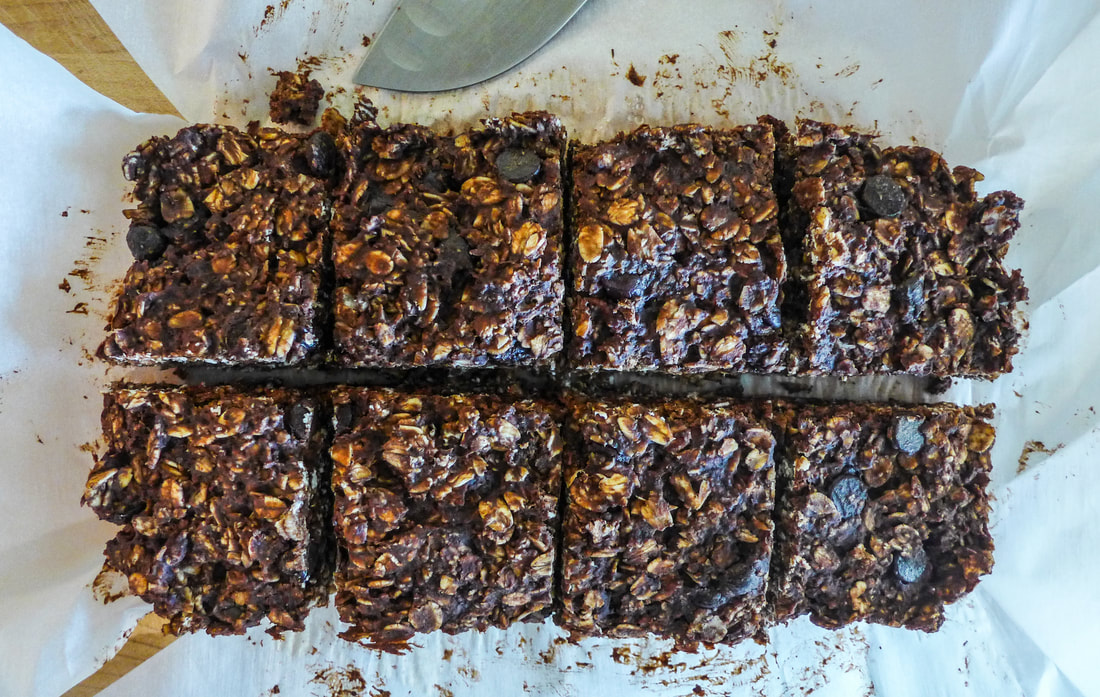 Yield: 8 Squares (9x5 loaf pan) Free from: Gluten Adapted from: Chocolate Covered Katie's Wonderful Baked Oatmeal Ingredients
Instructions Preheat oven 340 F.
|
I'm Jess!This is my very first food blog! I post revised conventional recipes of foods that I hold near and dear to my heart. My cooking here is all gluten-free and cruelty-free, but full of flavor and comfort.  


 Archives
December 2017
Categories
All
|

 RSS Feed
