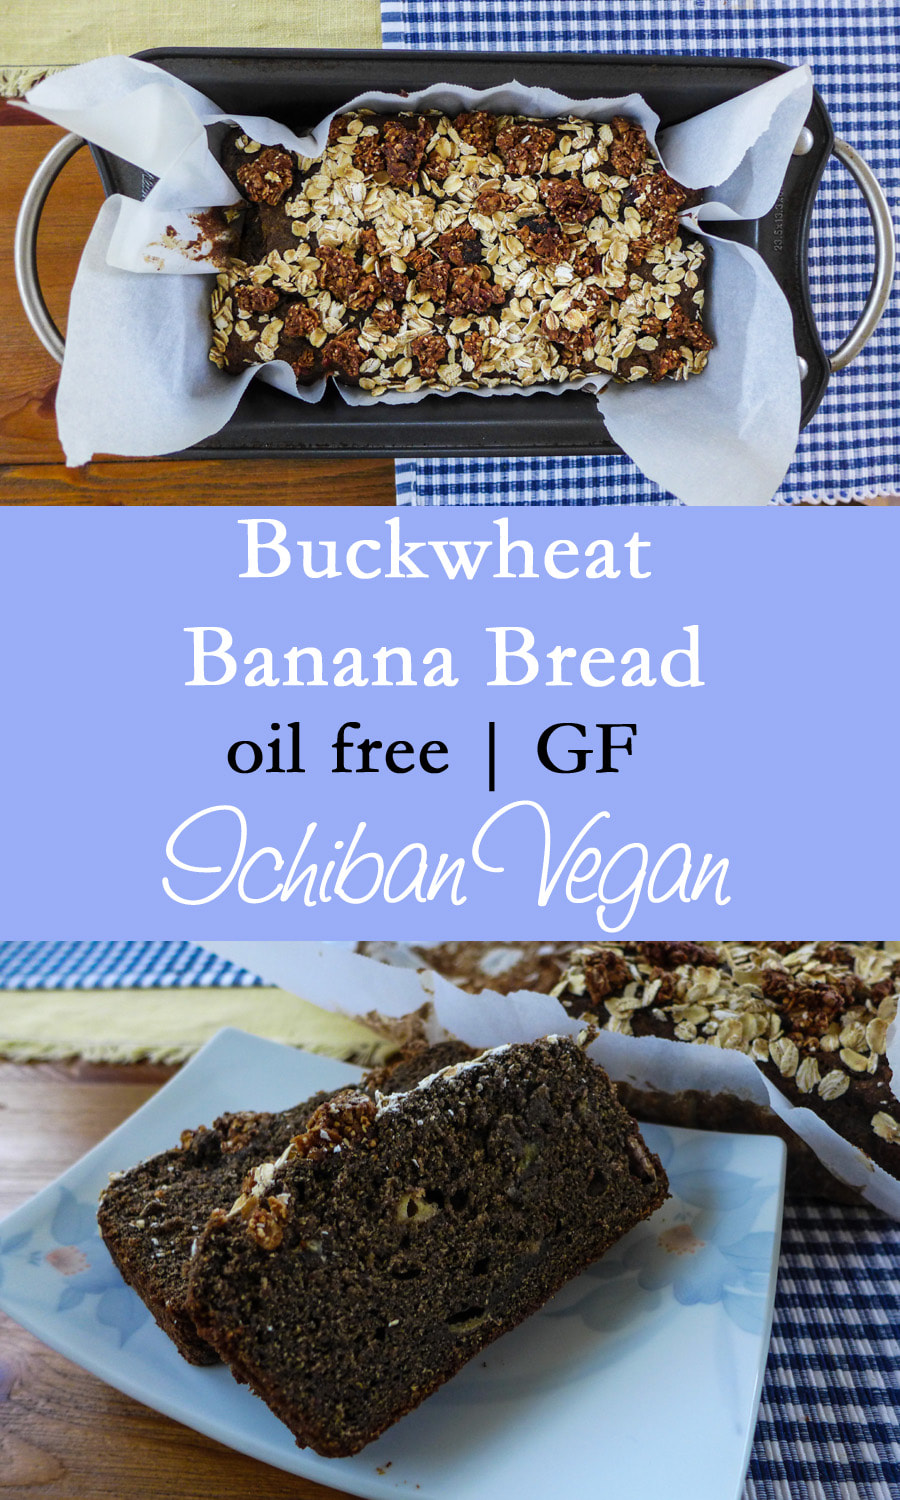
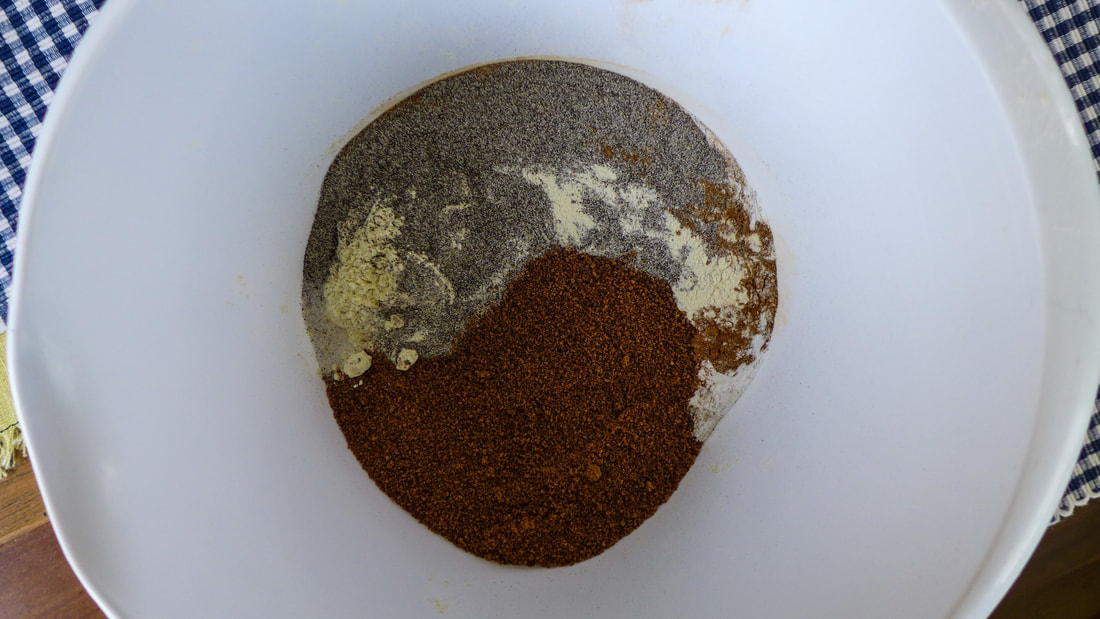
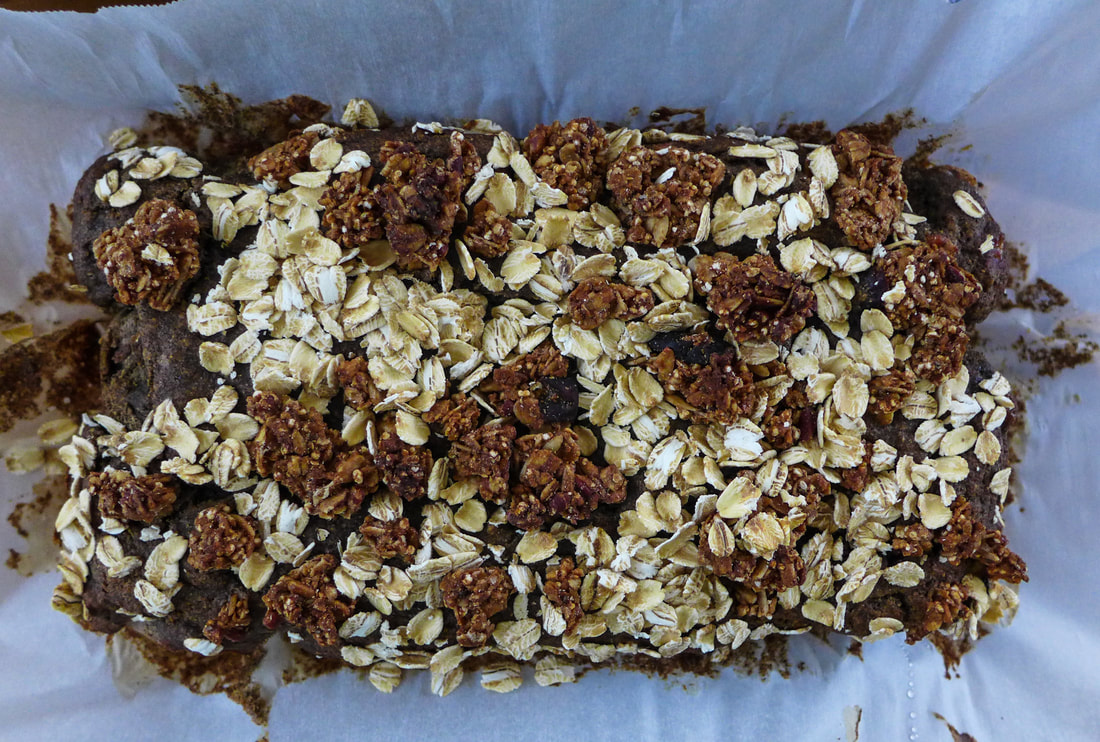
 This is my response to the "unconventional grains" prompt! I love to bake with different grain flours often since most of my baking is gluten-free. I've experimented with all types of grain flours and some grain-free as well. I find that there is no "one" magical flour that can be substituted for wheat flour in a baking recipe. Gluten-free flours must be combined in order to achieve an optimal texture, fat content and taste for different applications. I find that my favorite "all purpose" gluten-free flour blend is good old Bob's Red Mill. I like to combine this all purpose blend with other grain flours for awesome texture. This flour is also good as a 1 to 1 substitute for my purposes, I find. I make roux with it, dust surfaces, and use it alone for simple baked goods like biscuits. I've never found another flour blend that does it quite like this one for me. I also really love the flavor, which some people might not be partial to because it contains chickpea flour. Some people say it makes whatever you cook taste like falafel. I'm not in this camp but it's all a matter of taste, I suppose. This recipe came to me one day when I was using leftover bananas to make banana bread. The original version was made with quinoa flour instead of buckwheat. Upon my second time using this recipe, I found that I actually like the buckwheat flour much more! The banana bread is wonderfully moist, sticks together, is dense but rises nicely, and has a depth of flavor that transcends just "banana and sugar". I also love the nutrition that the buckwheat flour brings to this recipe! It's got a good amount of protein and fiber! The only downside that I can possibly see with this recipe is its darker color. You can't really see the banana in there unless you look closely. I don't mind this too much. It's dang tasty and that's all I really care about. I took the liberty of sprinkling some granola and trail mix on top of my banana bread. You can do this if you want some more texture and crunch as well. Alternatively, whip up some streusel and sprinkle that on top! How can that be bad? Feel free to spread some of your favorite nut or seed butter on top of a slice of this for a hearty breakfast. Since there's no added oils or fats in this bread, you can control the type and amount of fats you add to it for a well-rounded meal! Enjoy! 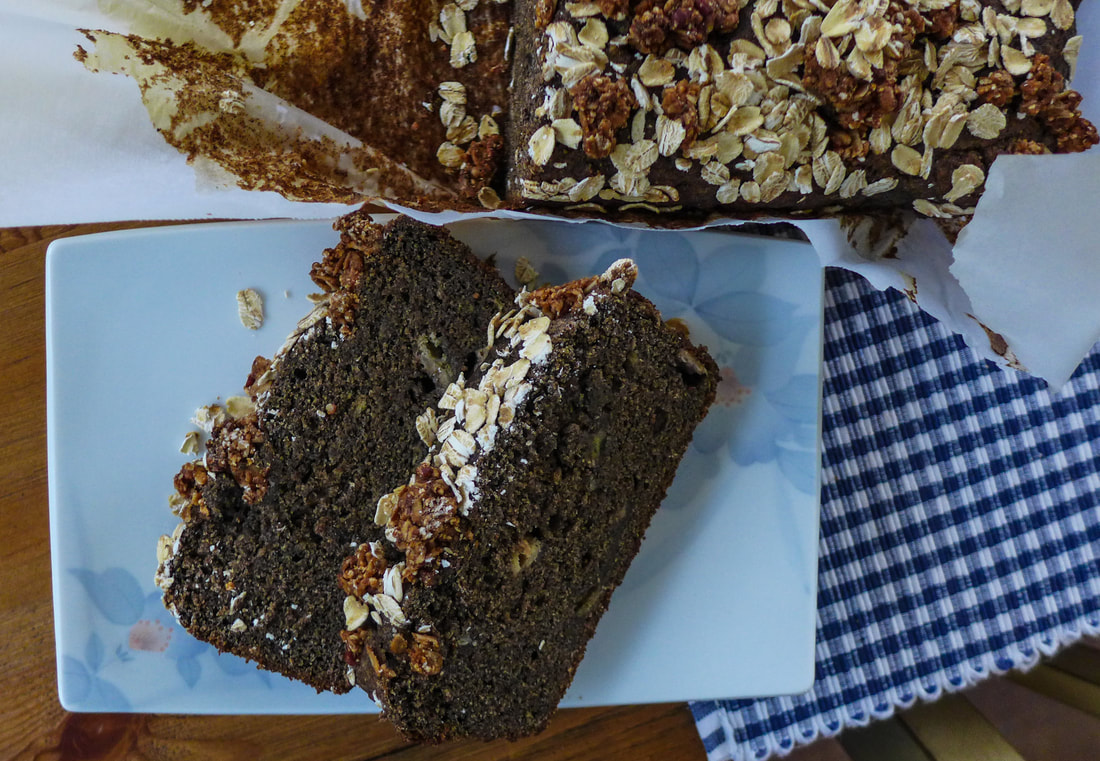 🍌🍌🍌🍌🍌🍌🍌 Buckwheat Banana Bread (Oil Free)Ingredients Yield: 1 loaf (9x5 pan) Free from: Gluten, Soy*, Oil*
 Instructions Preheat oven to 350 F.
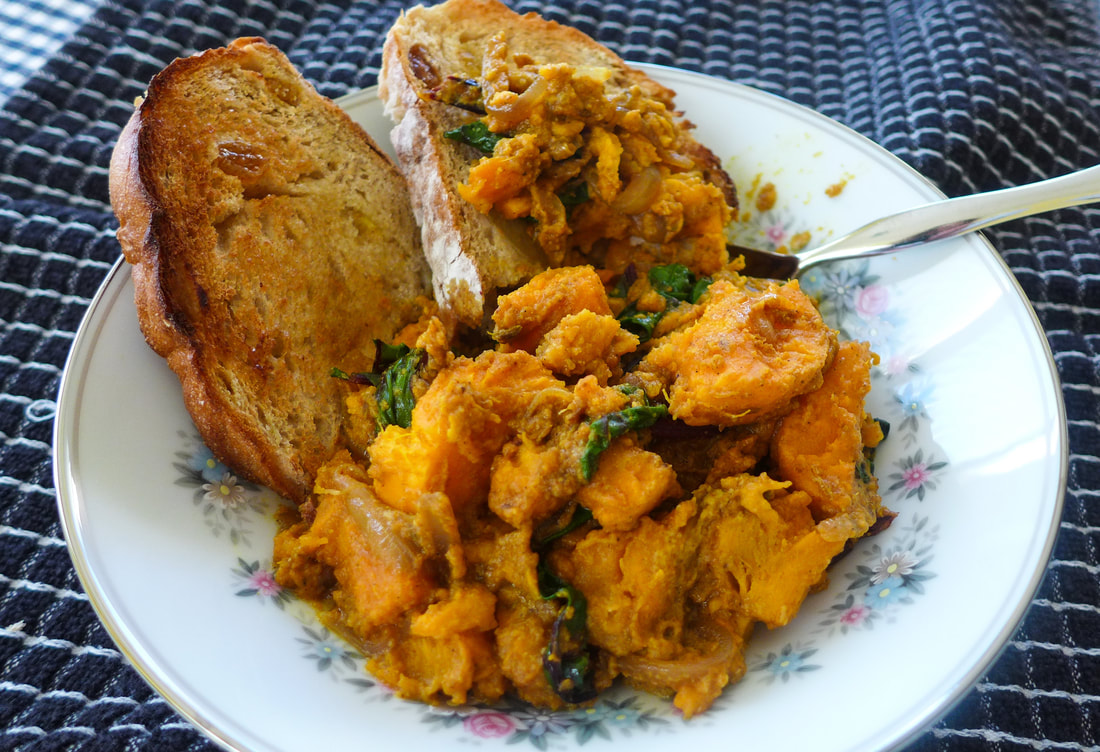
 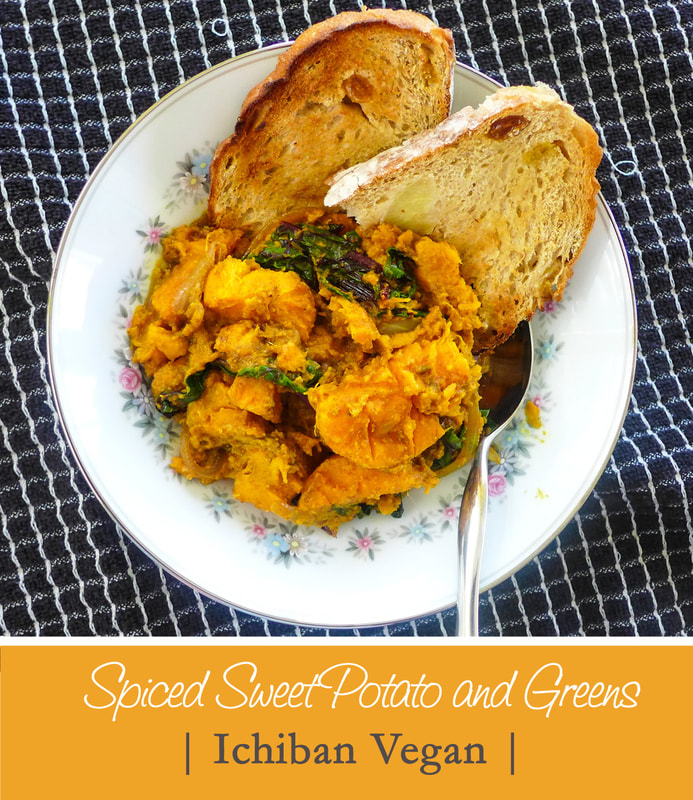 Today's prompt is everything that I love about this time of year: SPICES!  Not that spice... I love warm spices. They always seem to find their way into my recipes in some form or another. I use cinnamon in almost everything. As I developed a taste for other spices, I discovered that I loved curries and stews with warm spices as well. I think savory applications of spices are my favorite simply because they offer unique depths of flavor. I love how the addition of spices to a simple chili or stew can create so much aromatic flavor. One of my favorite foods in the fall and winter is sweet potato. Sweet potato is always known for its ability to carry sweet spices in desserts. I wanted to add spices to sweet potatoes this time in a more savory way. The blend that I created is nothing extraordinary, but it creates a wonderful combination of smoke, earthiness, and sweetness. The flavors are wonderful when mixed with the mellow sweetness of the potatoes. I added some bitter beet greens and sweet onions into the mixture as well. The simple blend of veggies is a wonderful meal on its own or can be served with a bread or grain of your choice. I didn't create my own garam masala, but definitely do so if you're feeling up to the challenge. One of these days, I'd like to create my own spice blends. I've heard that fresh whole spices ground at home are the best. In addition to these spices tasting great, they also offer some wonderful medicinal properties (especially that turmeric). This mixture would also be a great breakfast to avoid any sugar crash during your day. Also, it would make a fabulous side dish for Thanksgiving. Just throwing that out there (it is next month, after all). Enjoy and feel good about it! 🍁🍂🍃🌰🍠 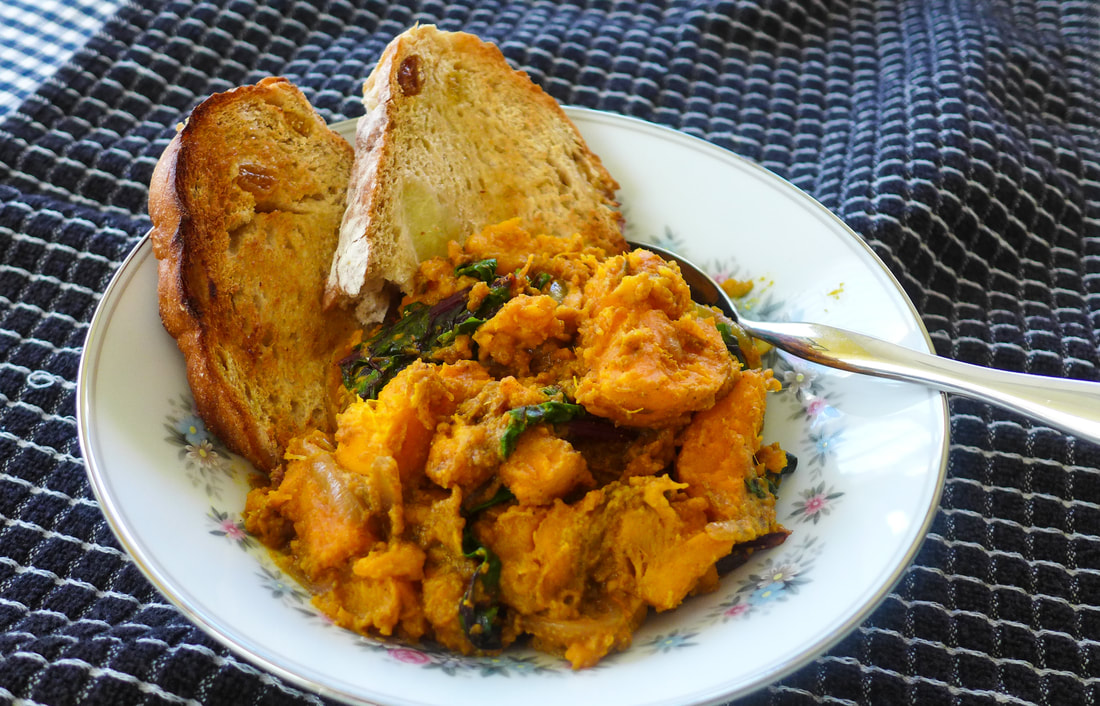 Spiced Sweet Potato and GreensYield: About 4 Servings Free from: Gluten*, Soy, Nuts, Grains Ingredients
Serve with bread or grain of choice, optional Instructions
 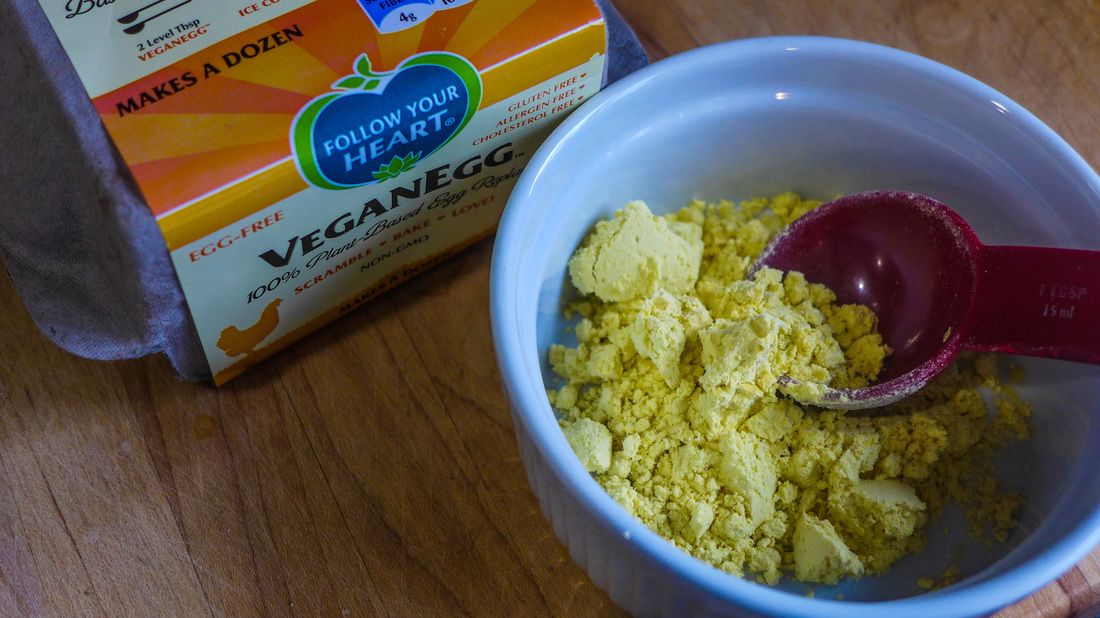
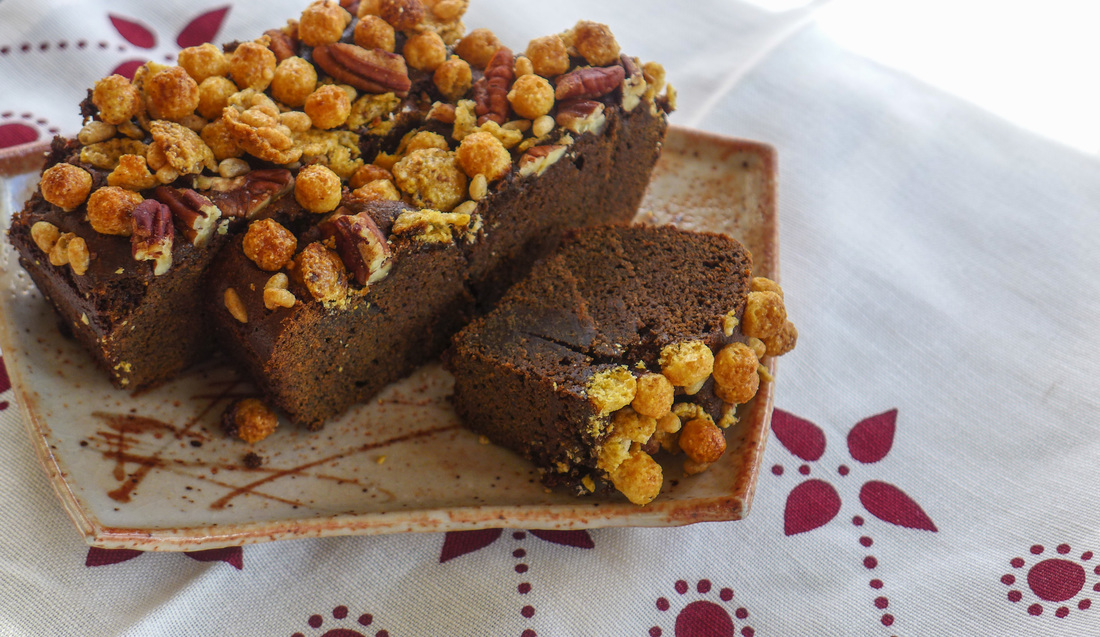
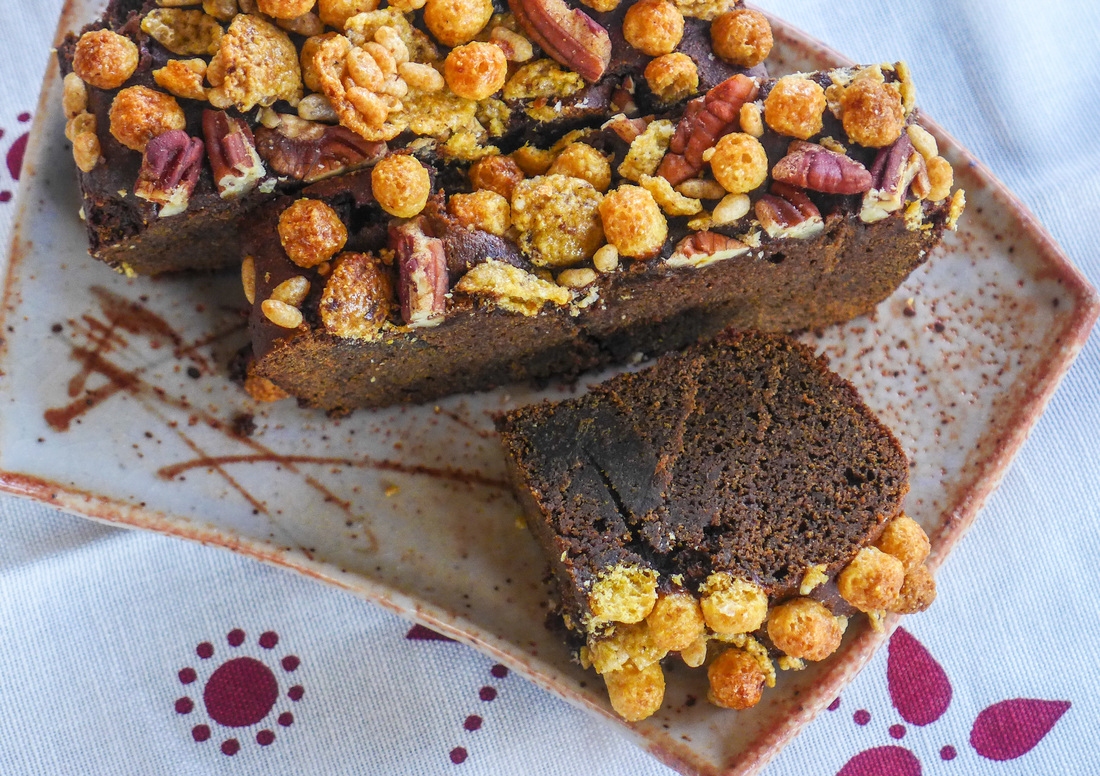
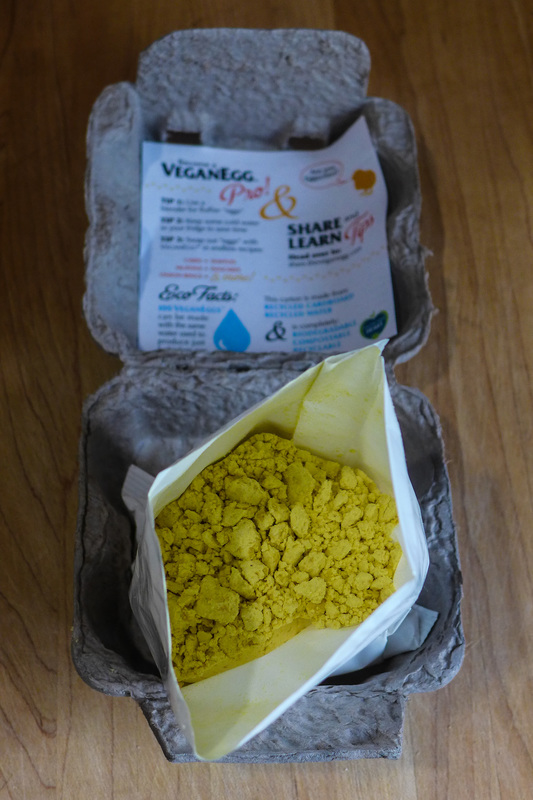
I've made tofu scramble countless times since becoming vegan and I've had the satisfaction of making an egg-like meal with delicious ingredients and scrumptious flavors. This, however, was the very first time since 2011 that I felt as if I was cooking actual eggs again. It was a very strange feeling. 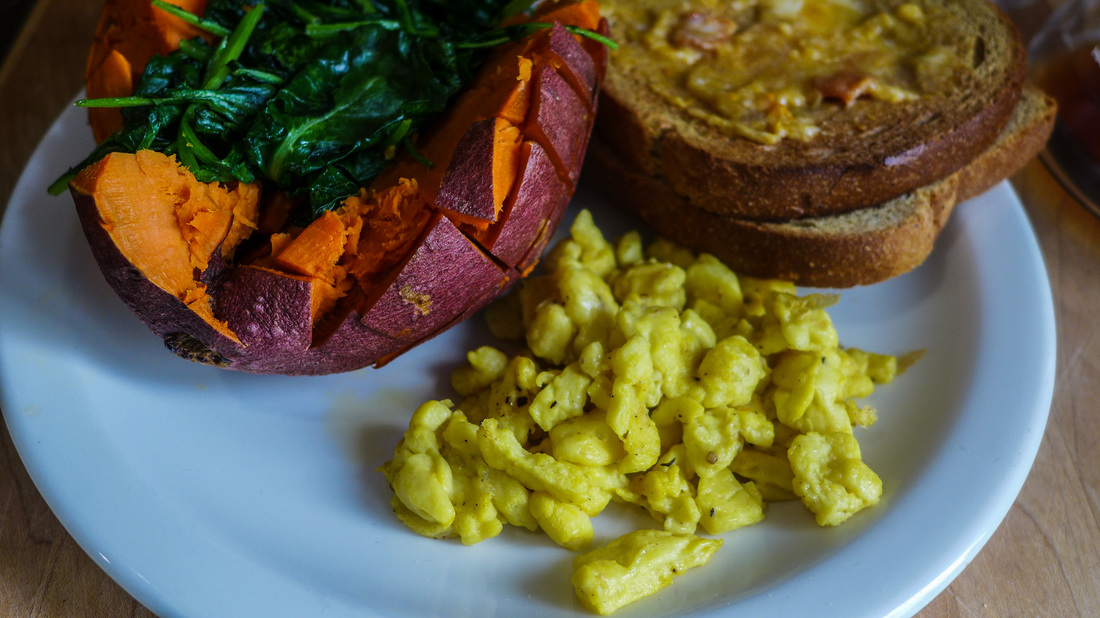 That looks straight up like scrambled eggs, doesn't it? Weird. Making the VeganEgg was a simple process today. I wanted to make the product as the instructions said to so that I could taste it as it was without fancy additions or techniques getting in the way. This was tough to do, though. I always want to tinker! ^_^ The VeganEgg is fairly simple to make. All you need is some cold water to mix with the provided powder and voila! The resulting mixture almost seems like pancake batter in consistency. In fact, once I poured the batter into my pan, I felt as if I was going to make a pancake. Once I started to move the mixture around a bit, though, I noticed what all the fuss was about. EGGS! The VeganEgg cooks just like regular eggs do for the most part. It slightly sticks to the sides of the pan, it becomes spongey and fluffy as it firms up, and starts to become fragrant. Boy, does this stuff smell like eggs. What I loved most about the product is that it doesn't overcook easily like real eggs do. Whenever I would cook real eggs, I would always err on under cooking them (which in hindsight was a terrible idea!) so they would not become rubbery and hard. The VeganEgg takes a little longer to cook, maybe about 4-5 minutes on medium-low heat. I added only about 1/2 teaspoon of olive oil in my pan to cook the VeganEgg with and it was perfect. I seasoned with salt and pepper only in order to keep the flavor integrity of the product. I felt the flavor was nice but not over-powering. It was also not overly-eggy, which I think would've been a turn off. I did experience illness several times after eating real eggs and ever since the smell has somewhat deterred me. 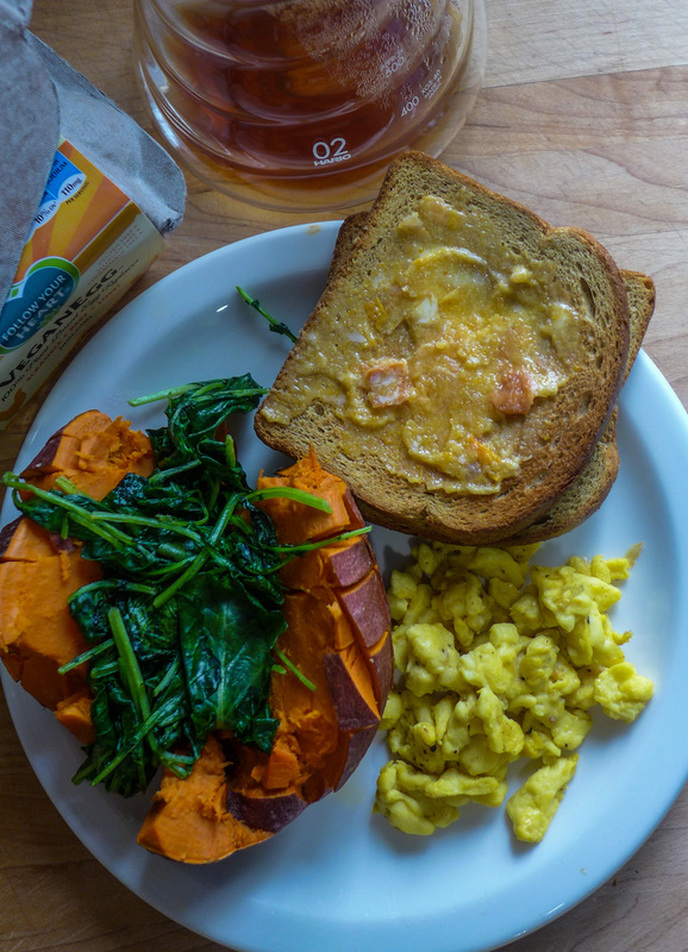 The full spread! I love how the VeganEgg cooks. It "browns" a little to add texture to the scramble but does not greatly alter the color. My scramble was fluffy and light yet slightly drier than normal eggs. Although, i suppose this is a good thing since real eggs are full of cholesterol. I liked the plain preparation of the VeganEggs, but I'm itching to do more with them. Since they retained their shape very well, I think they would be perfect for making omelettes. When I flipped the VeganEggs initially while cooking, they stayed in a very perfect circle until I broke them up intentionally. I would love nothing more than to stuff them with mushrooms, spinach and onions next time! Mmmm... I had a fun time eating these VeganEggs with a nutritious vegan breakfast of a baked sweet potato, sauteed baby kale, and two slices of toast slathered with vegan butter and persimmon jam. Oh, I made some coffee too in my V60! ;) Since I don't eat a full breakfast too often, I like to go a little nuts when I make it at home. I figured this was a special occasion, so why not? 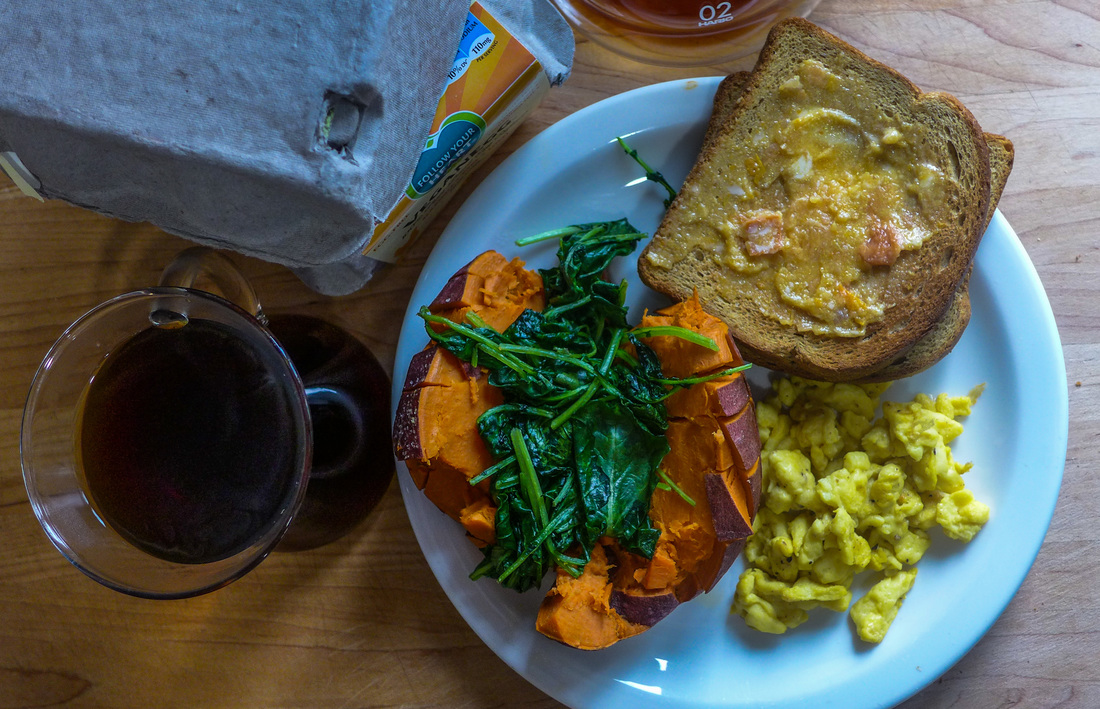 In short, I absolutely recommend the VeganEgg. I haven't used it for any other purpose except scrambling, but that was enough to sell me! Don't be surprised to see new posts coming soon of baked goods, quiche, frittatas, omelettes, or anything else you could possibly do with eggs. I'm headed deep into vegan egg land and I don't expect to come back until I've explored every corner of it! Happy breakfasting, everyone! If you have any suggestions as to what I should make next with the VeganEgg, let me know! I'm down for it all. 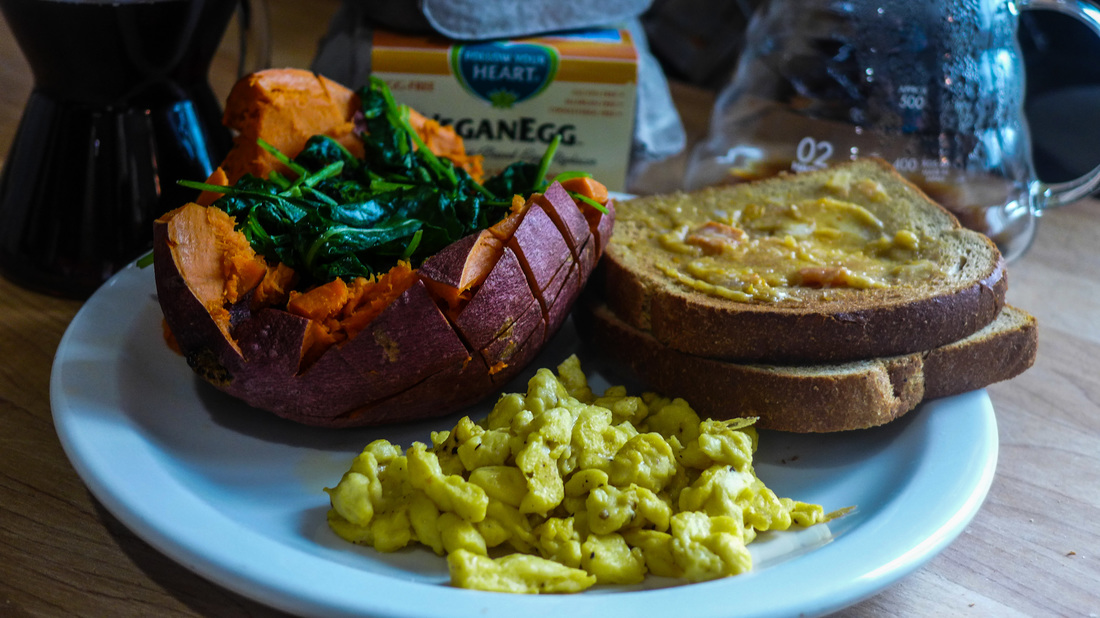 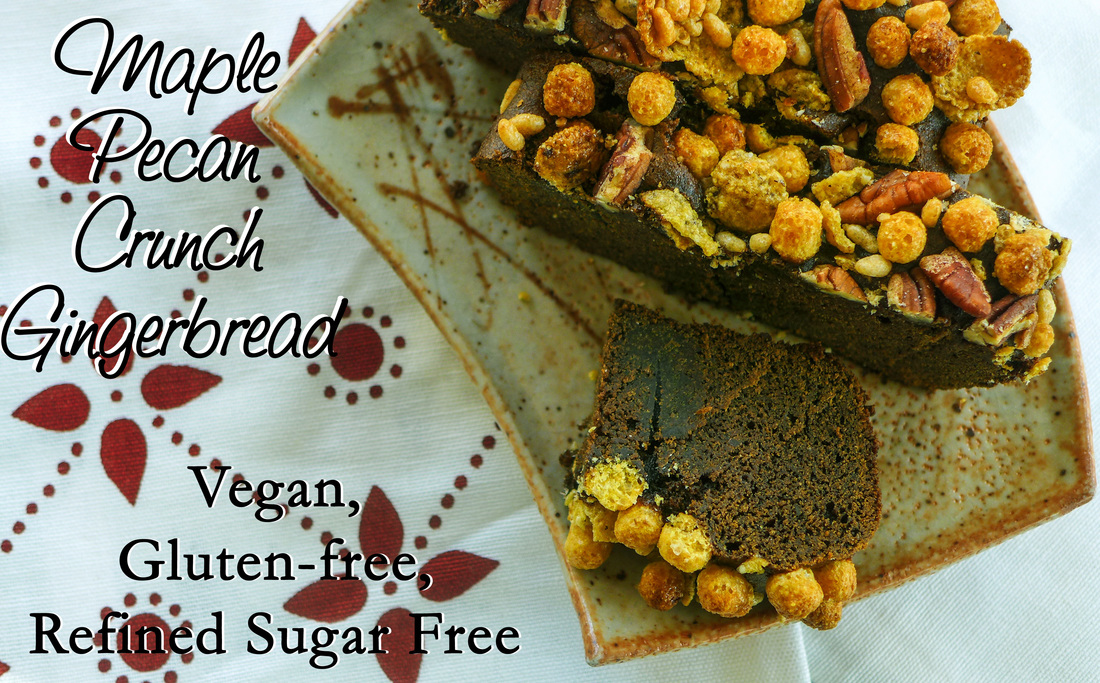 I was trying to figure out what type of quick bread to make for the holidays this year. I always gravitate towards the same flavors like carrot, chocolate or date. However, I decided to mix it up this year with a quick bread that I actually haven't made in quite a long time. It's really familiar this time of year, though. You got it. Gingerbread! Also, this is the second recipe in a row to have the word "crunch" in it. How fun! =P I haven't made my own gingerbread in a long time, and it's a shame. I love molasses and ginger together. There's a great depth of flavor that molasses brings to the table that I don't indulge in very often. What a shame, right? In addition to being rich and dark in flavor, molasses has wonderful and unparalleled health benefits that not other sweetener can offer. Just take a look at the Wikipedia page for molasses. There are a variety of important minerals that molasses supplies. These are especially important for vegans, since minerals and vitamins are spread out among all types of plant foods. We have to be a little more mindful in choosing our food in order to supply our bodies with proper nutrients. I find it kind of fun. It gives me a reason to pay more attention to what I'm eating and what ingredients I'm using! With molasses supplying iron, magnesium and calcium, it's a bit of a superfood! I decided to let the molasses be the star of my gingerbread, so I did not add any refined sugars. I added some maple syrup for a boost of sweetness and maple flavor, but nothing more! If you feel as though you'd like this bread to be more sweet, try added in some coconut or brown sugar to maintain a warm depth of flavor. We all know that indulgence his high around this time of year, don't we? ;) My goal with recipe writing these days is to come up with treats that will appeal as something special and festive while also providing health benefits. I like to think that everything I cook or bake has something to offer my body. This recipe shows just that but also feeds my heart with joy and comfort! ^_^ I hope it does the same for you! <3 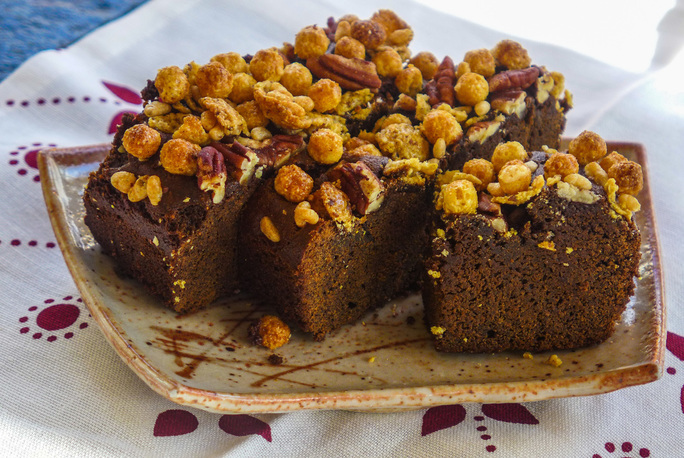 Maple Pecan Crunch Gingerbread
Instructions Oven 350 F.
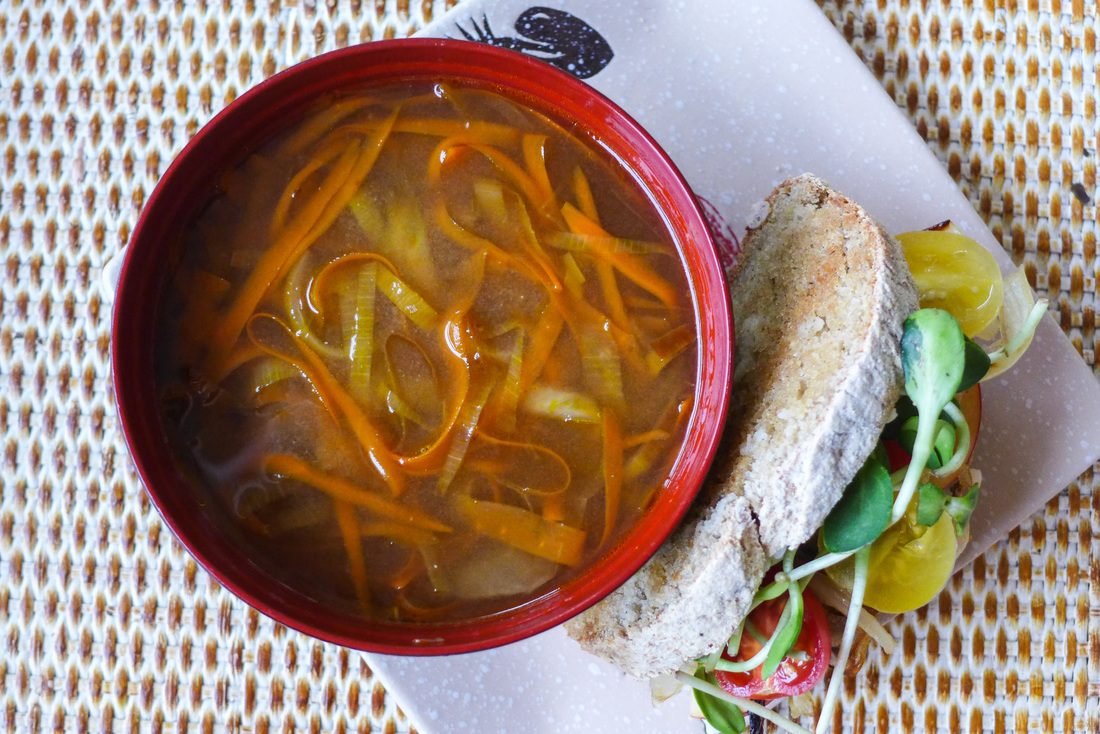
  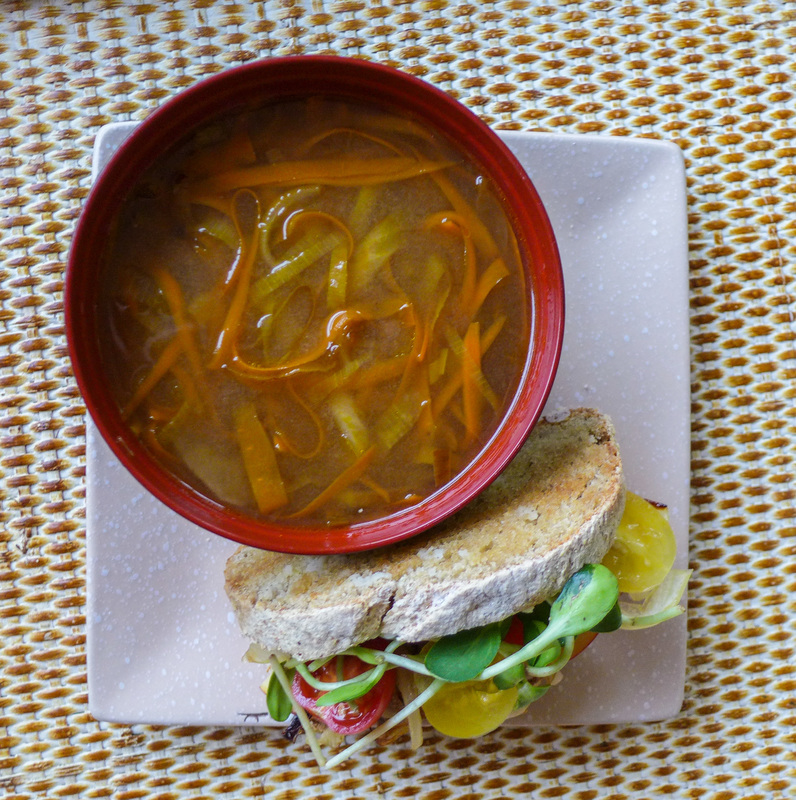 For my rainy/snowy/generally dreary day meal, I'm going to make some broth and put stuff in it. I love soups of all types, all year round. The best time for soup, though is the fall and winter for me. I love coming inside from the cold to a bowl (or sometimes cup!) of piping hot liquid with deliciously seasoned veggies in it. Soup is always great, too because its flavors become more concentrated as time goes by. I love to eat soups the day after I make them, when the ingredients have had time to marinate and become more rich. There's nothing better to make you feel at home! I also love to eat sandwiches and soup together. I like sandwiches by themselves, too, but much more if they're next to a bowl of soup. There's something about eating bread and soup together...it's such a classic combination. I'm going to throw together a sandwich from ingredients that I have on hand, so definitely do the same if you're into the idea! I didn't include a recipe for the sandwich because I think it's a fun thing to play with depending on the ingredients you have at your house and what's in season near you. For me, it's early Autumn and I decided to go a little sweet and savory with sliced apple, caramelized onion (reserved from the soup!) and vegan cheese. You need to indulge every now and then, people! ;) This prompt was interesting because I really had to think about what ingredients I had in my house already. I always keep certain things in my fridge, like miso, onions, etc. I figured miso soup would be a great thing to make since I almost always have the ability to make it! I tried to make my miso soup a tad different than the normal scallion and tofu combo. My grandma taught me to make miso with whatever I had to put in it. If you have daikon, put that in it. Potato? Put that in. Onion? Yup! So, I figured, what's something cool I can do with onion? Uh, caramelize them! And leeks too? Why not?! =D This soup recipe is meant to feed approximately 4 people. You can make it stretch if you serve everyone a smaller portion. For a small crowd, though, I'd double the recipe. Plus, leftovers!! ^_^ 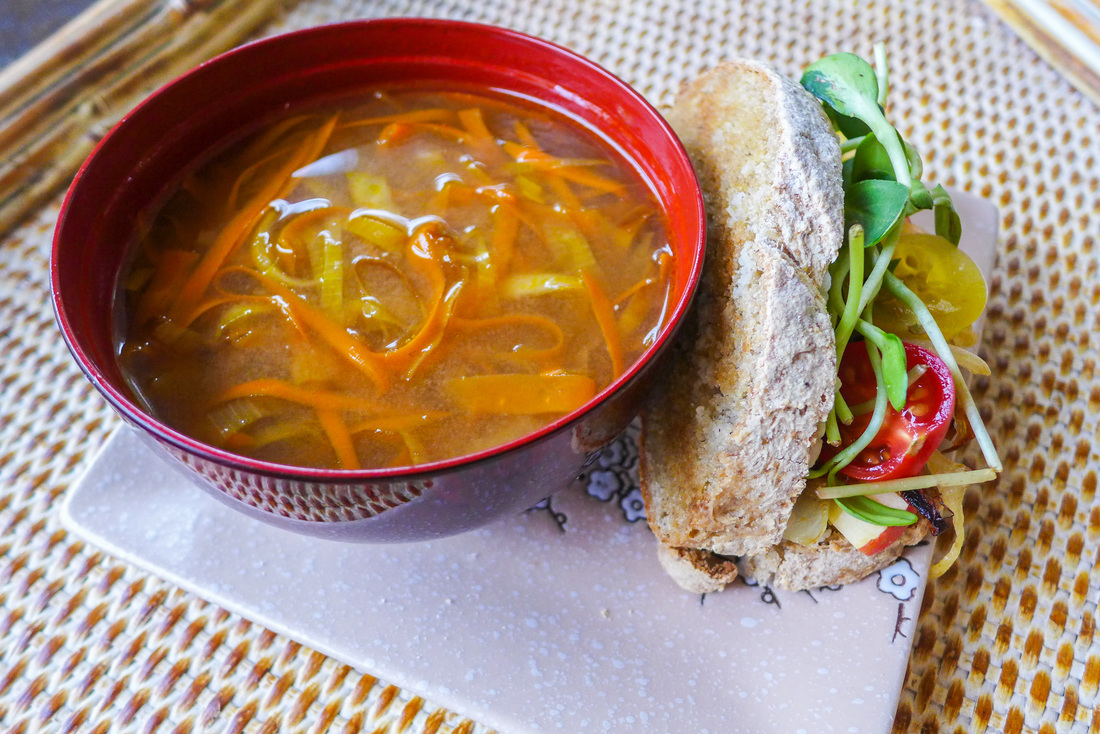 Caramelized Leek & Onion Miso SoupYield: About 4 servings Free of: Gluten, Nuts, Sugar Ingredients
Instructions
My sandwich was:
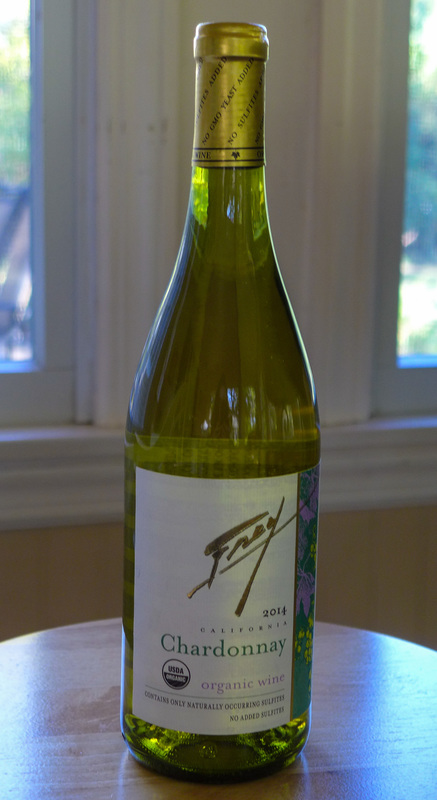
 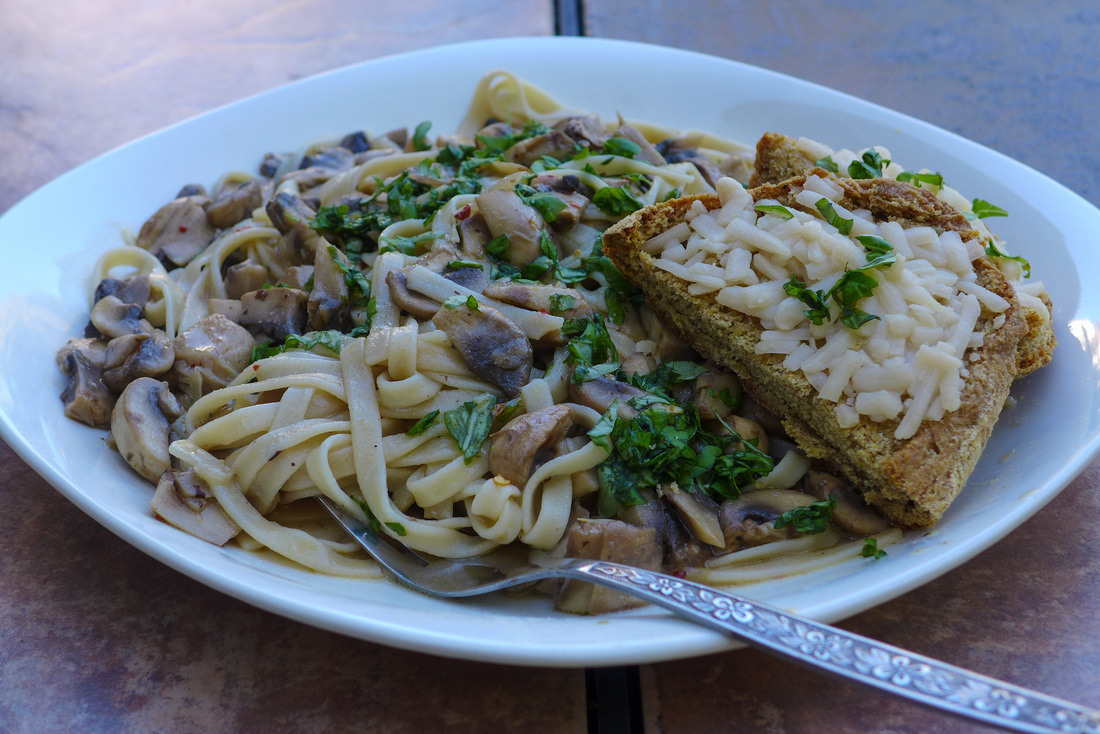 So, my post for today is featuring a dish that I think Rachael Ray would love if she were to eat a vegan meal. Why I chose Rachael, you ask? Well, for one, I love her. She has been a very influential person for me with regards to how I've learned about food preparation and technique. My parents and I began watching 30 Minute Meals probably 10 years ago by now. That show alone inspired my mom to cook more from-scratch meals since she saw that it didn't take very long. From that point, we made the transition from semi-homemade meals to full scratch-cooking for dinner! What a treat. After that, we started to use products like extra virgin olive oil (or EVOO as Rachael calls it) and fresh garlic almost every day. Don't get me wrong, my mom did cook from scratch before that point, but it wasn't every day. Normally, she would save scratch meals for certain dishes or special occasions. I don't blame her. Raising kids is hard and time consuming. But, as my sister and I got a little older, we gave my mom more time to spend thinking about our family meals. At a certain point, I started to help my mom cook. That's where my story as a cook began! So, as you can imagine, choosing a person to make a vegan meal for today was a pretty easy choice. Rachael Ray has always been someone I've followed. I also love that she embraces food trends as they evolve. She's recognized allergen-free cooking and vegan cuisine on her shows before, which I love. She also offers meatless options for many of her dishes on her cooking shows. She also loves Veganaise, so that's awesome! =D
 Oh, yeah, and I hit it with a little organic white wine and made a side of gluten-free garlic bread. ;) SOLD! 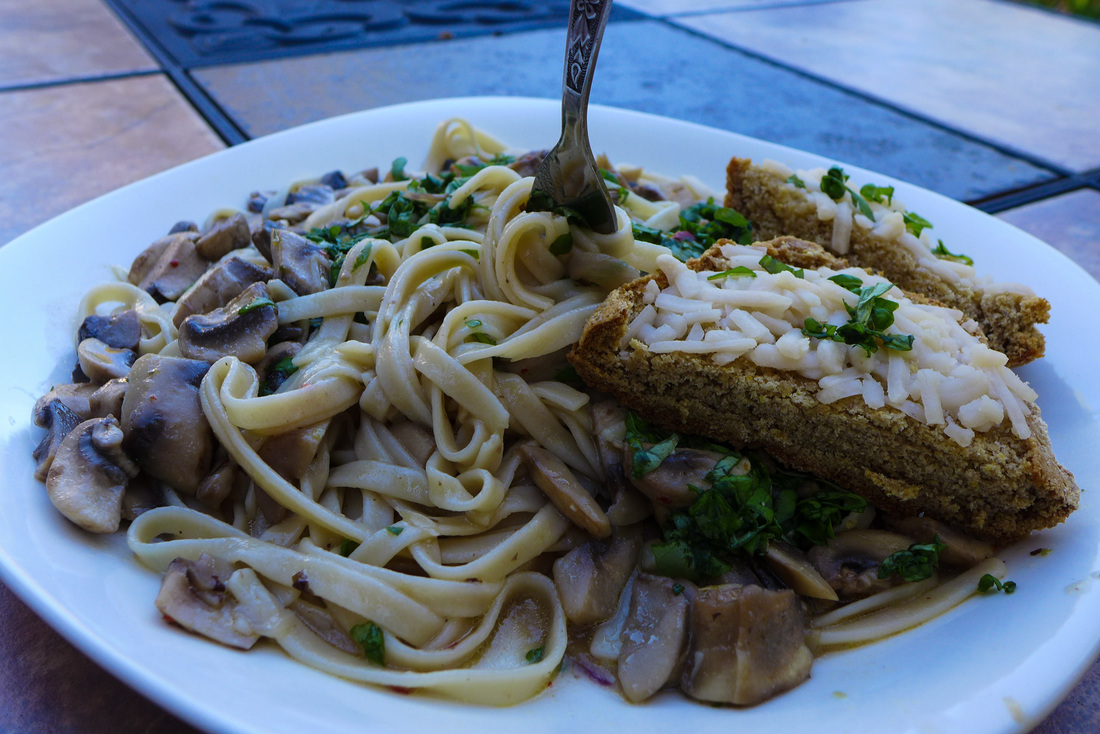 Vegan Fettuccine with "Clam" SauceYield: Approx. 2-3 servings Adapted from Linguine with Clam Sauce by Rachael Ray Ingredients
*Recipe below Instructions
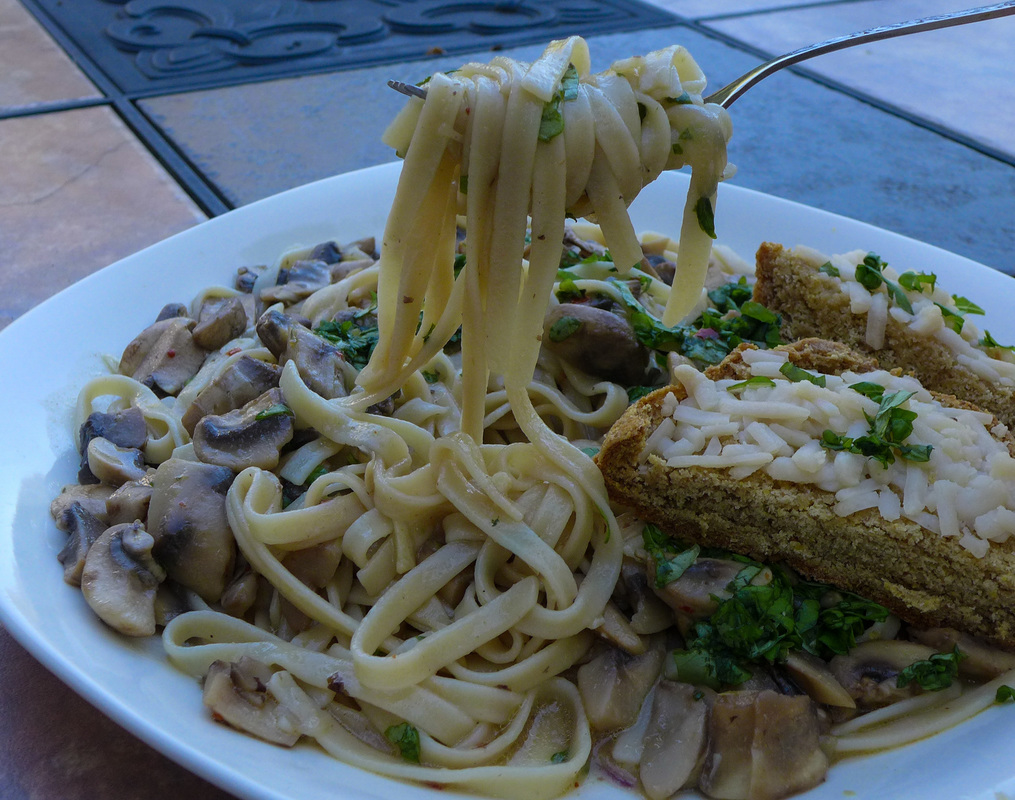 Garlic Bread
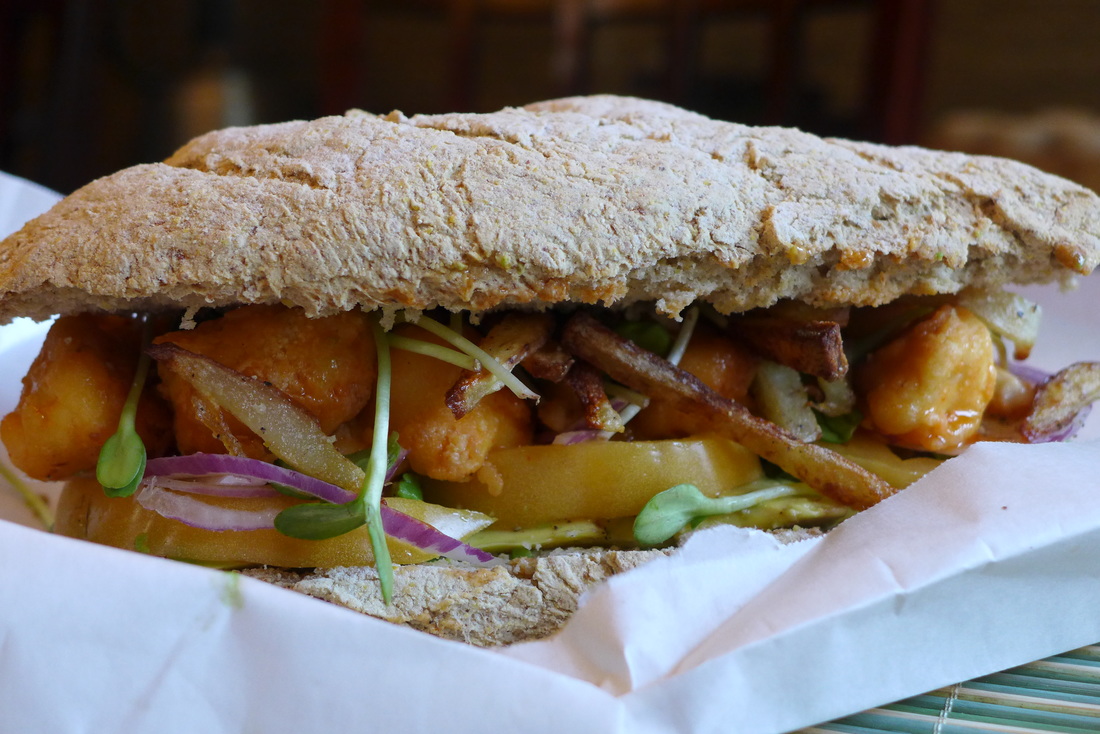
Spread 1/2 Tb of vegan butter/coconut oil on each slice of bread. Sprinkle each one with some garlic powder, to taste. Top them with vegan cheese, if desired. Pop your bread slices into a 350 F degree oven for about 12 minutes, or until they are toasted and the cheese is slightly melted. Enjoy with some pasta and maybe a little wine. ;)  I'm not a huge fan of sandwiches. I always like the idea of sandwiches, of course, but I find that I get really full from the bread before I can enjoy any of the goodies on the inside. Sometimes I like to take all the stuff out of the sandwich, eat it, and then have dessert to fill my stomach. That method has worked for me countless times. ;) However, I went to college in New Brunswick, NJ and I did have a brief affair with sandwiches at that time. Eating as a vegetarian in college left me with few options for food that wasn't salad or pretzels. I always had something to eat at the dining hall, but it was rarely healthy. Did that stop me? Of course not. One of the foods that my friends and I would grab routinely after every semester as a celebration would be the infamous fat sandwiches from the grease trucks. These bad boys are sandwiches with everything you could ever want (or not want) to eat on them. Protein? Yes. Veggies? Yes. Sauce? Of course. French fries? Duh. I always got one of three sandwiches there. One had a veggie burger on it, one had some mozzarella sticks and the other had falafel. The last one I ever ate had falafel on it. ::drool:: I decided that if I was going to make a vegan sandwich for Vegan MoFo this year I had to go all-out. So, I went the extra mile and made from-scratch rolls and fried up some cauliflower. This sandwich is going to be the most complete sandwich experience of your life. And you won't need to eat another. Ever. Enjoy! ^_^ 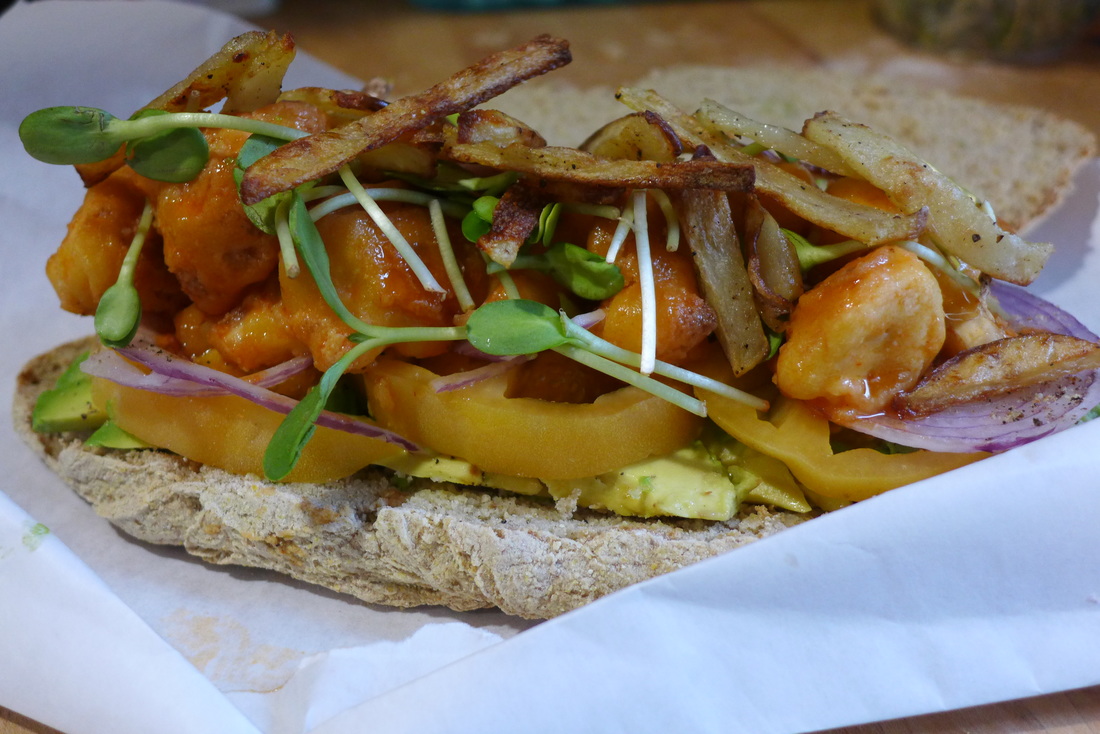 Ingredients Makes 3 large sandwiches. You can always make less and save the fillings for salads or snacking later!
Instructions Preheat oven to 375 F.
 Mmmmm, get in there. 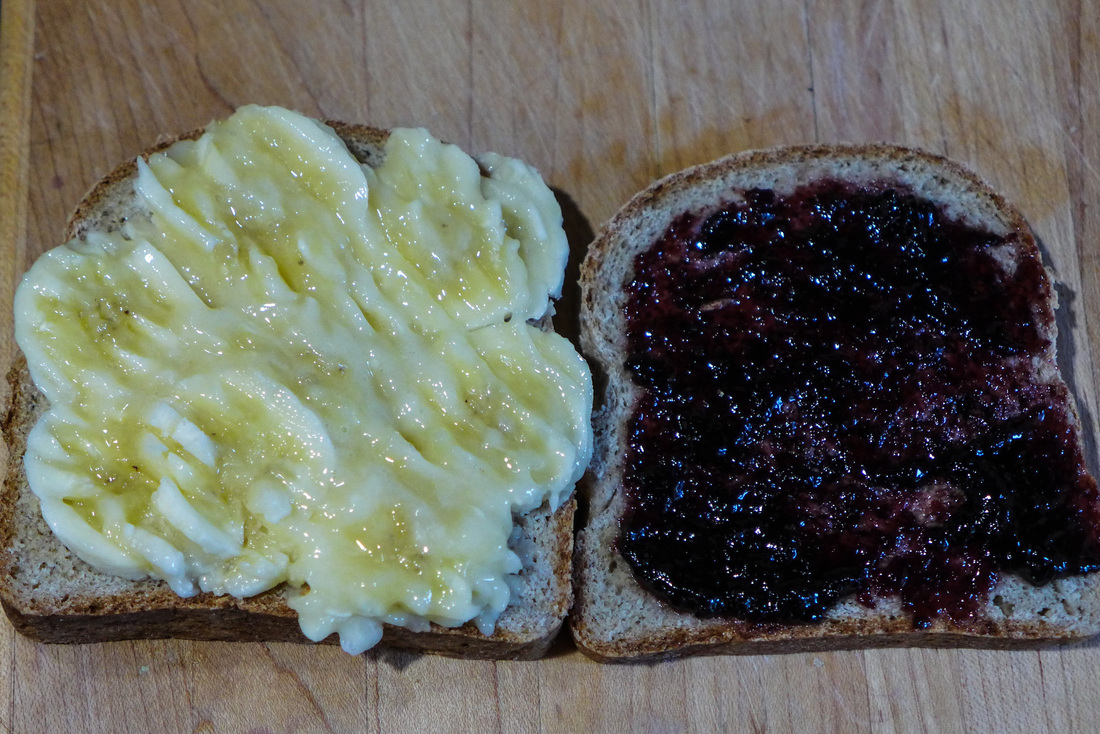 Stuffed french toast may sound fancy, but it really isn't if you have some basic things on hand. This is MoFo Day 2: Quick, Easy & Delicious!!! I wouldn't dupe you, I promise. You may recall ::erhem:: from what I posted yesterday that I recently baked some gluten-free bread. I posted the recipe here! But, for those of you who either do not require homemade gluten-free bread or would rather not be bothered (usually me), store-bought vegan bread will do! I always splurge on bread because I don't buy it very often. I like to get a mostly whole grain loaf that was made from scratch somewhere. For making french toast the way I like it, I like to have a dense and firm slice of bread to work with. There's nothing that I dislike more than a soggy slice of french toast. =( If you have a loaf of bread, I recommend leaving it out overnight or leaving a couple slices out overnight. The slices will hold up better to frying if they are a tad stale. I got this idea from a recipe made by the amazing food blogger Richa of Vegan Richa. I absolutely love her blog. She seems to never run out of ideas for new recipes. Her dishes are usually very accessible but infused with different flavors than what you would expect. She made this samosa stuffed french toast that I had to try one day and "my goodness gracious" is all I have to say. It was outrageous. I love to make savory breakfasts and brunches when I don't feel like eating anything sweet. However, I felt that today I wanted a touch of sweetness and I looked around my kitchen to find some friends to help me on my quest. All you need for this recipe is a small banana, 2 slices of bread, jam/jelly/compote/another fruit of choice, and a simple chickpea batter. You can always make a different batter if you don't have chickpea flour on hand, but I really love how smooth and crispy it turns the outside of the french toast. It also has a lovely flavor. Also, you can make this french toast when you are absolutely starving because it only takes about 10-15 minutes to prepare. Not too shabby. ;) Fry away, friends! 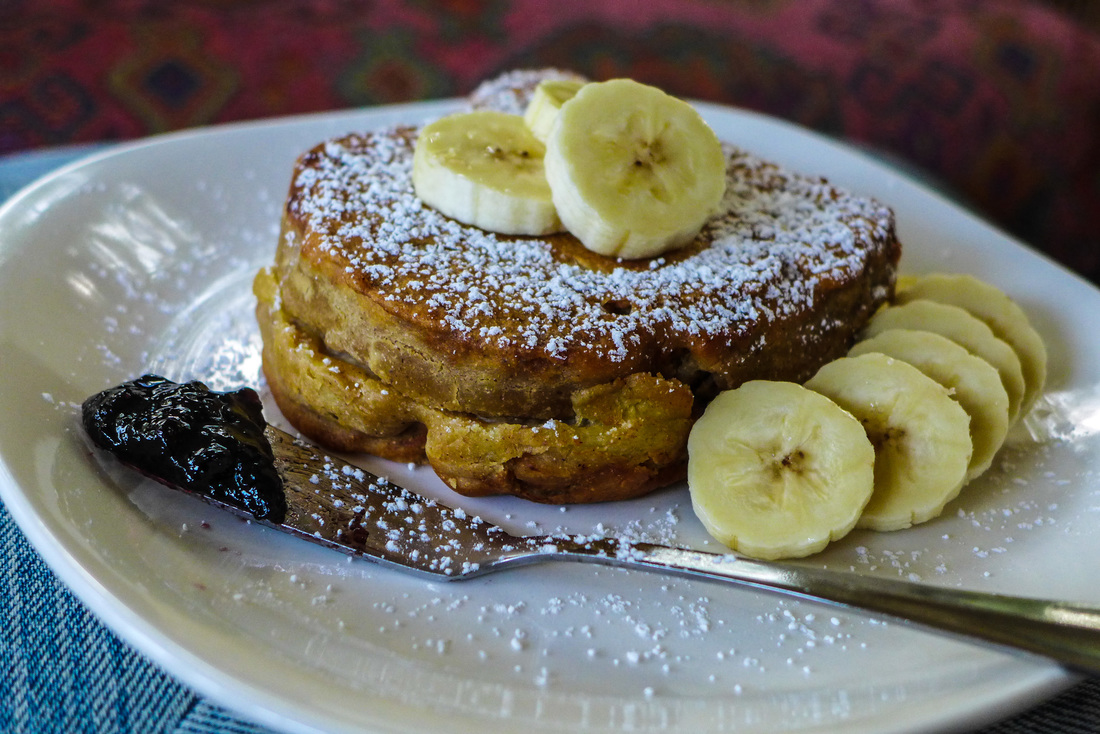 Diner worthy, I'd say. Banana Stuffed French Toast For OneYield: 1 serving (1 double french toast) Inspiration: Vegan Richa's Samosa Stuffed French Toast Ingredients
Cooking Instructions
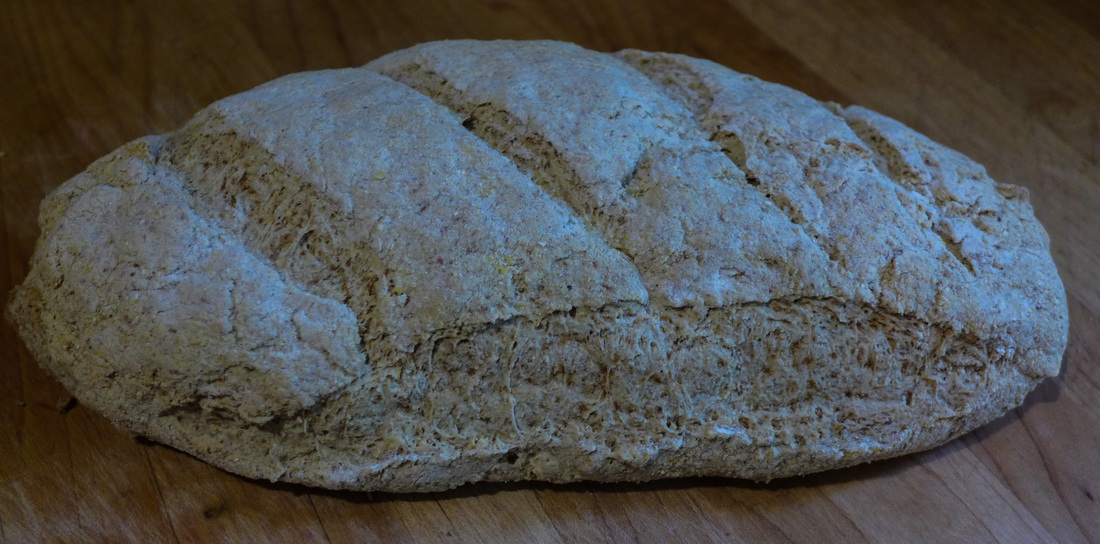
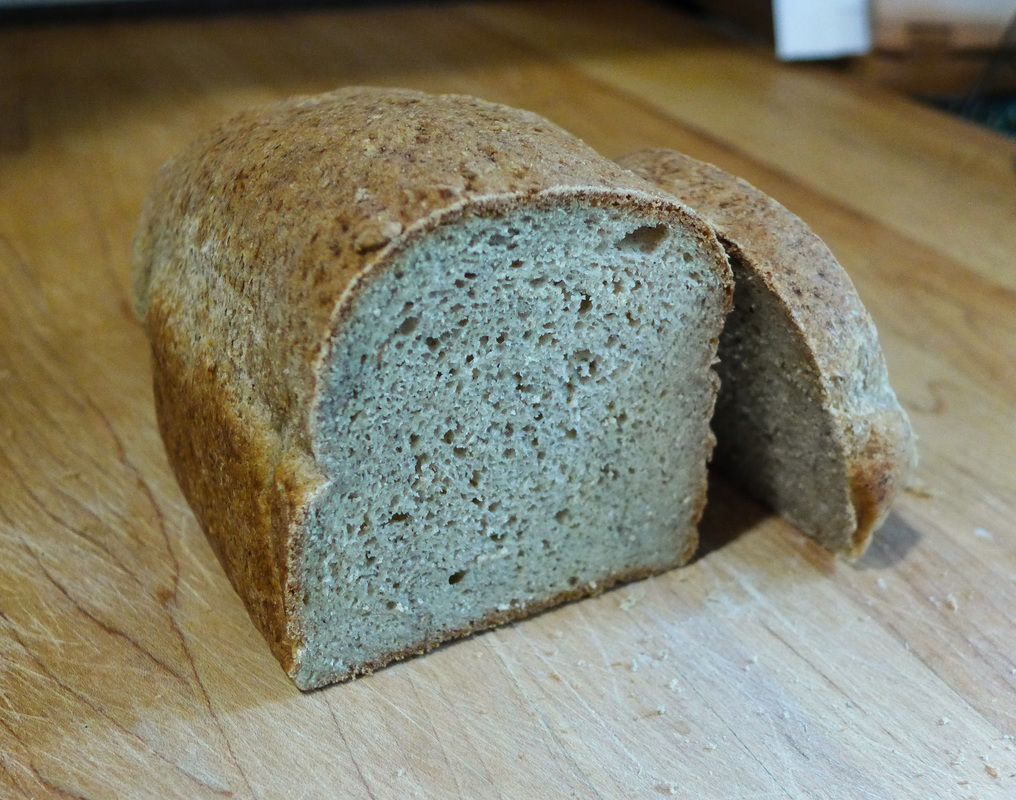
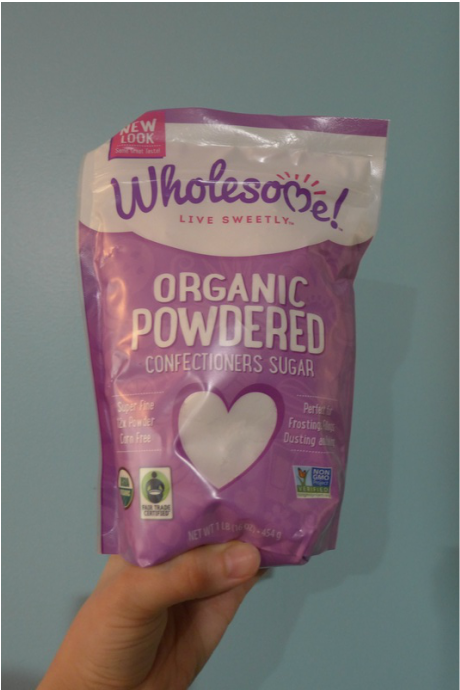
* I recommend either making your own powdered sugar in a blender or buying a good quality brand like Wholesome Sweeteners. They make awesome products that you can feel good about buying. I don't use powdered sugar often, but when I do I like to make sure it's vegan and non-GMO. Go ahead and dig in. It's all yours! 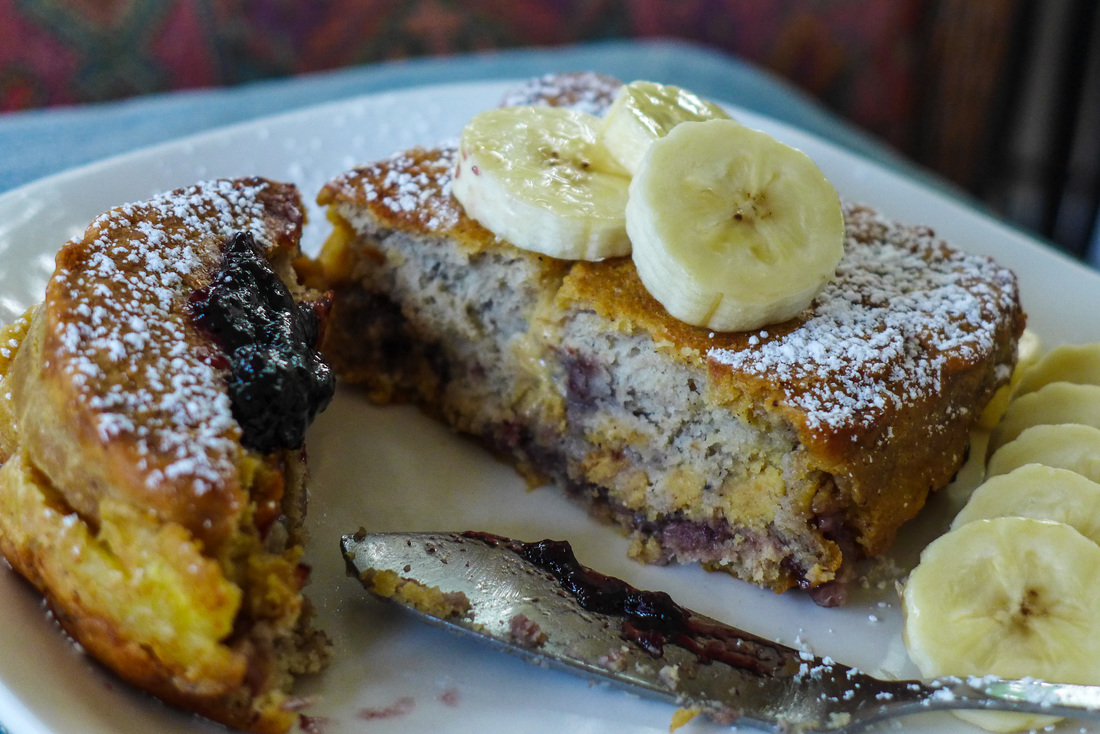 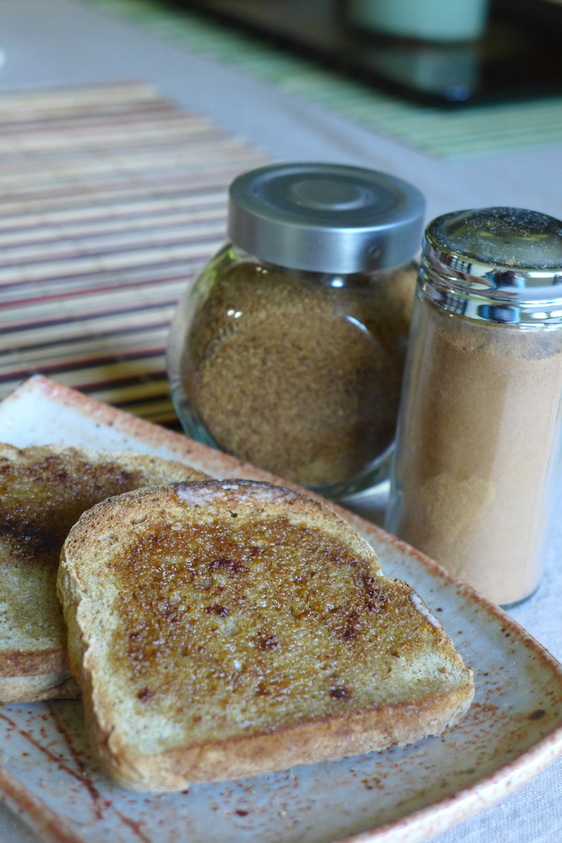 MoFo Day 2: recreate a meal from childhood So, this prompt was pretty easy for me to figure out. I was a very picky eater as a kid, which I'm sure many people can sympathize with. I was very wary of new flavors and new foods. I had a huge sweet tooth. I also loved carbs. The two things that haven't changed about my tastes from childhood are my love for carbs and my distaste/indifference towards meat. I was never a big meat-eater. I merely ate meat because it was served to me. It was the only real option for a sit-down meal. I always preferred carb-heavy options, however. I loved baked goods, rice, pasta, crackers, pretzels, etc. I also loved cinnamon on everything. Okay, so that hasn't changed either... Put cinnamon on it, and I'll probably approve. The one thing that my grandma would make for my dad, his siblings, and my sister and I for breakfast was something she called "Ichiban Cinnamon Toast". My grandma is from Japan, and she never really ate bread growing up. Bread in Japan is very rich, buttery, and flaky like a pastry. Japanese bread, like most of their baked goods, has an abundance of egg and dairy in it to give it a very airy texture with a rich, buttery flavor that is pretty much to-die-for. My grandma would take a slice of white bread, toast it lightly, and spread some butter on top while it was still warm. Then, she would lightly sprinkle some cinnamon and sugar over the toast. This is a very common thing to do, I'm sure...but, when she made it, it was so much better than anything I'd ever had! The bread was crispy, light, savory and lightly sweet with a hint of warmth from the cinnamon. It's the most amazing breakfast I've ever had. I make it to this day when I'm feeling under the weather or down in the dumps. It's wonderful with hot tea or coffee. Ever since I pretty much stopped buying bread on a regular basis due to my growing bread snobbery, I haven't eaten cinnamon toast often at all. I reserve the pleasures of cinnamon toast for times when I have an excellent bread to toast. I decided, since I made my very first successful gluten-free and vegan bread last year, that I would make a loaf of bread and make an excellent slice of cinnamon toast from it. So, I've revisited the bread recipe that I used from Cara Reed's blog Fork & Beans and I've altered it to be more buttery and airy than my last loaf. I used the same ratios from Cara's recipe, but changed some ingredients around a bit. I snuck in some aquafaba, non-dairy butter, and Ener-G egg replacement powder among other things to yield a gluten-free bread that rises like a champ and is tough enough to knead like regular gluten-filled dough. Thanks to Cara, this bread recipe is gum-free for anyone who doesn't like to use xanthan or guar gums. I usually don't mind using these products, but it's nice for those who don't feel like buying them for just one recipe or who cannot eat them for dietary or health reasons. Here is my bread recipe and below that are instructions for my favorite cinnamon toast! Have fun! B) 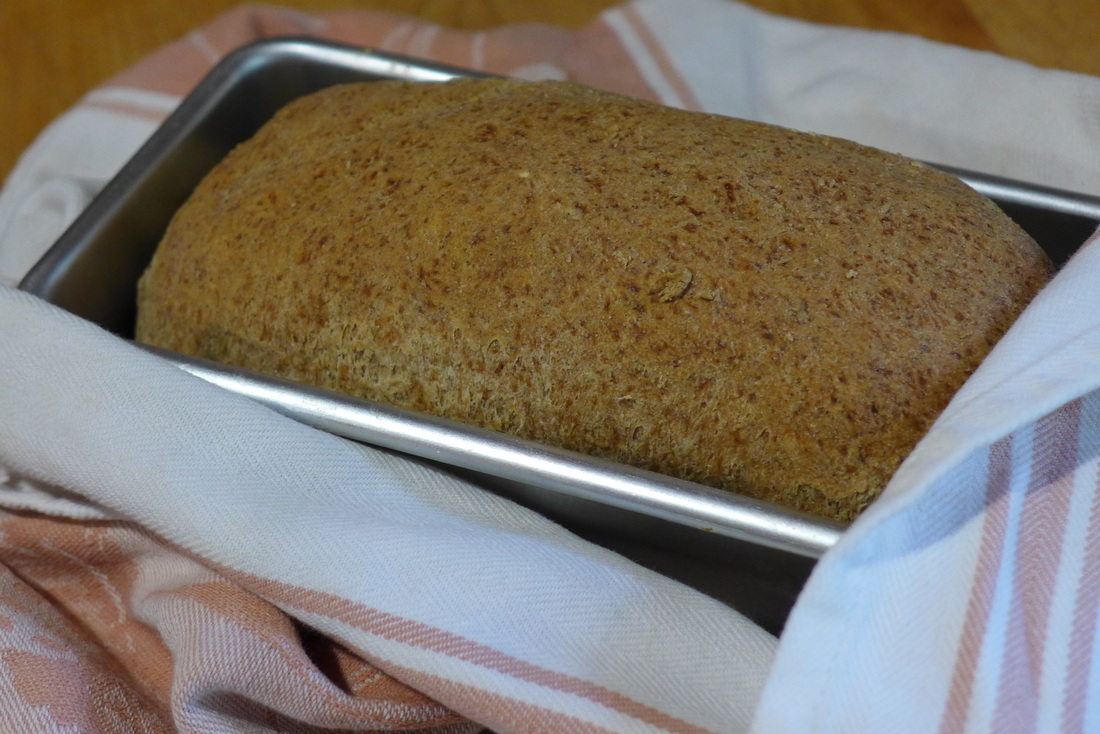 Gluten-Free Vegan BreadYield: 1- 8x4 loaf Gluten & Gum-free/Can be: Soy & Nut-free Source/Adapted from: Fork & Beans Ingredients Wet
Dry
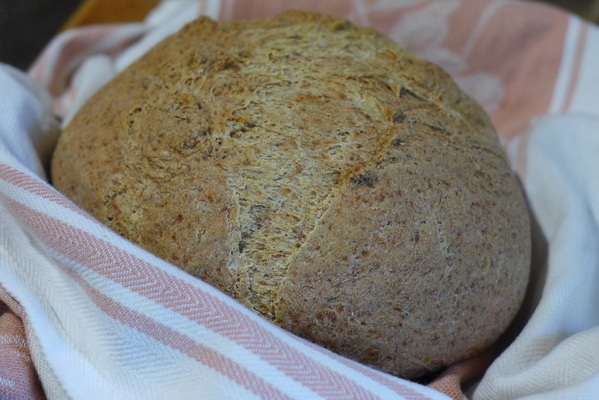 I split my recipe into a small loaf and a small boule. They both were wonderfully formed and flavored! I'd love to make a larger boule next time. Instructions
 Cinnamon Toast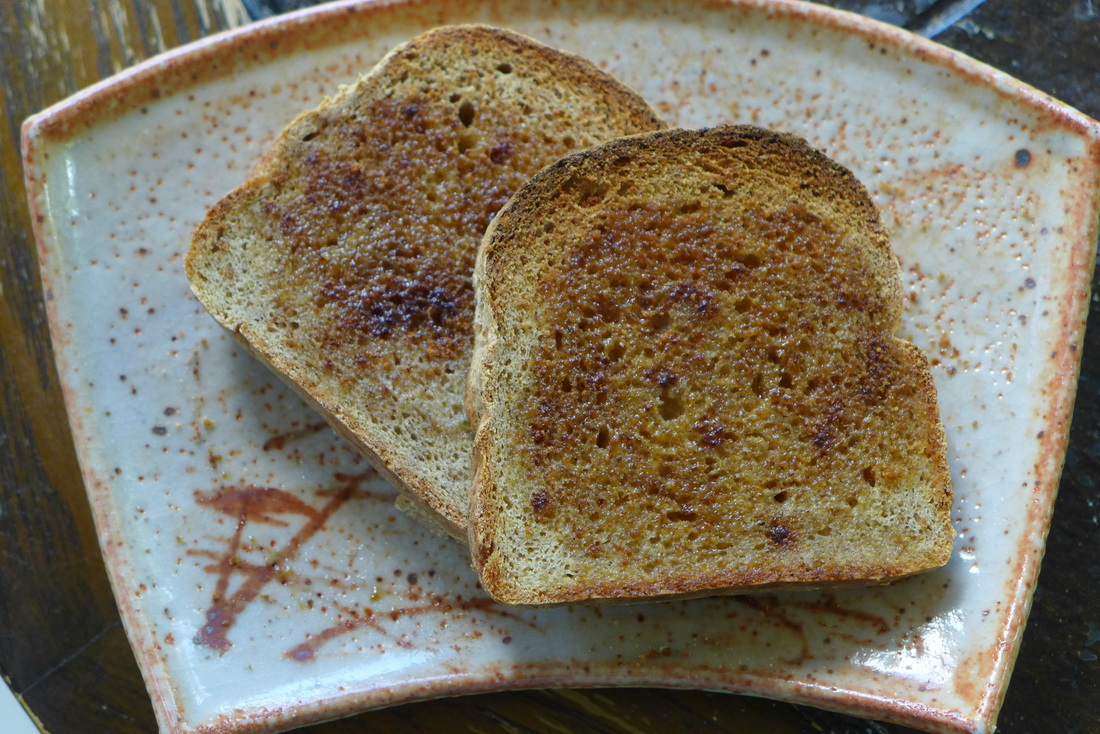 All you need for this (it isn't really a recipe) is some non-dairy buttery spread (like Earth Balance or Melt) or coconut oil + sea salt for a less processed option. If you use coconut oil and salt, I'll suggest on adding a sprinkle of nutritional yeast on your toast as well. I find this combination together gives a slight buttery taste. It's pretty delicious! After you spread as much of your "butter" of choice as you would like on your sliced, toasted homemade bread (OMG I'm hungry!), sprinkle on some dry sweetener of choice. I used coconut sugar because I'm obsessed with it and I love its flavor. You can always substitute sugar with stevia or any other natural vegan sweetener you like. Then, the kicker: add a dash of organic cinnamon on top. I always try to buy organic spices and dried herbs so I can control the quality of my dishes. I also like to get the best quality that I can for ingredients that will last me a long time. Enjoy your ichiban cinnamon toast with a piping hot cup of something and relax. You've earned it after all that effort it took to bake bread from scratch. ;) 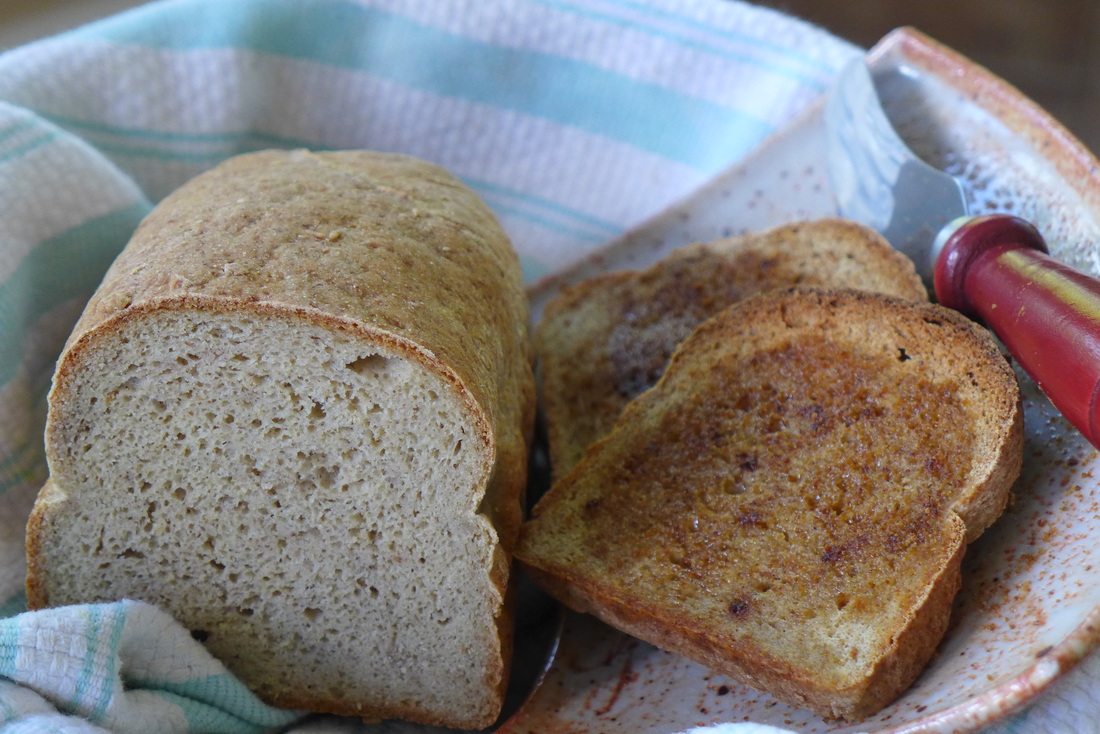 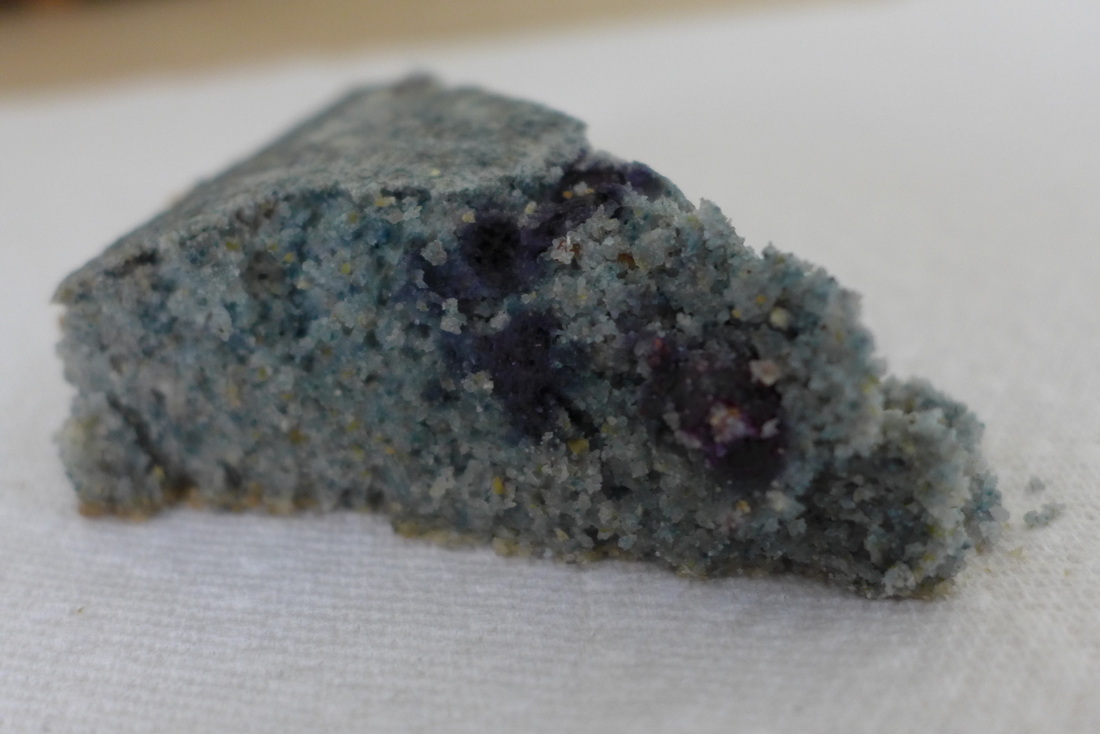 Cornbread is something that I never ate too much of while growing up. We almost never had home made or even home baked Jiffy cornbread! When we got some, it was usually store bought. I can't even imagine what ingredients made up that stuff. It's a shame; homemade cornbread is so easy to make! Once I began to bake, I decided that cornbread was going to be something that I wanted to master. I love to put things in it, like berries, seeds, jam, vegan cheese...you name it! I have yet to try a spicy cornbread recipe, but that is next on my list... A few weeks ago, I was fortunate enough to come across blue cornmeal! I had read about this rarity in Vegetarian Times a couple years ago and was instantly intrigued. I haven't been able to find it since. Luckily, Arrowhead Mills sells an organic variety of blue cornmeal that I happened upon. I knew this was a sign. I had to make blue cornbread. But, not just any blue cornbread...DOUBLE blue cornbread! I took inspiration from double chocolate muffins. If it can be done with chocolate chips any cocoa powder, why not with blue corn and blueberries? I love blueberries in cornbread. I first tried this combination a few summers back at my local Whole Foods. The bakery there makes vegan blueberry cornbread from scratch and it's mighty delicious. I've always liked the taste of cornbread because it's savory and sweet at the same time. The best thing you can do for homemade cornbread is mix in something slightly sweet into the batter to give it some depth of flavor, like fresh sweet corn off the cob...that's a dream right there! I hope this recipe inspires you to fantasize about cornbread as much as I do! 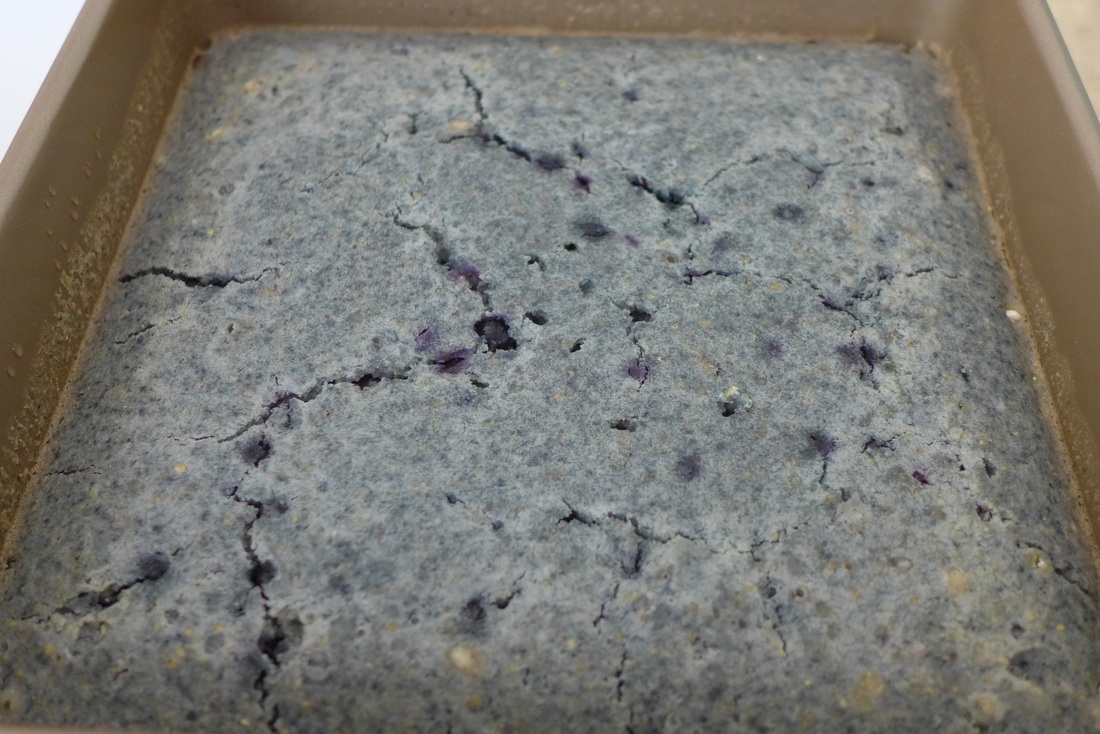 So cool looking! 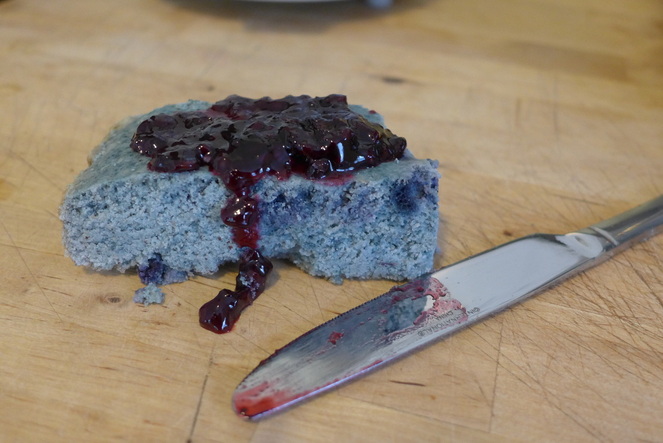 Serving suggestion: Smother in jam! I used blackberry and spiced rum jam from Gingiffer's Kitchen (I picked some up in Oregon...best jam ever!) Serving suggestion: Smother in jam! I used blackberry and spiced rum jam from Gingiffer's Kitchen (I picked some up in Oregon...best jam ever!) Double Blueberry Cornbread
Yield: 1 8x8 square pan/1 loaf/1 muffin tin's worth Ingredients
Instructions Oven 350 F.
|
I'm Jess!This is my very first food blog! I post revised conventional recipes of foods that I hold near and dear to my heart. My cooking here is all gluten-free and cruelty-free, but full of flavor and comfort.  


 Archives
December 2017
Categories
All
|
 RSS Feed
